Hardware Config — per-chassis identity & drill-down redesign
The Hardware Config screen gets the same drill-down treatment as Pretrain Configuration in v1.2.5 — one dedicated screen per chassis, a hero rig visualization, Tier-1 component selector, Tier-2 variant chips, and clear per-tier item lists. Plus an A4000 rental revision in flight alongside.
The Hardware Config screen — the one you open every time you want to tweak GPU, RAM, storage, or cooling — was the next “wall of dials” candidate after Pretrain Configuration got the drill-down treatment in v1.2.5. Same diagnosis: every chassis tier expanded simultaneously, every component section stacked underneath, hundreds of pixels of scroll between two adjacent decisions. This redesign breaks it into four per-chassis screens, each showing only the relevant context — and each chassis now has its own visual identity instead of being just a label.
📜 The old screen — wall of dials
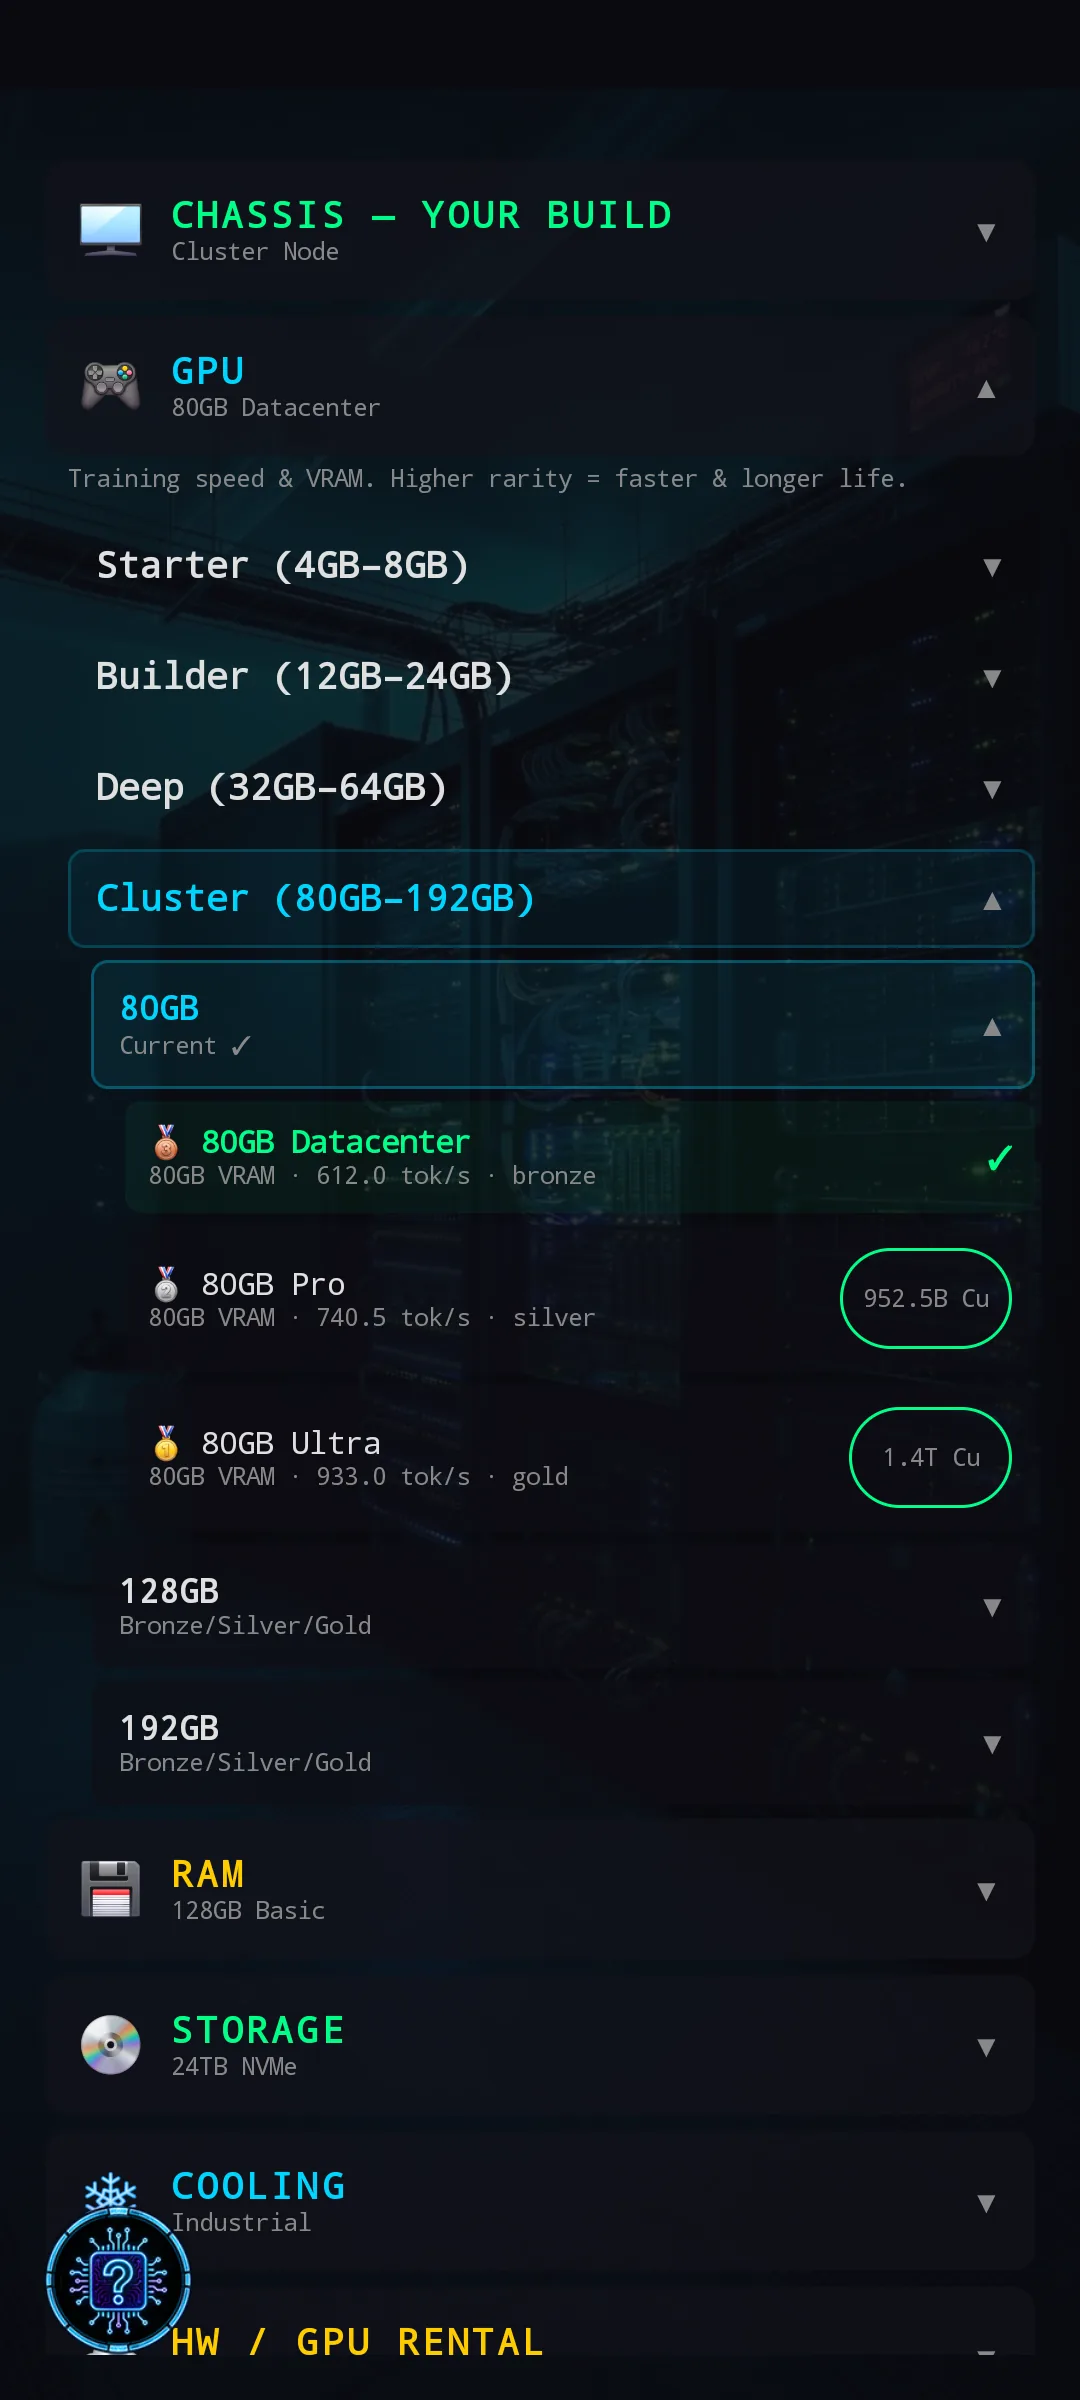
The old Hardware Config had all four chassis tiers (Starter / Builder / Deep / Cluster) expanded vertically at the same time. Tap Cluster to look at its GPU options, scroll past Cluster’s full RAM / Storage / Cooling sections to compare with Builder’s, scroll back up two screens later when you change your mind. On a small phone, you spent more time scrolling than configuring.
The structural problem was the same as the old Pretrain Configuration: a single screen trying to be a reference for every tier and a config for one tier simultaneously. Doing both at once does neither well.
🎯 The fix — one screen per chassis
The new Hardware Config is fundamentally different: one screen per chassis. The Hub takes you straight to the chassis context you actually care about, and that screen shows only that chassis’s component config. Switching chassis becomes a navigation action, not a vertical scroll through everything you don’t currently own.
Every chassis screen now follows the same five-region layout:
- Hero visualization — a rendering of the actual rig at the top of the screen, with the four component icons (GPU / RAM / Storage / Cooling) overlaid at their physical positions on the hardware.
- Tier-1 selector — four icons under the hero (GPU / RAM / Storage / Cooling). Selected one lights up cyan. Tap any icon — on the selector row or directly on the hero — to focus that component.
- Item list for the selected component, with quality tiers (bronze / silver / gold) and prices side by side. The currently installed item is marked with a cyan ✓ ACTIVE label.
- Tier-2 chip row at the bottom — sub-variants of the selected component (VRAM size for GPU, capacity for storage, type for cooling).
- BACK button to return to the Hub.
It’s the same drill-down pattern that landed for Configure Training in v1.2.5, now applied here so the rig-build flow uses one consistent navigation grammar instead of two.
Starter Rig — laptop
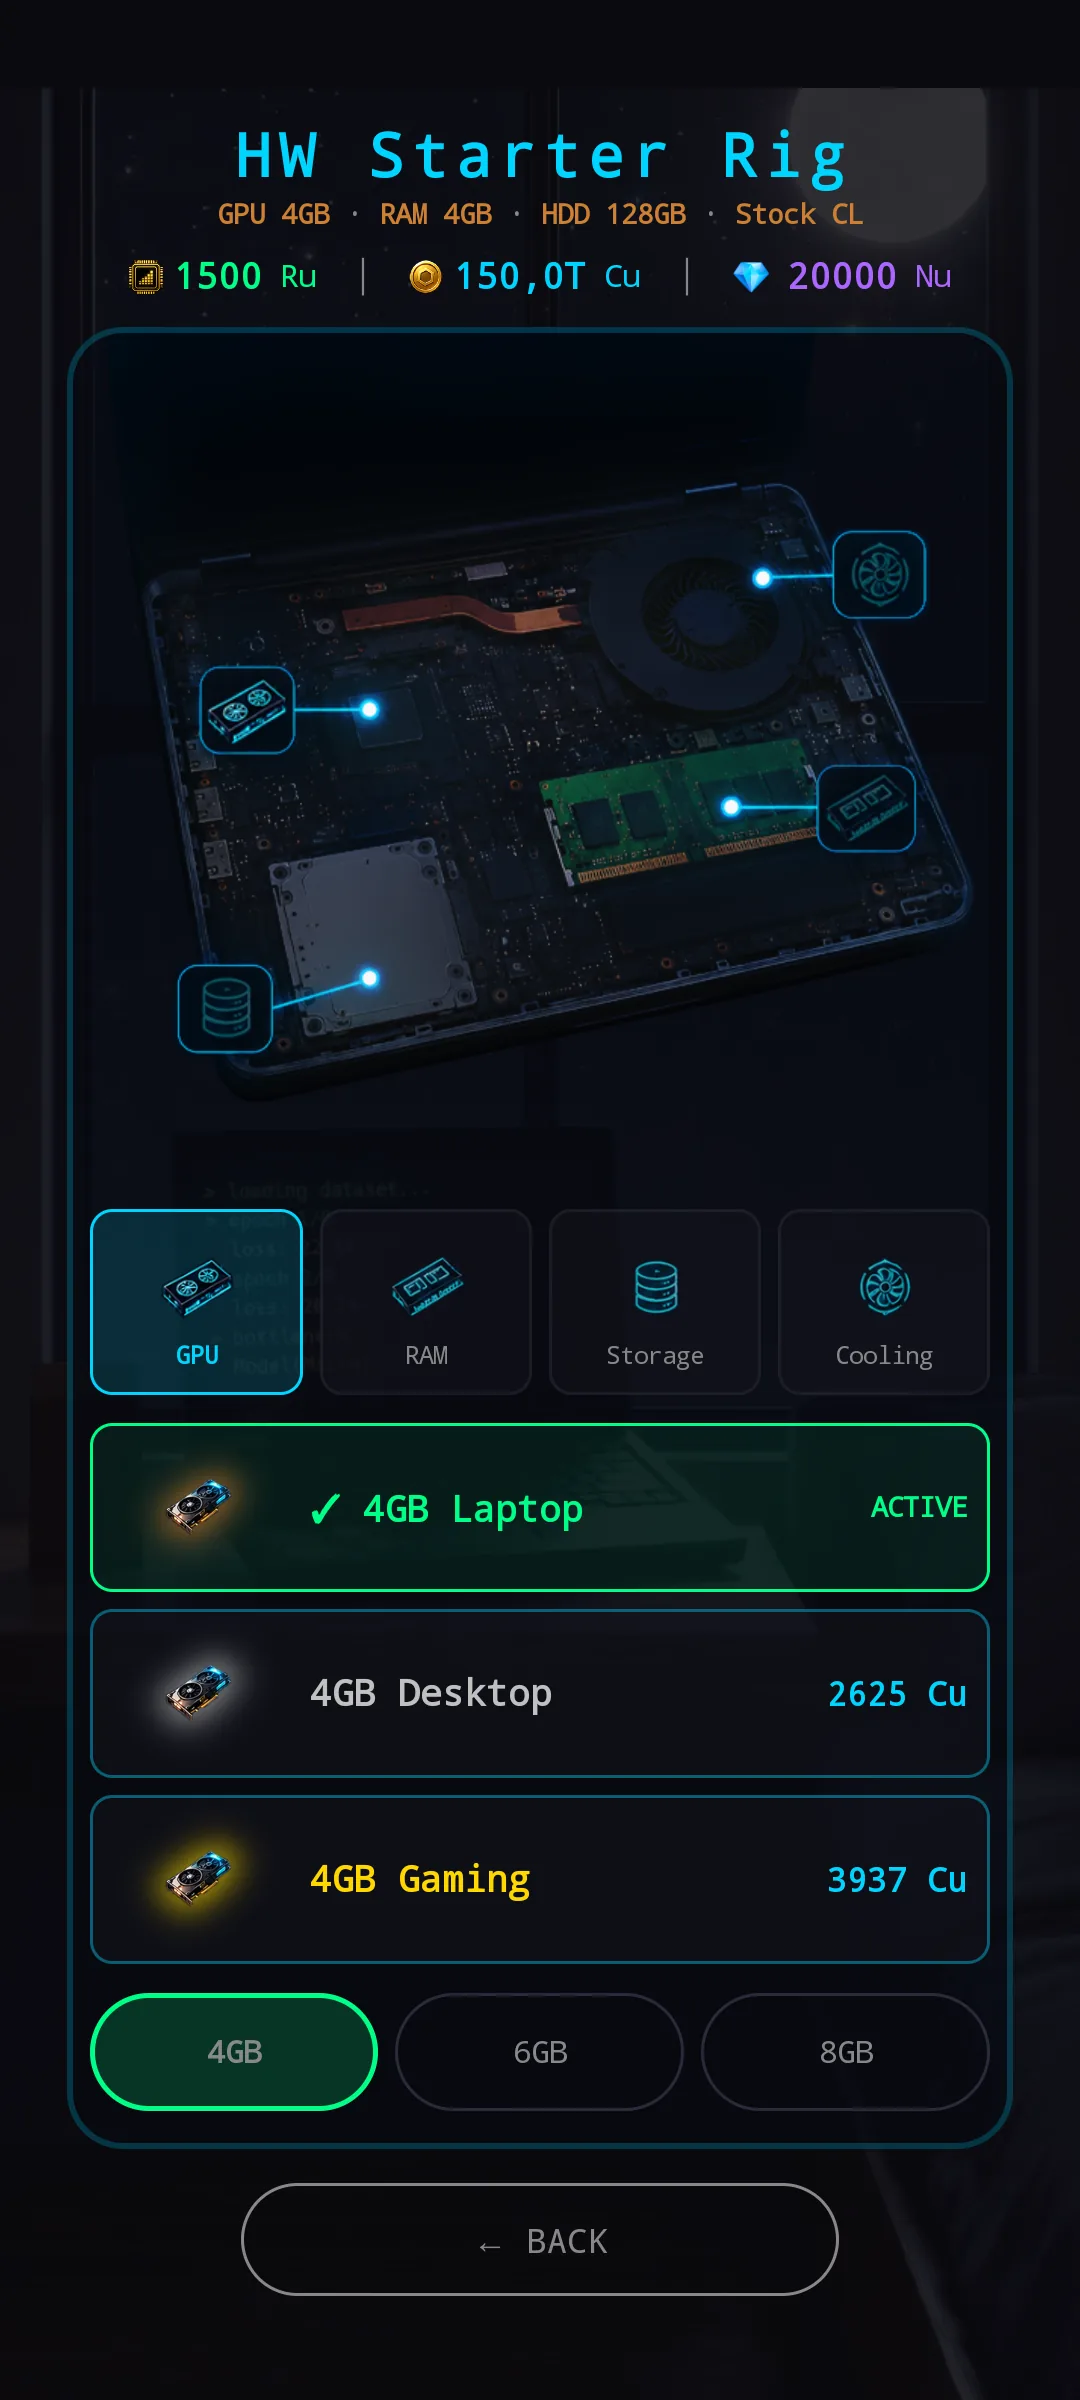
Your opening chassis. A modest laptop with VRAM sizes from 4 GB up to 12 GB and matching component tiers. This is the rig most players will live on for their first ~30 brain sales or so before saving up for Builder. The laptop visual makes it instantly readable as the entry-tier — no manual cross-reference needed to remember which tier you’re on.
Builder Box — first major upgrade
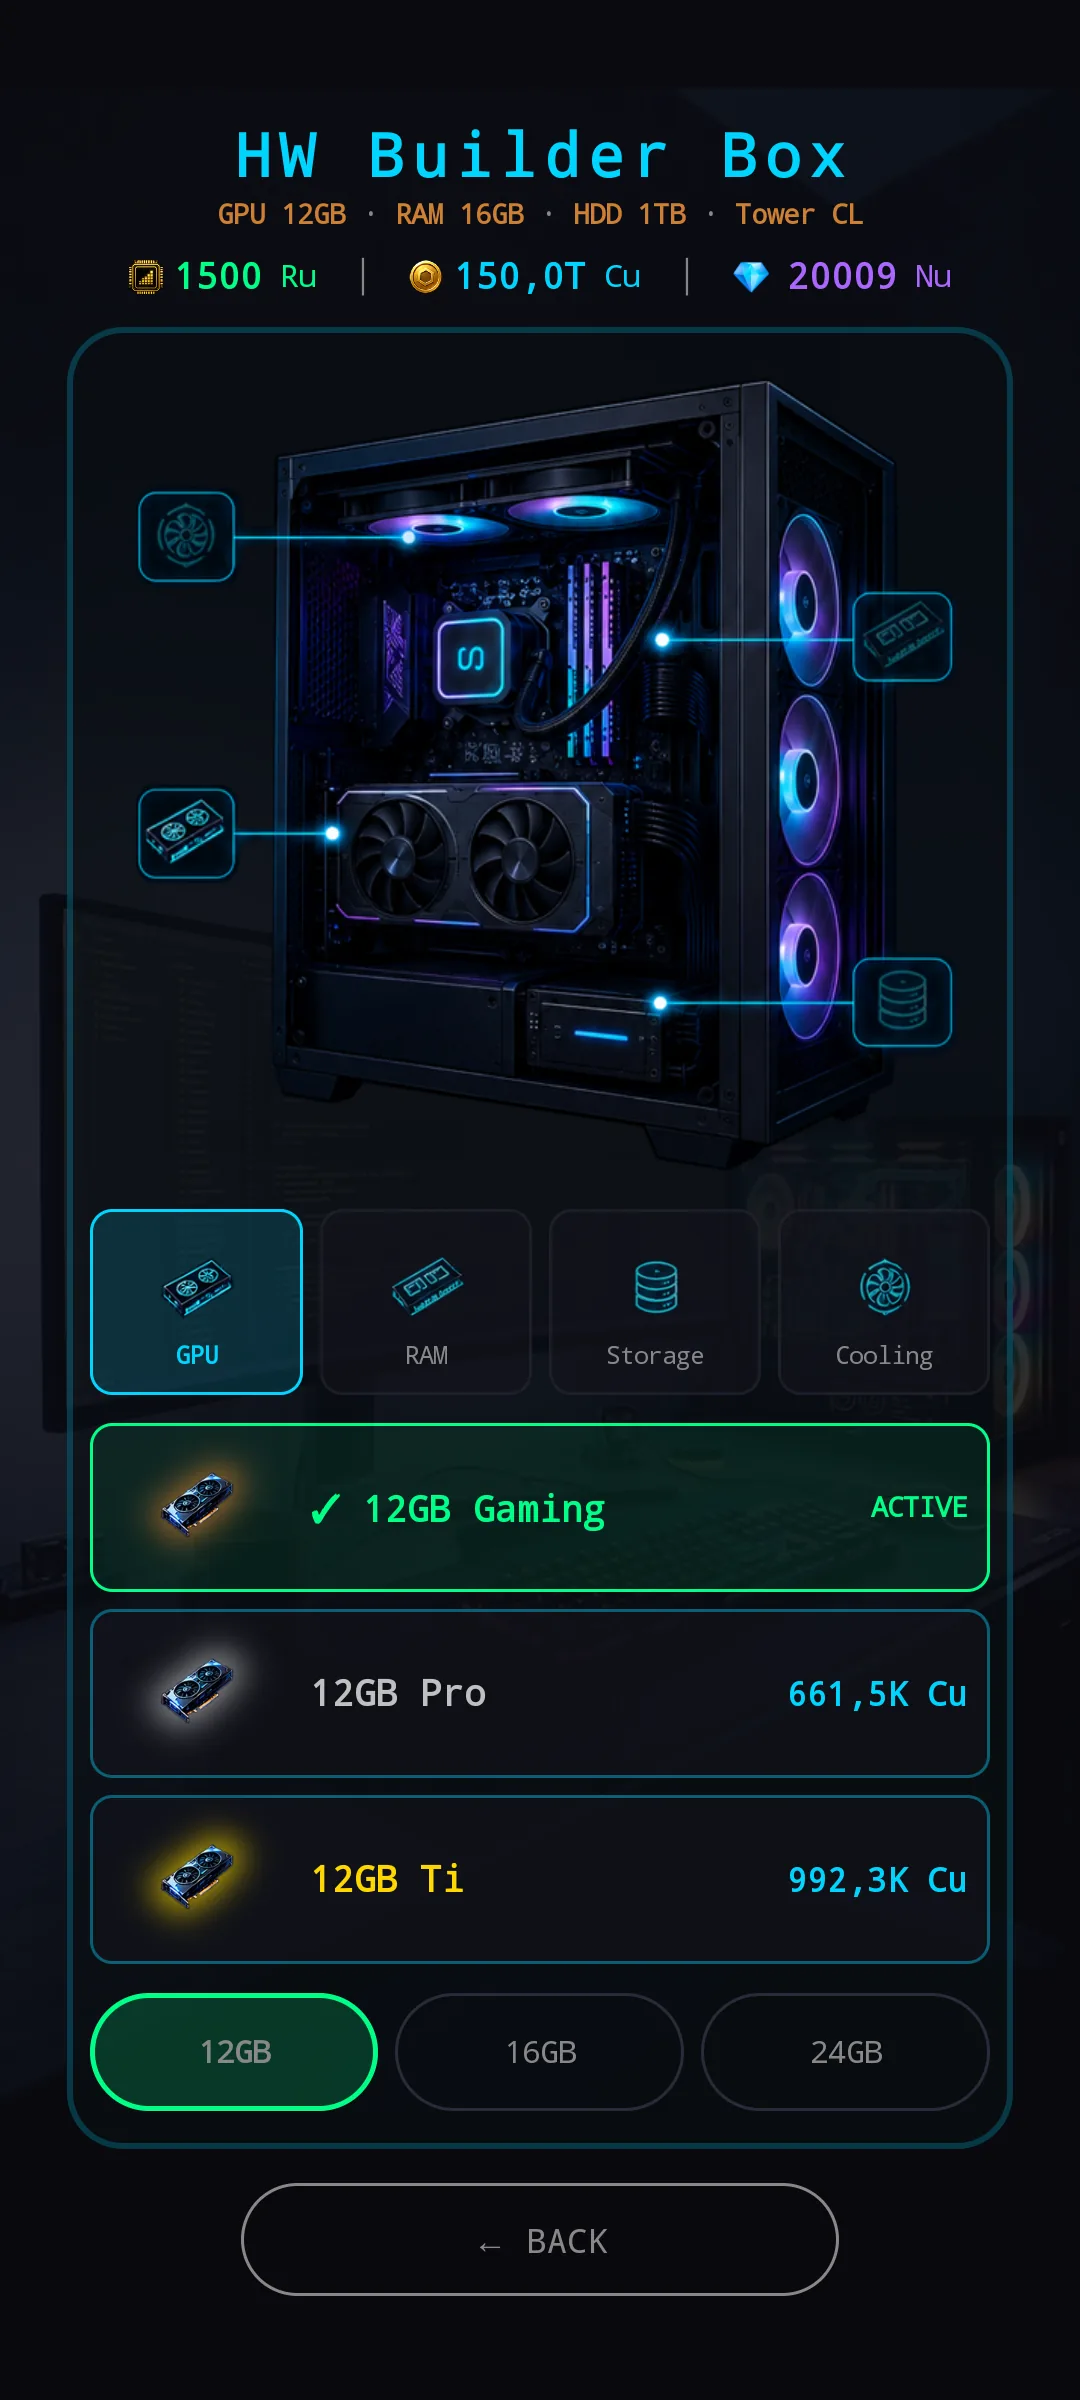
The classic tower-PC step. RGB front fans visible through the side panel, VRAM tiers from 12 GB up to 24 GB. The premium variant Builder Pro uses the same physical chassis — the difference is the one-time Medium model unlock Builder Pro grants on purchase, not raw hardware capability.
Deep Forge — industrial mid- and late-game
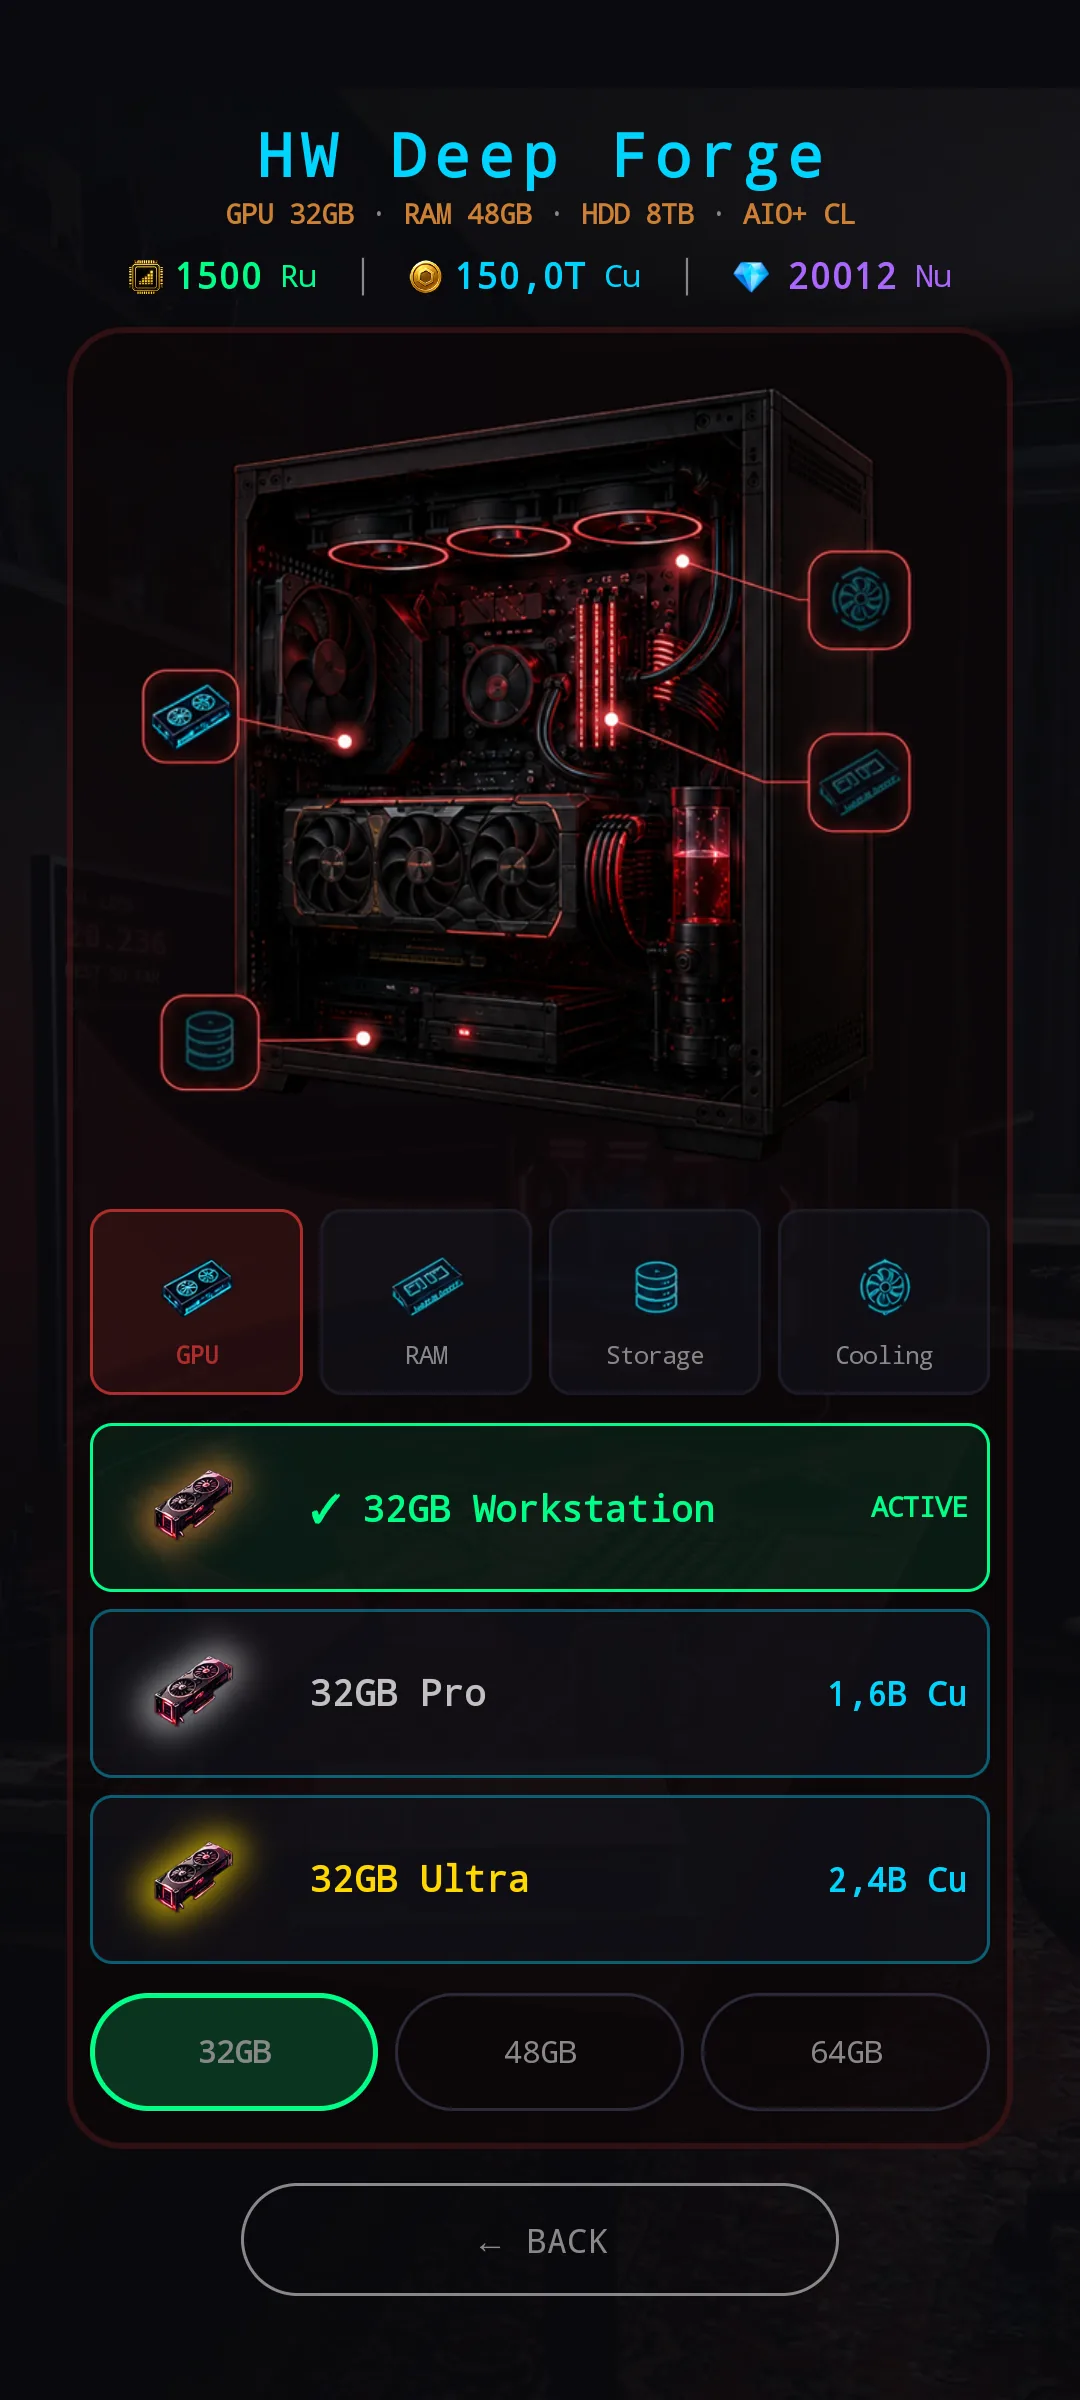
Heavy-industrial visual: red-tinted internals, exposed cooling pipes, the look of a workshop rig rather than a desktop. Storage tiers move into 8 TB and beyond, and per-domain slot counts climb to support the larger models this chassis can run. Deep Pro mirrors Builder Pro — same chassis, with a one-time higher-tier model unlock at purchase.
Cluster Node — endgame
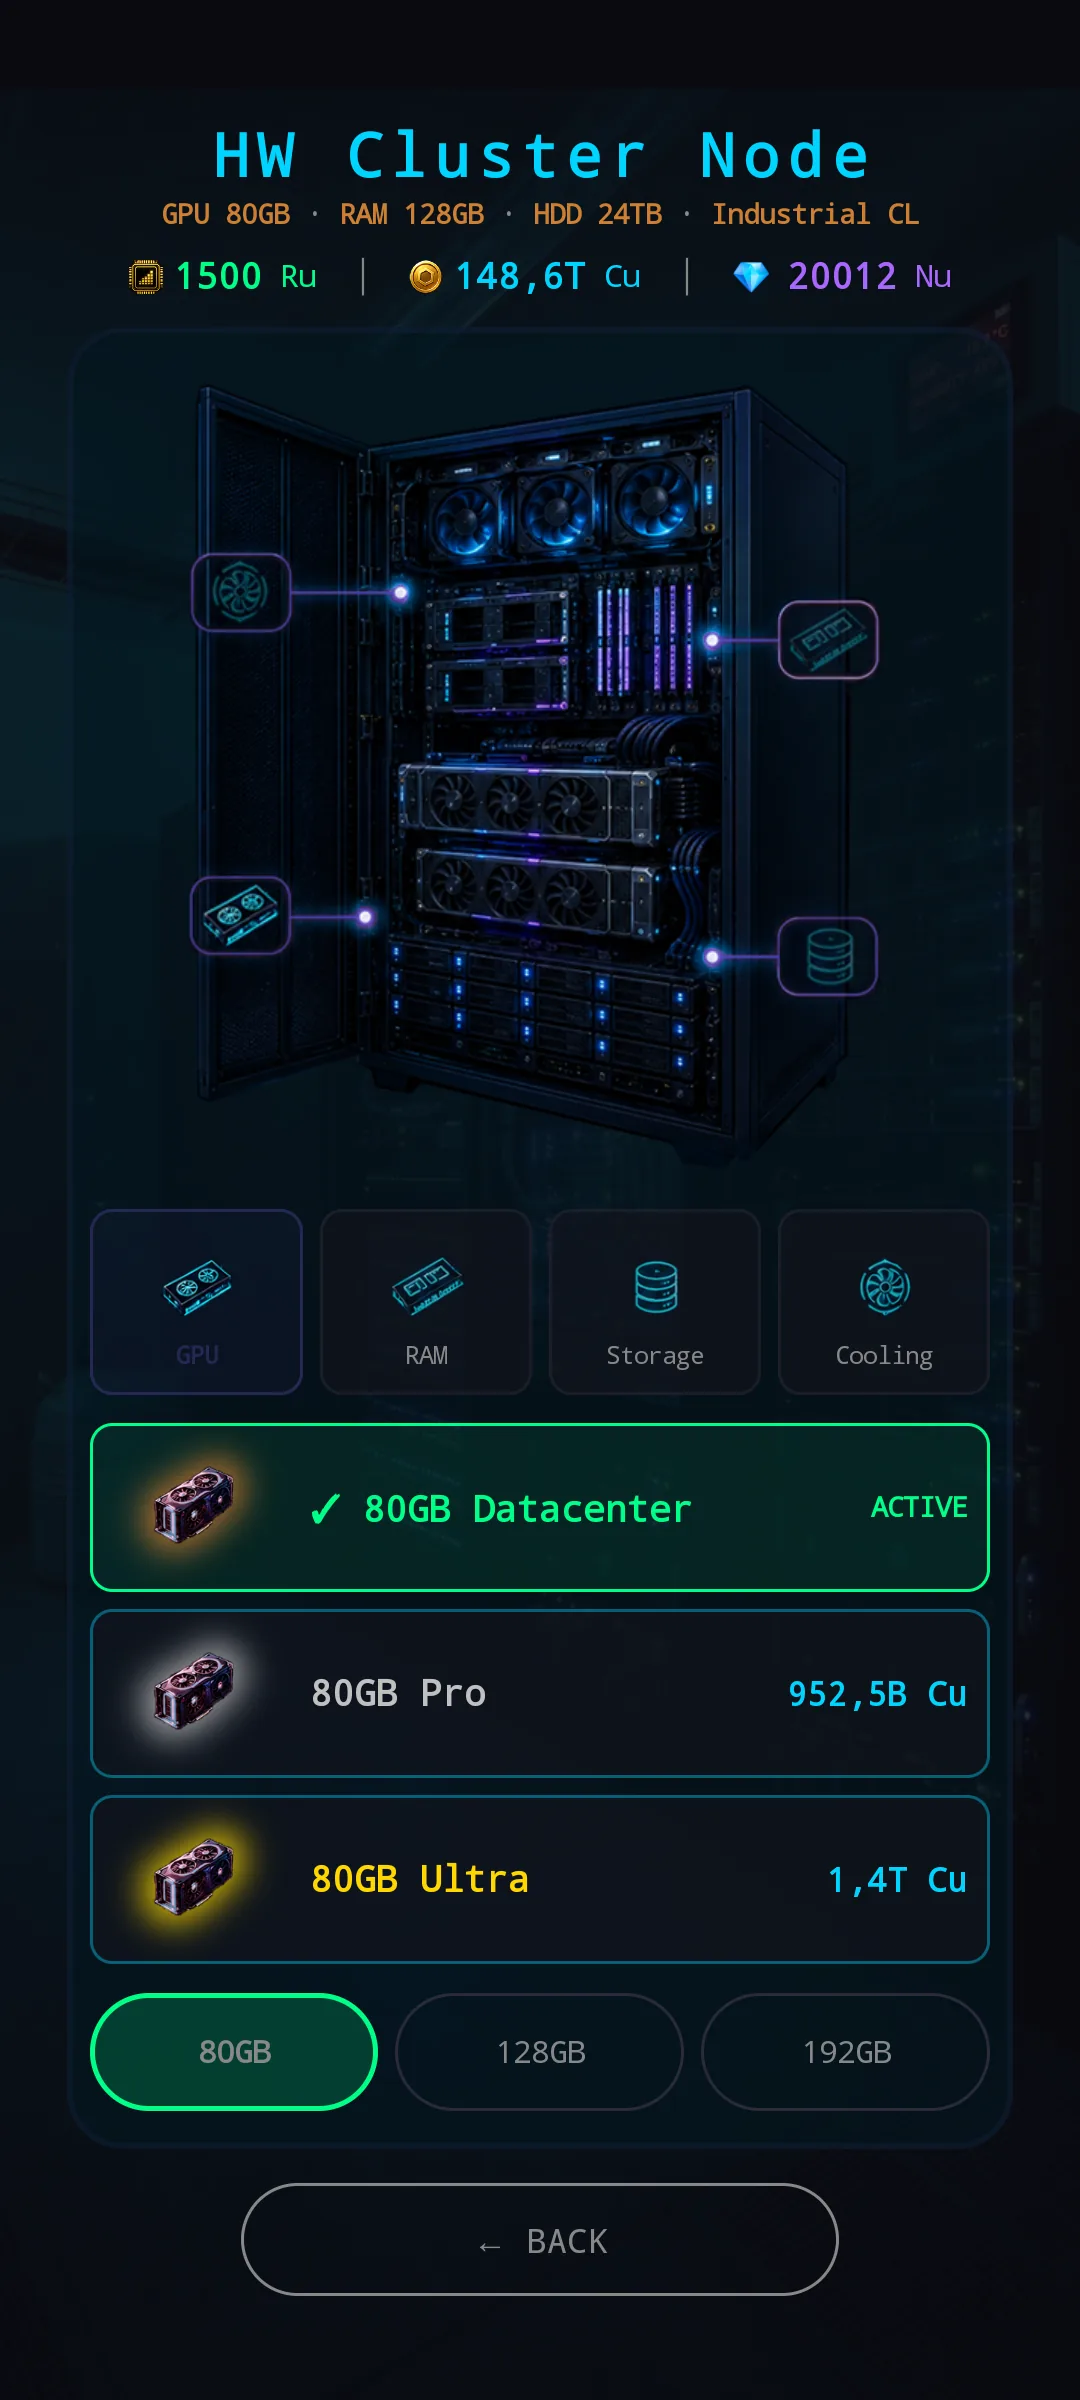
Server-rack chassis. The visuals shift to a stacked rack-mount design with industrial cooling — explicitly leaving the desktop-form-factor language behind. Cluster is the gateway to Project Contracts and the Multi-Agent endgame, so the component slots scale accordingly: cooling tiers move into Datacenter and Cryo territory, storage and RAM tiers follow.
There’s no “Cluster Pro” — Cluster has its own dedicated activation flow (free path via Agent stipend during Fine-Tune, or paid 1.36 T Cu Hardware Shop unlock) instead of a Nu premium shortcut.
📊 The HW summary header bar
Every chassis screen carries a small but load-bearing strip just under the title: a one-line summary of all four installed components at once. For Cluster Node it reads GPU 80GB · RAM 128GB · HDD 24TB · Industrial CL; for Starter Rig it reads GPU 4GB · RAM 4GB · HDD 128GB · Stock CL. Cooling is shortened to a class label (Stock CL / Tower CL / AIO+ CL / Industrial CL) to keep the line readable on a small phone.
The point is to keep the entire current build at a glance even while you’re drilled into one specific component. Tap into the GPU tab to compare three new card options, look up — you can still see what RAM, storage and cooling you actually have without leaving the screen. Removes the “wait, what cooling did I have again?” moment that used to send players back through HUB → HW Config.
🛒 Buy modal — explicit before/after comparison
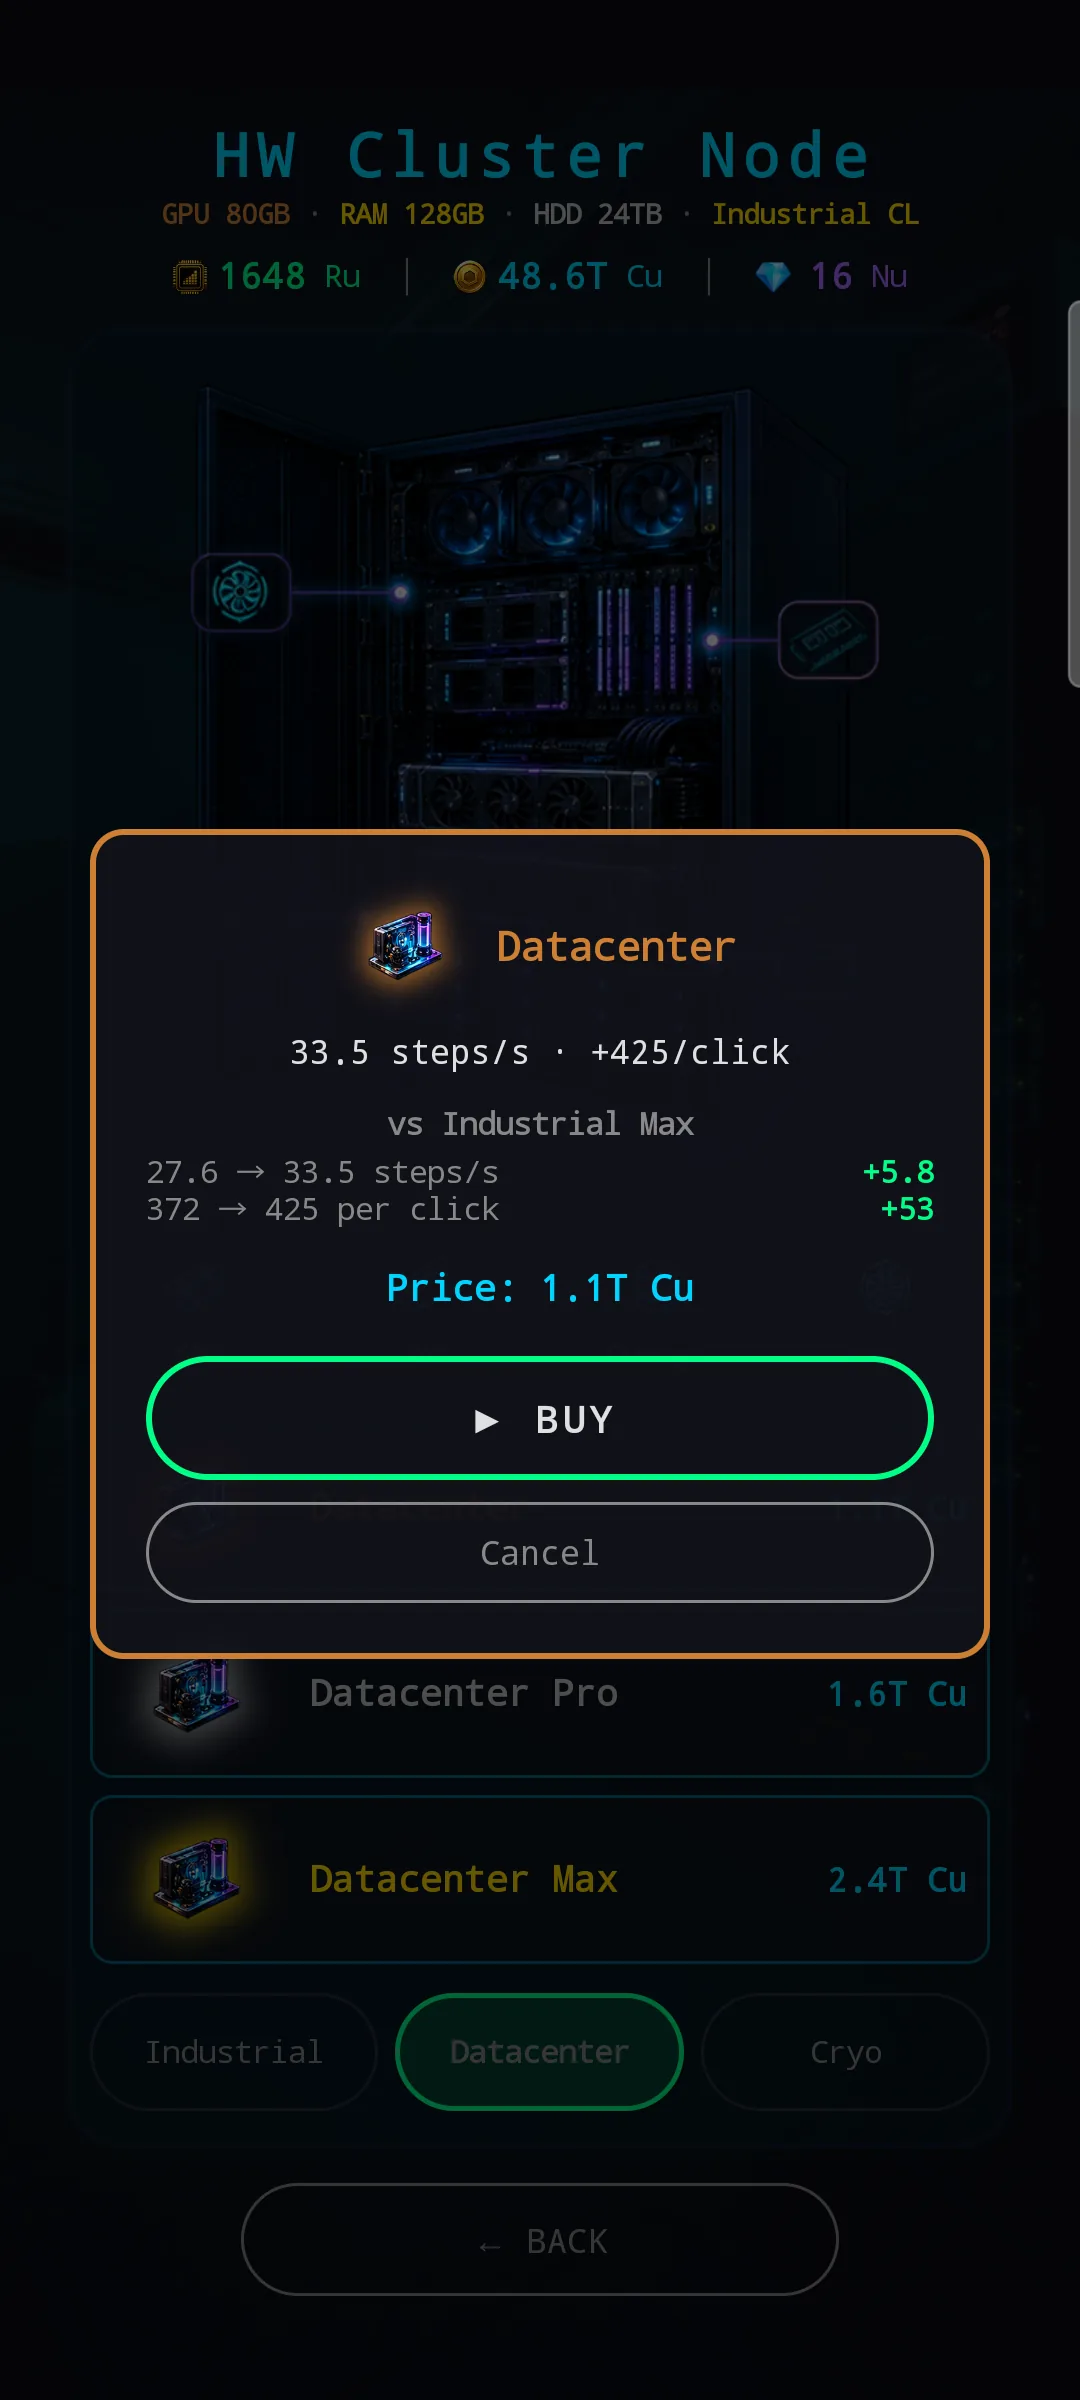
Tap any item card in the list and a buy modal slides up with an explicit vs your current comparison. The modal shows the item’s headline stats at the top, then a delta block against the item you’re currently using by name — vs Industrial Max → 27.6 → 33.5 steps/s **+5.8** · 372 → 425 per click **+53**. Deltas are colour-coded (green for improvement); you get the upgrade in absolute terms and as a step-up, side by side.
Nothing about that comparison was visible in the old wall-of-dials. You had to remember what you were running, do the subtraction in your head, and hope you remembered it right.
Two small touches worth noting:
- The comparison is vs the currently-installed component, named (
vs Industrial Max), not a vague “your current cooling.” If you don’t recognise the name you’ll find it in the header sub-bar above the modal — same screen, no navigation. - No ACTIVE marker appears on the item list when the visible Tier-2 chip variant is different from your installed one. The buy modal stays the source of truth for “what does this actually change for me.”
🧭 Same drill-down grammar as Pretrain Configuration
The Tier-1 component selector (GPU / RAM / Storage / Cooling) plus the Tier-2 variant chips (VRAM size, storage capacity, cooling type) form a two-tier drill-down identical to Configure Training’s redesign: pick the category, then pick the variant within. Active selection is always one tap away; everything else stays out of the scroll.
This consistency is intentional. The rig-build flow now uses one navigation grammar across both Pretrain Configuration and Hardware Config — fewer screens to learn, faster to come back to after a break, fewer “where do I do X” moments.
Same playbook as Pretrain Config: pick the screen that costs the most scrolls, rebuild it on a consistent drill-down pattern, and give each branch of the tree a visual identity that’s hard to confuse for another. Hardware Config was due. 🧠
— NeuroVault Research Systems