Pretrain Configuration
Every brain begins at the TRAIN button — and the very first thing it asks is how: let the game Autotrain to a sweet-spot result on its own, or take the Manual path and drive it yourself. This page covers both, and the five dials you set once you pick Manual.
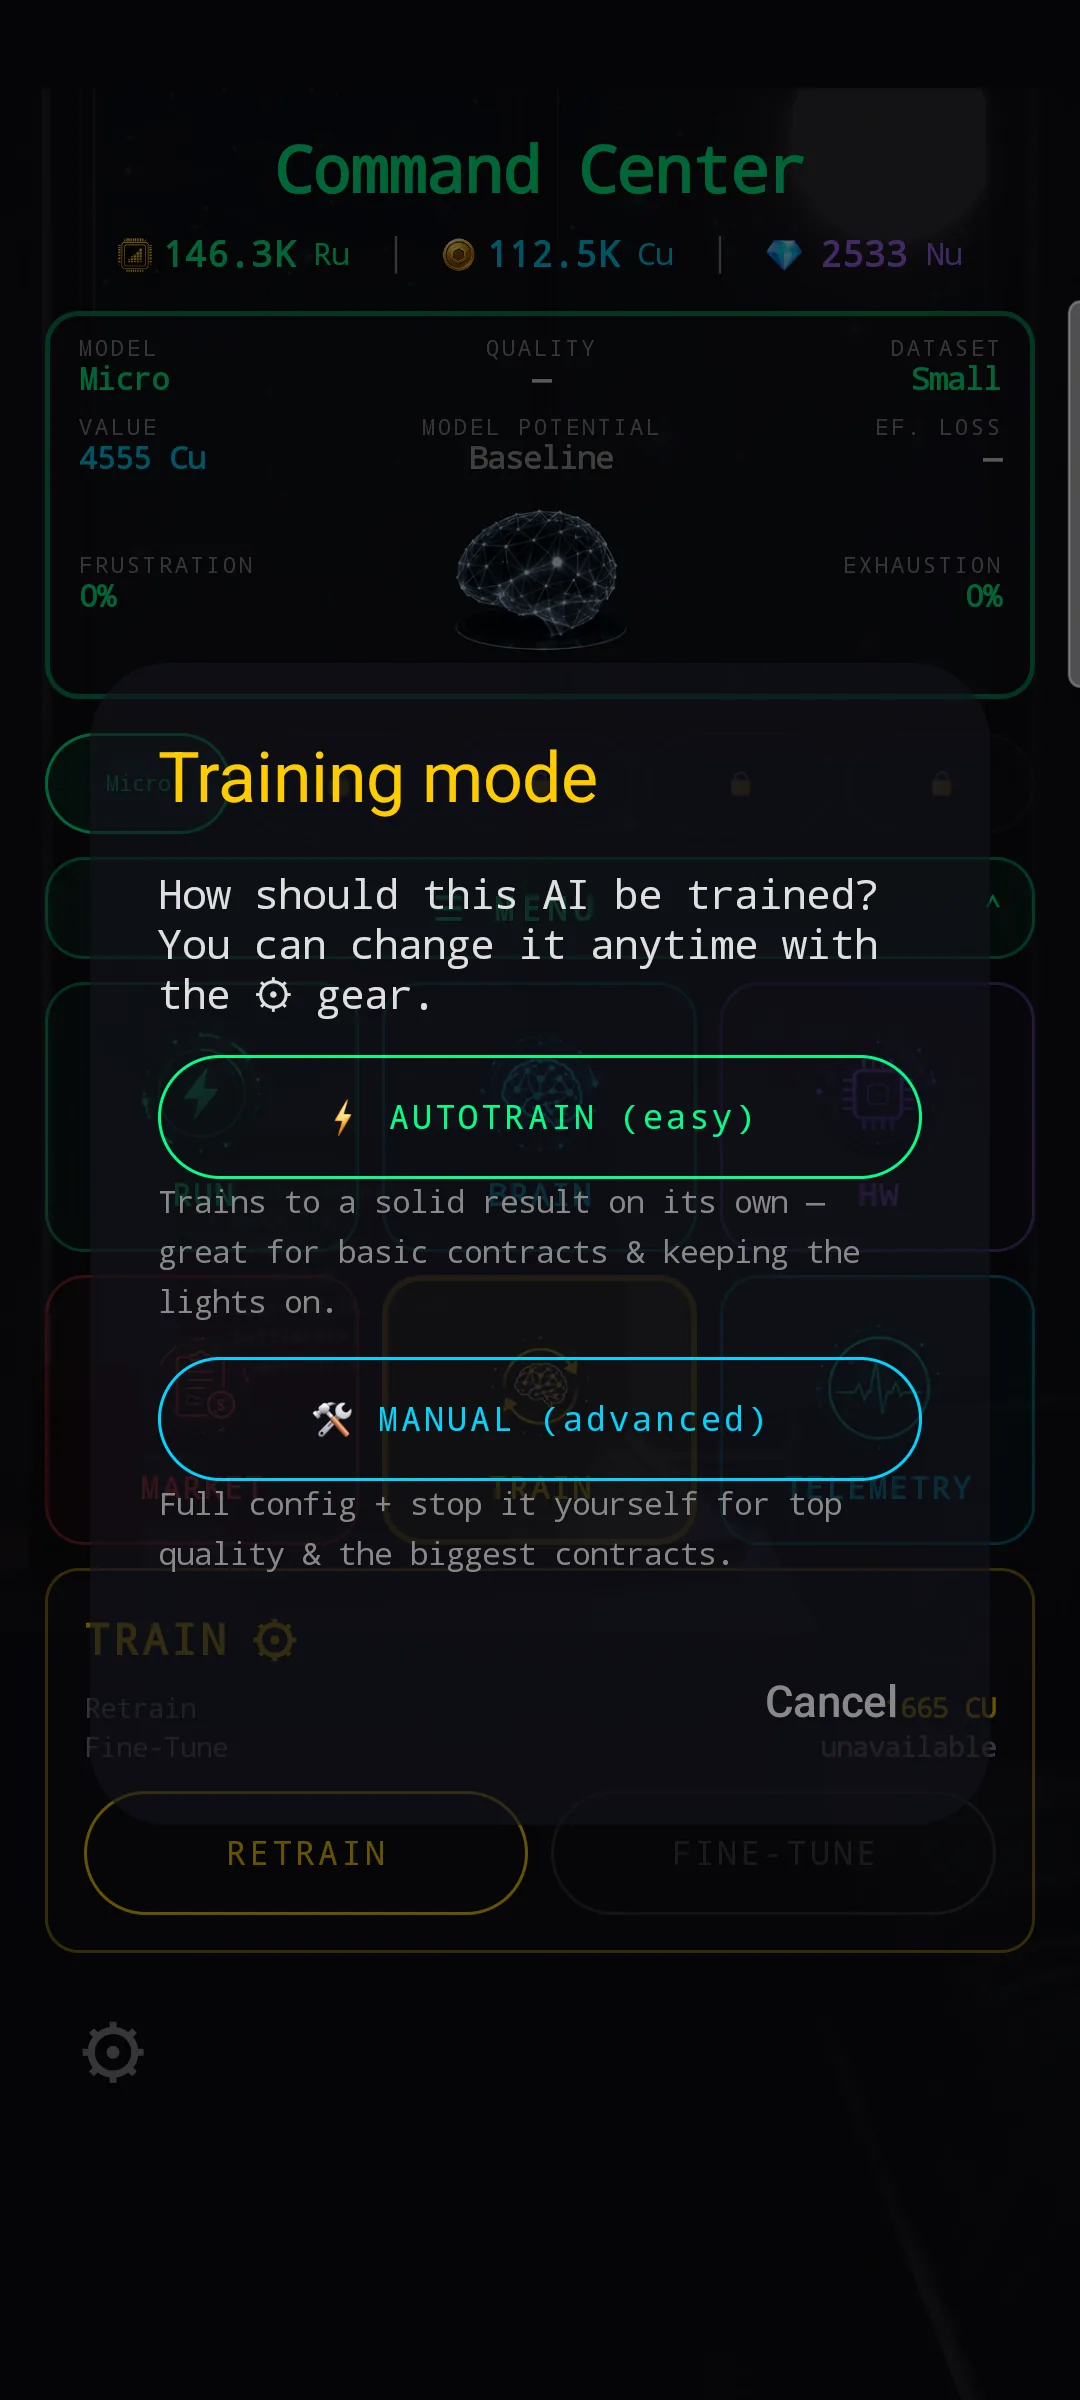
Training mode — the first decision
Tap TRAIN on the Command Center and the game asks the same question every time: "How should this AI be trained?" Two answers, each optimized for a very different kind of brain.
- ⚡ AUTOTRAIN (easy) — the game handles the two decisions that are hardest to get right: how to configure the pretrain, and when to stop it. Under the hood, it picks a preset tuned for a solid speed-vs-quality compromise and runs the training until it hits the sweet spot on its own. You can still tap during training to push it faster — that's how the SPEED UP button works in both modes — you just don't have to watch val loss or touch the dials.
- 🔧 MANUAL (advanced) — you open the Configure Training screen, set the five dials yourself (batch, sequence, stride, dataset, model), watch the loss curve, and press STOP when you decide the brain has converged. Slower, hands-on, and the only way to reach top-tier quality.
The mode you pick is remembered as your default. Tap the ⚙ gear icon on the Command Center to reopen the Training mode modal any time — one click flips Autotrain ↔ Manual, so you can run Autotrain for a stack of quick sale brains, then switch to Manual for a contract build without leaving the screen.
Configure Training — the Manual path
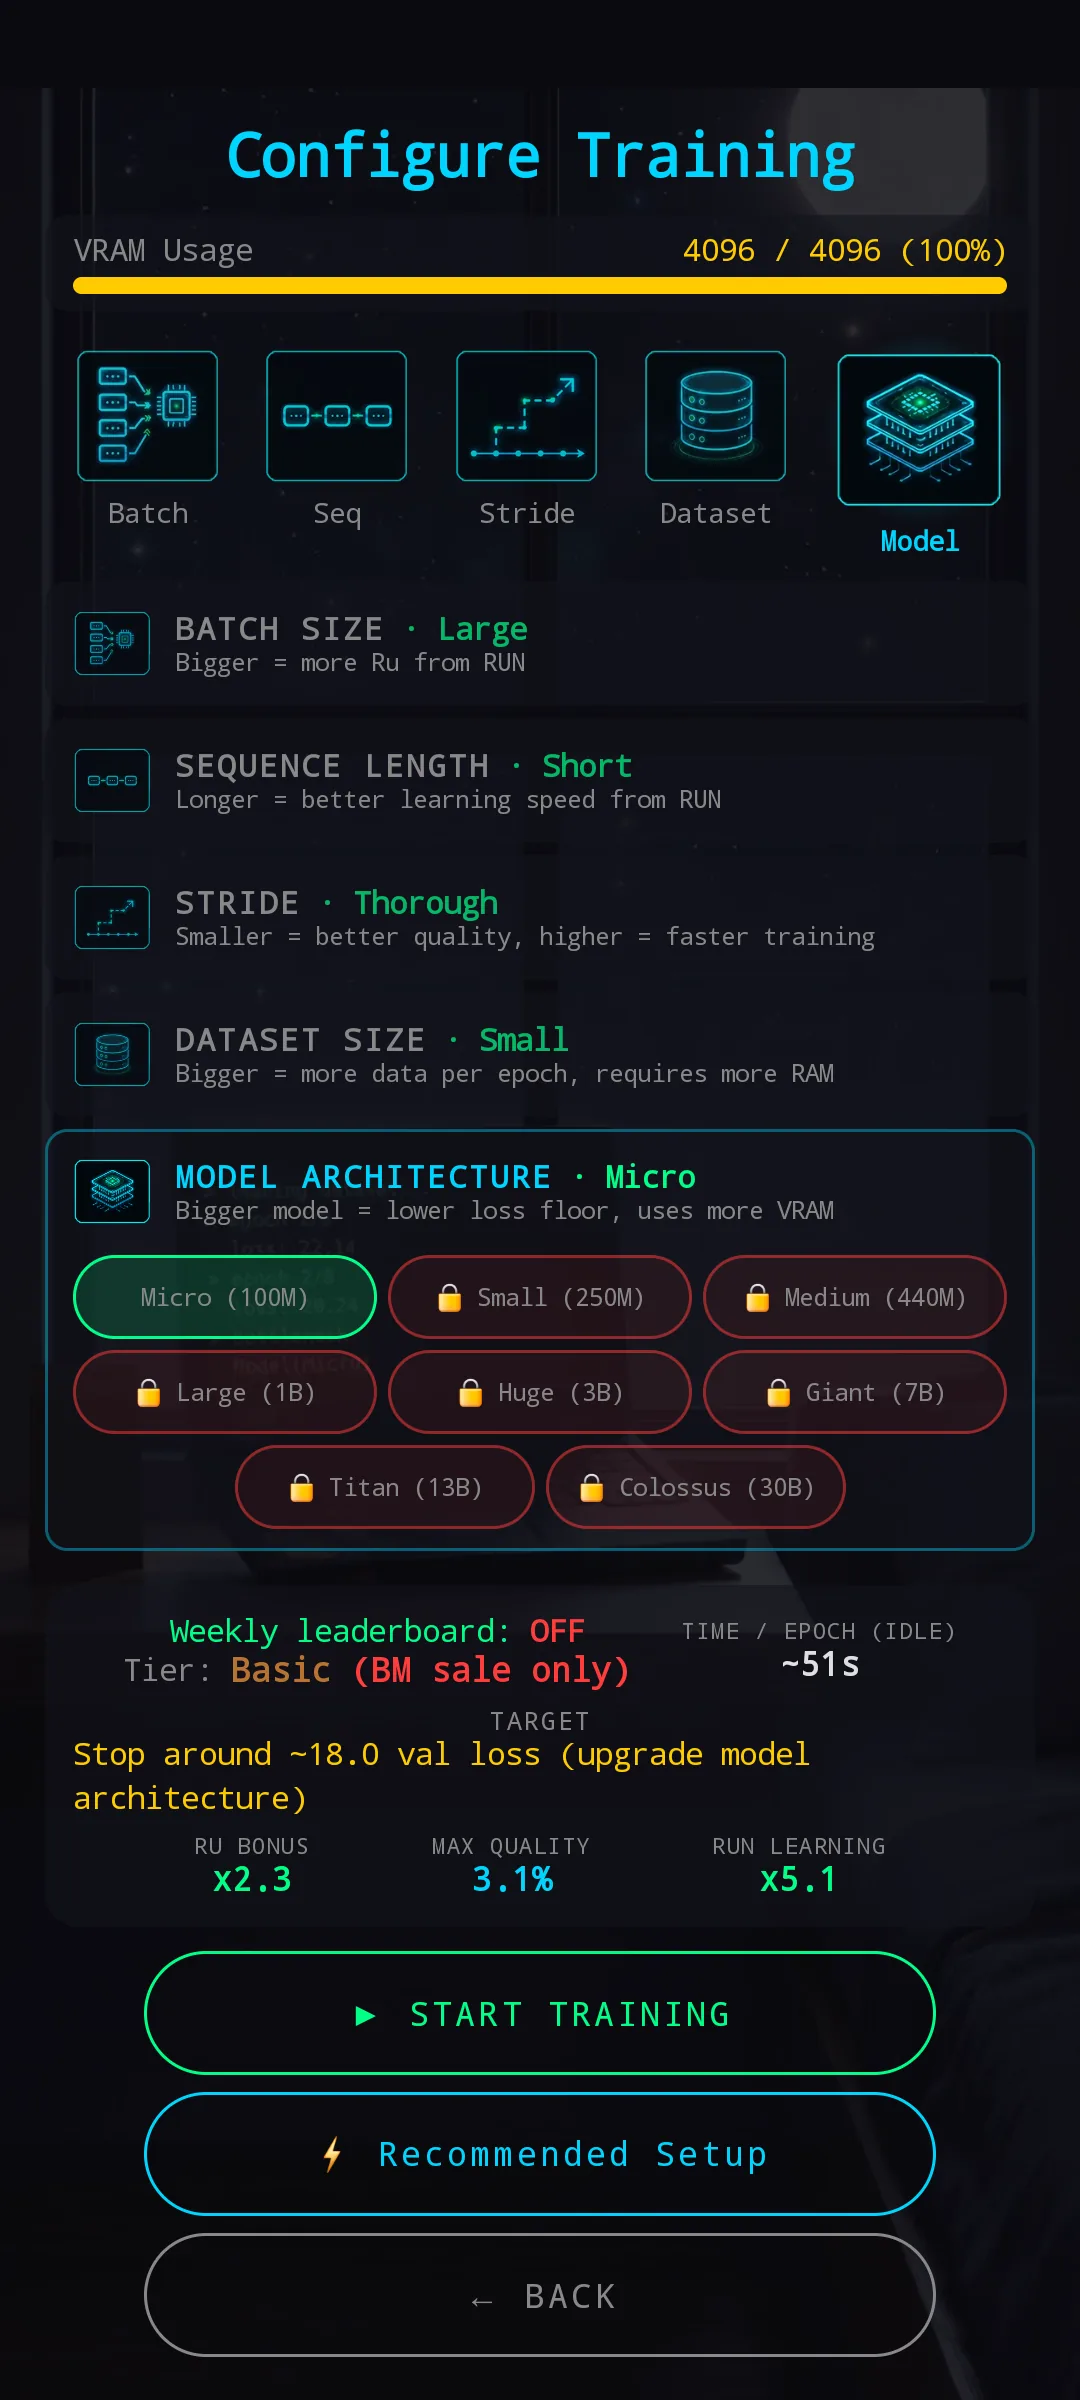
The screen has three regions stacked top to bottom:
- VRAM bar — your hard ceiling. Batch and sequence length both eat into this; if it hits 100% you can't push either dial further without upgrading the GPU.
- Tier-1 selector + accordion — five dials in a drill-down: Batch Size, Sequence Length, Stride, Dataset Size, Model Architecture. Tap an icon at the top, or a section header, to expand. Only one section is open at a time.
- Derived stats + buttons — pretrain SPEED, CLICK BOOST, time per epoch, the target loss the engine is aiming for, and three downstream tags that preview what the finished brain will do in runs (Ru bonus, max quality, run learning). Three buttons at the bottom: START TRAINING, ⚡ Recommended Setup, BACK.
Each collapsed section header shows its current
value next to the title (BATCH SIZE · Medium),
so you can read the entire setup without opening anything.
VRAM — the hard ceiling
The yellow VRAM bar at the top is your budget, not just an info panel. Three things consume VRAM:
- Batch size — bigger batch, more VRAM per step.
- Sequence length — longer sequences also scale VRAM use.
- Model architecture — each model tier has a fixed VRAM footprint just for existing.
The bar fills as you push any of the three. Once it hits the limit of your installed GPU, further chips in those sections show as orange-warning (your hardware can't run them right now) or red-locked 🔒 (the option is gated by a hardware tier you haven't reached yet). You can't start a run that would overflow the budget.
Batch size — speed and Ru, at the cost of sweet-spot room
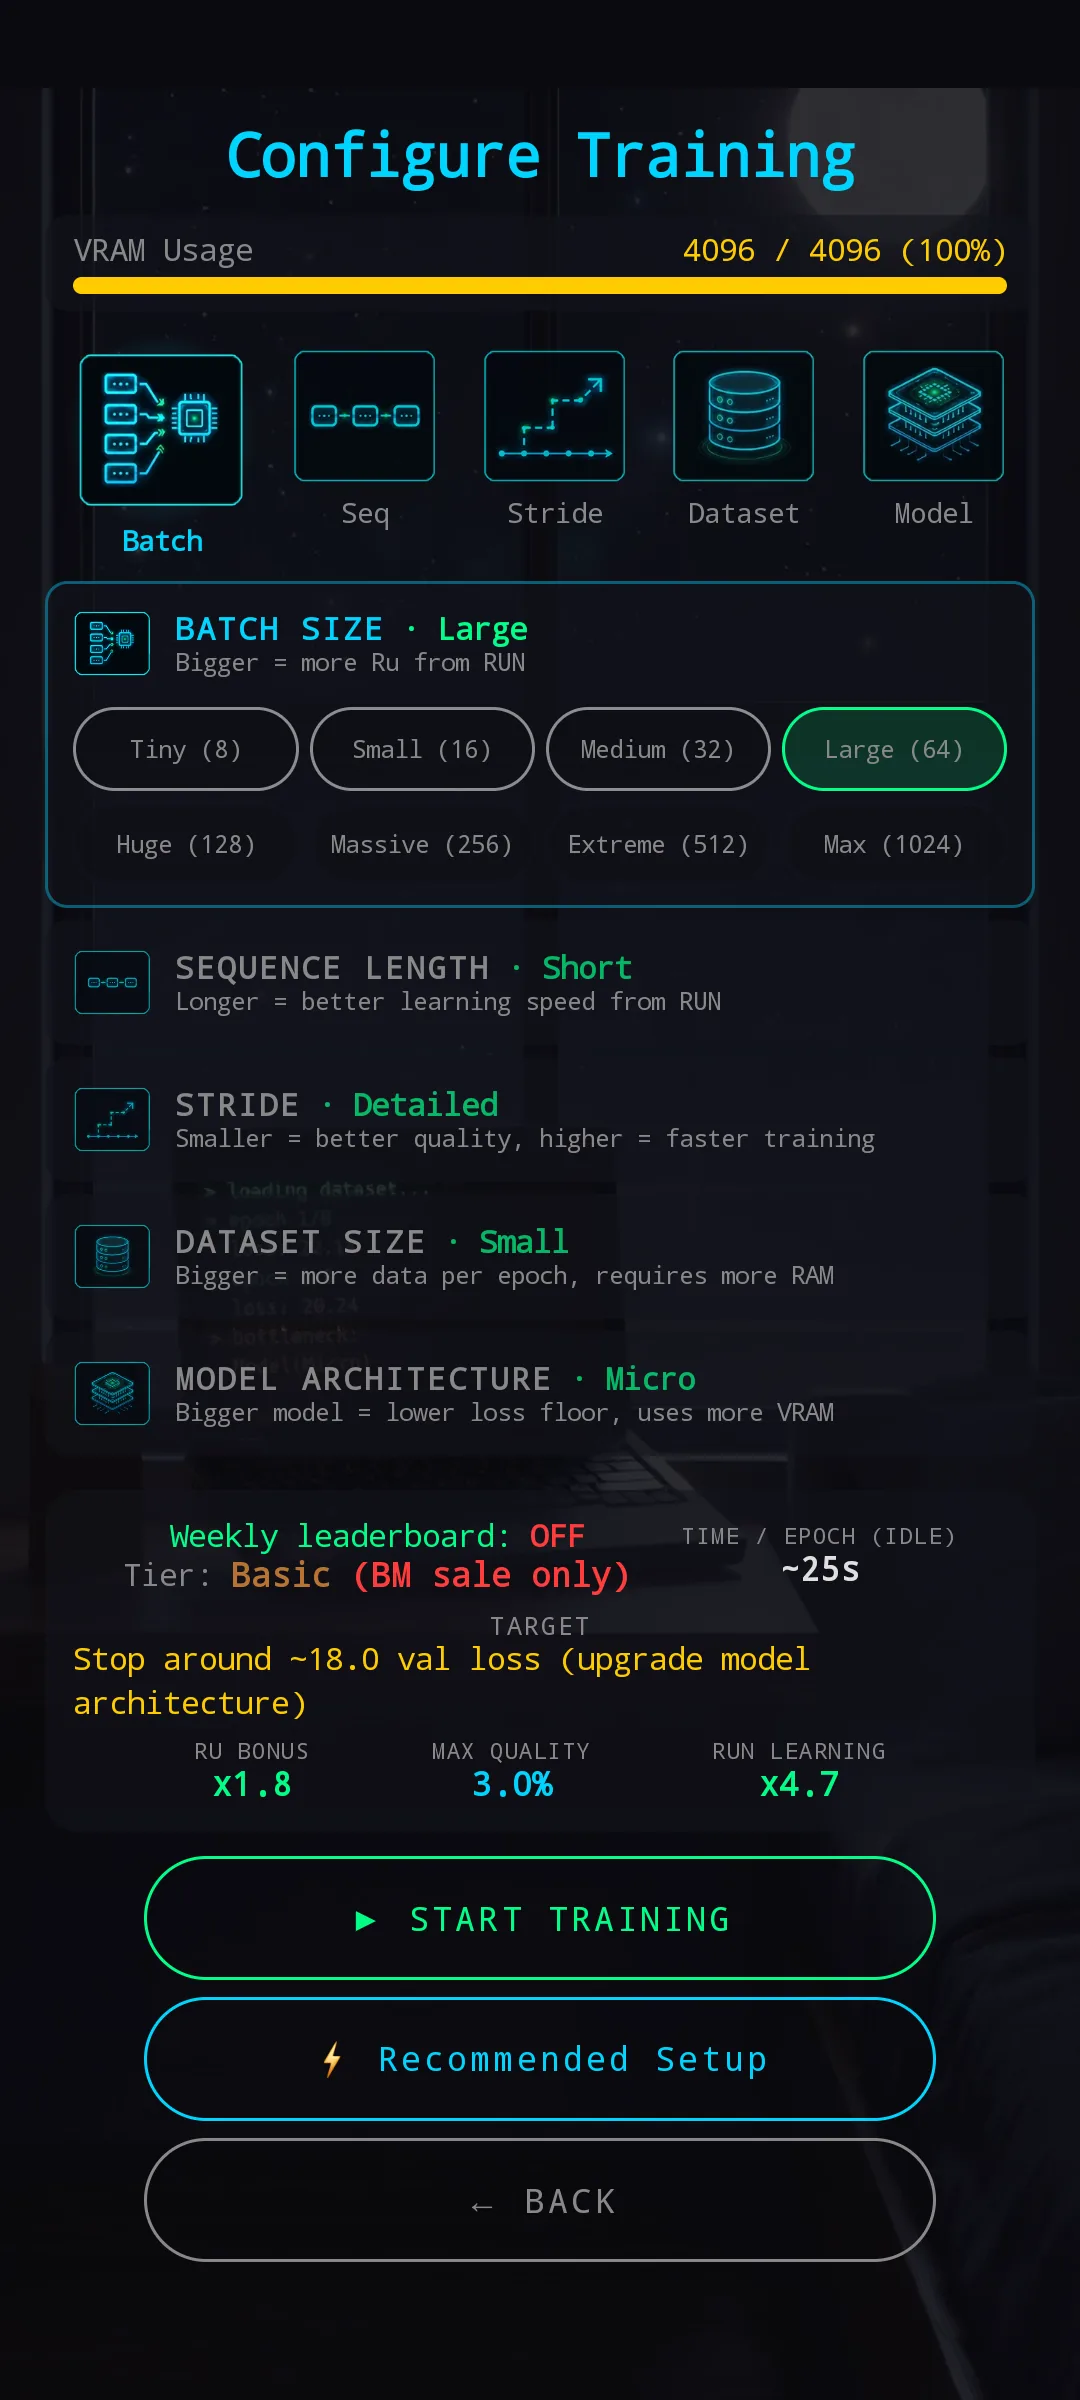
Batch decides how many sequences the GPU processes in parallel per training step. The trade-offs that matter:
- Pretrain speed — scales up with batch. Bigger batch finishes the pretrain meaningfully faster.
- Ru bonus — scales up with batch. A finished brain trained on a bigger batch produces more Ru in every run from then on, for the rest of its life. (v1.2.5: this was previously attached to sequence length; it now lives on batch where it makes more thematic sense.)
- Sweet-spot window — shrinks with bigger batch. The "best epoch" target the engine indicates tends to land earlier when batch is high, so you have less room for error before overfitting starts.
- VRAM cost — scales up with batch (see VRAM section).
Rule of thumb: push batch high when you have spare VRAM — the Ru and speed gains compound across every run the brain will ever do. Drop batch back down when you're chasing the quality ceiling on a fragile model, because the extra sweet-spot epochs give the loss curve more room to converge before overfitting kicks in.
Sequence length — learning depth in runs
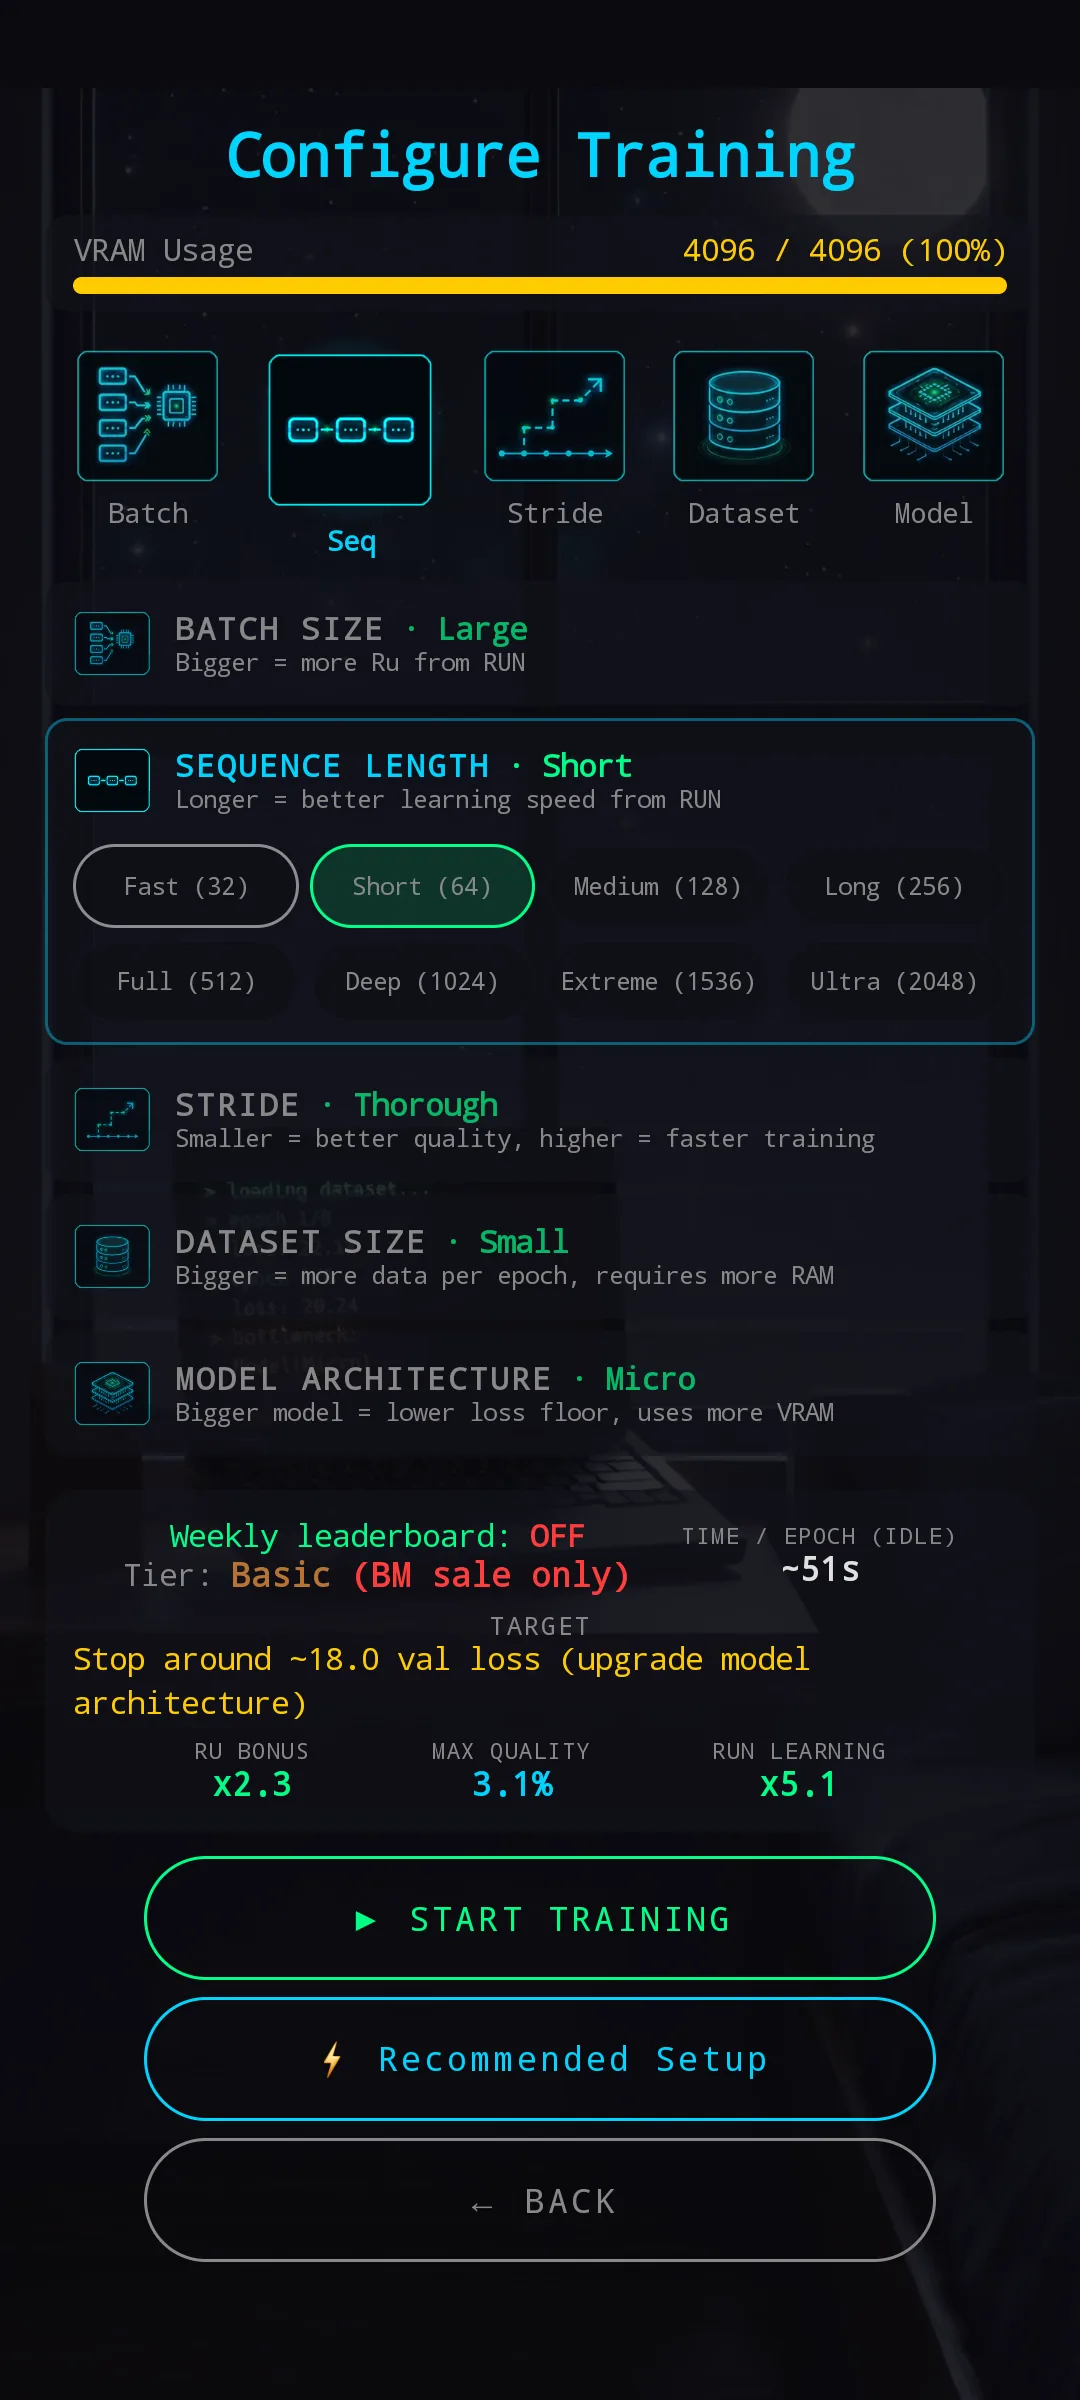
Sequence length is how many tokens fit inside one training sample (the model's context per step). The trade-offs:
- Run learning — scales up sharply with seq. A brain trained on long sequences learns much faster during runs: it makes more progress per domain visit before fatigue and frustration accumulate. (v1.2.5: the upper end of this scale was buffed significantly. Long sequences are now a quality/endgame playstyle in their own right.)
- Pretrain time — scales up with seq. Longer sequences mean more work to process per epoch.
- Pretrain loss curve — longer seq lets the model converge lower, but only up to a point. Pushing past roughly mid-range gives diminishing returns on convergence (run learning keeps climbing, though).
- Ru bonus — none. Ru came off sequence in v1.2.5 and now lives on batch.
- VRAM cost — scales up with seq.
Rule of thumb: push seq for trophy / quality builds — brains that will earn through contracts or mastery runs rather than pure Ru farming. For brains intended as Ru factories, keep seq mid and pour the VRAM into batch instead.
Stride — thoroughness vs throughput
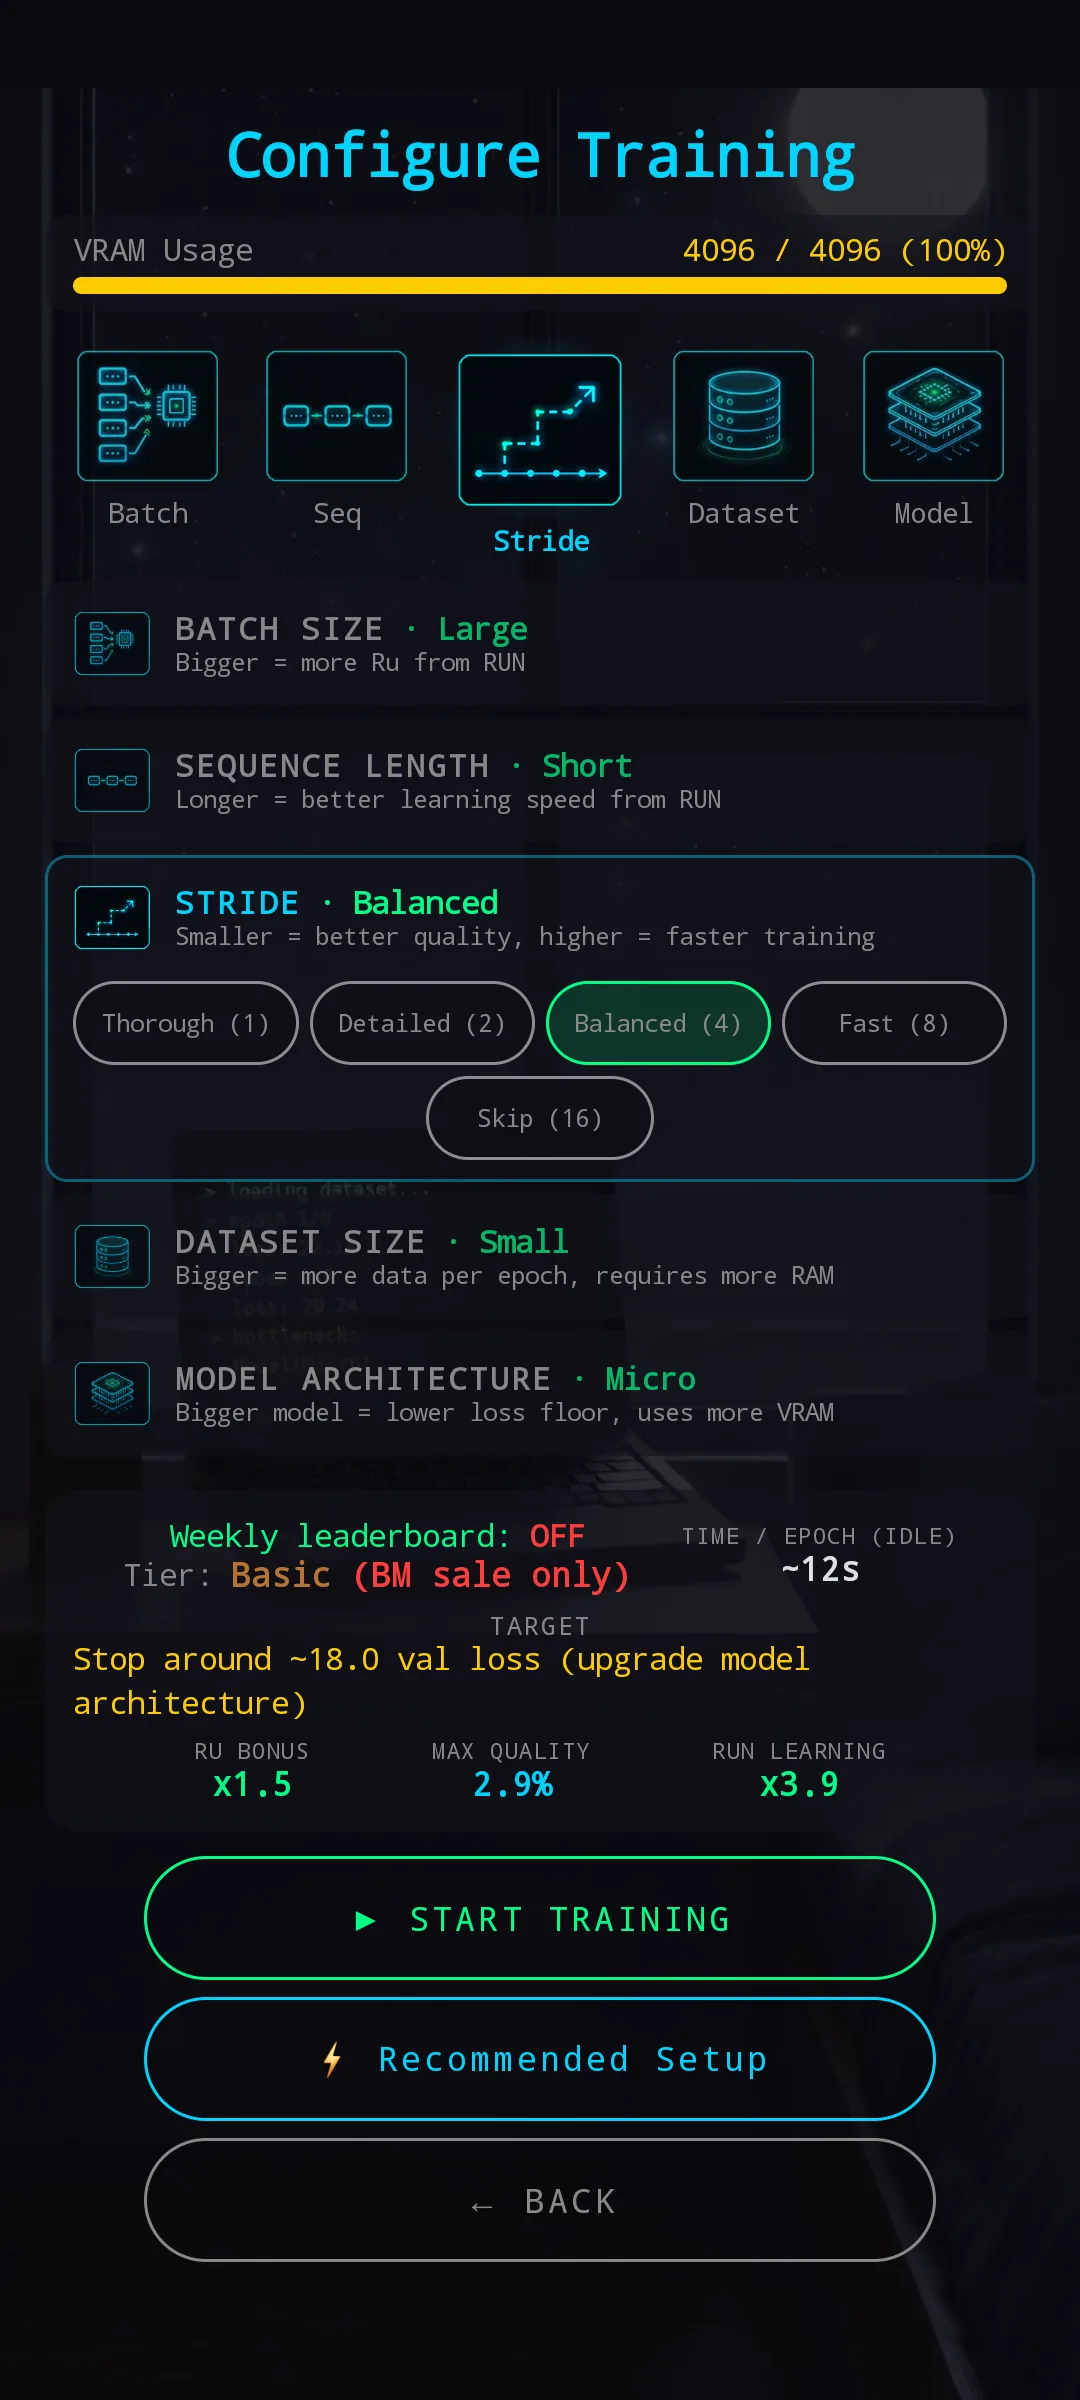
Stride is how far the training window slides between samples — small stride means the model sees overlapping windows of the data (thorough); large stride skips ahead between samples (fast).
- Work per epoch — small stride costs more. Stride 1 (Thorough) doubles the work per epoch compared to stride 2 (Detailed); stride 16 (Skip) cuts work to a fraction.
- Quality ceiling — small stride raises it. Stride 1 lets the model reach its maximum quality cap. Stride 16 imposes a hard cap noticeably below — even a perfect run won't get to the same quality.
- Ru bonus — small stride gives more. Mirrors the quality story.
- Starting loss — bigger stride starts higher. You begin further from the loss floor and have more convergence work to do per epoch.
Rule of thumb: stride 1–2 for trophy brains you'll keep and tune. Stride 4–8 for mid-game speed farming where you want brains finished and sold quickly. Stride 16 is only useful when you're deliberately throwing a brain at a contract with low quality requirements and just want it done.
Dataset size — RAM cost, loss floor, overfit speed
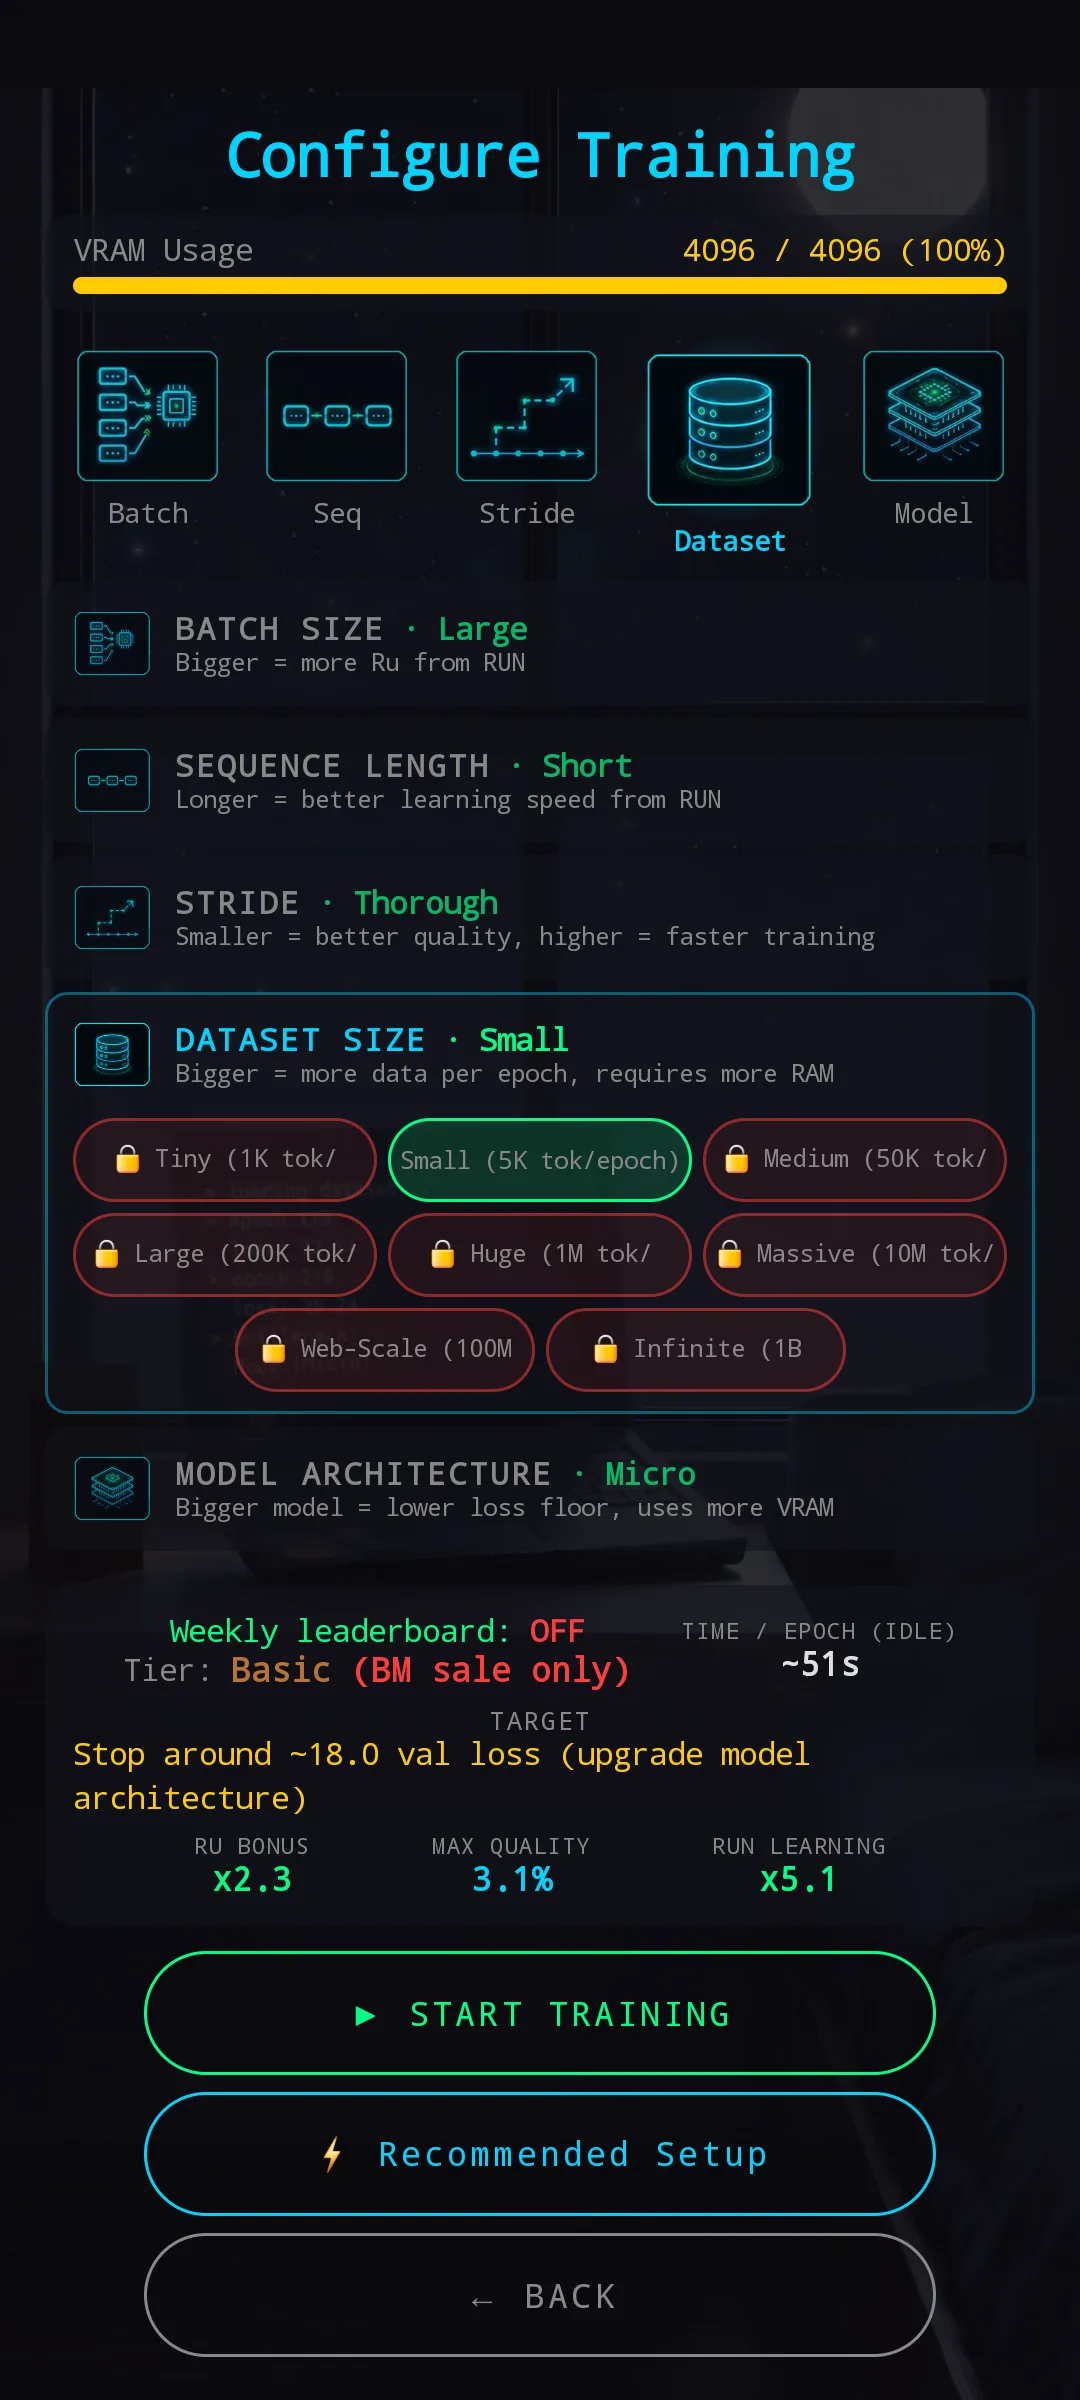
Dataset size is how much training data sits in the pretrain. It's gated by your RAM tier — bigger datasets demand more installed RAM to even appear as an option.
- Tokens per epoch — bigger dataset, more tokens per epoch, longer epoch time.
- Loss floor (quality ceiling) — bigger dataset drops the floor. The minimum loss the model can converge to is lower with more data, so the realistic quality ceiling rises.
- Overfit speed — bigger dataset overfits slower. Tiny datasets overfit fast: the model memorizes them quickly and starts regressing past the sweet spot. Huge datasets give you a wide stable window before overfitting starts costing quality.
- Sweet-spot window — bigger dataset extends it. More epochs of useful training before plateau.
- RAM cost — scales up steeply with dataset size. The biggest tiers need datacenter-class RAM to load.
Rule of thumb: match dataset size to model architecture. A Micro model pretraining on an Infinite dataset is mostly wasted RAM — the model can't extract enough from the data to justify the cost. Conversely, a Colossus model on a Tiny dataset overfits in a few epochs and ceiling-caps far below its potential. The bigger the model, the bigger the dataset it deserves.
Model architecture — the central decision
Model architecture (visible in the overview screenshot at the top of this page) is the single biggest decision on the screen. The tier list runs Micro (100M) / Small (250M) / Medium (440M) / Large (1B) / Huge (3B) / Giant (7B) / Titan (13B) / Colossus (30B), and each one — Micro through Colossus — sets the fundamental ceiling for everything else. Each tier is gated by VRAM and by an architecture unlock cost.
- Pretrain time — much longer per tier. Going from Small to Medium isn't a 30% slowdown; it's substantial. Cluster-tier models can take days of idle time per epoch even on premium rigs.
- Quality ceiling (max quality cap) — much higher per tier. Micro brains will never break a few percent quality; Colossus brains can hit the trophy cap.
- Loss floor — drops with bigger models. Larger architectures can fit the data more precisely.
- VRAM minimum — each tier has a hard minimum GPU memory requirement. Below it, the option is red-locked.
- Cu cost — scales exponentially. Each higher tier costs roughly an order of magnitude more in Cu to buy, and that cost is sunk into the brain's value when you sell it. Bigger sale prices, but a much longer ROI on the up-front investment.
- Run speed — drops with bigger models. Big brains process domains slower per step during runs. That's offset by their higher learning rate, but in raw steps-per-second terms, smaller is faster.
Rule of thumb: the model tier sets the ceiling for everything you're going to do with the brain. Pick it first based on your hardware (VRAM, RAM) and your patience (pretrain time), then build the other four dials around it.
Reading the derived stats panel
The panel between the accordion and the buttons is a live preview of what your current config will produce. Five things worth reading, grouped as they appear on screen:
- Weekly leaderboard — ON (green) if the brain your current config would produce is eligible for the weekly leaderboard sales race, OFF (red) if it's not. Small models on tiny datasets typically read OFF — the leaderboard is for meaningful builds.
- Tier — which vendor tiers will actually buy this brain. Basic (BM sale only) means the brain will only clear on the Black Market at this config; bigger, better-configured brains unlock the higher tiers of the market.
- TIME / EPOCH (IDLE) — estimated idle time for a single epoch at the current config. Per-epoch only — the engine never shows total training time, so you plan around the sweet-spot indicator rather than the total.
- TARGET — the val-loss the engine is steering you toward stopping near, plus a short hint ("upgrade model architecture", "more data", etc.) if your current setup will plateau before reaching a competitive target.
- RU BONUS (×N) — how much extra Ru a brain built from this setup will produce in runs. Mostly batch-driven.
- MAX QUALITY (N%) — the quality cap the brain can reach. Driven by model tier and stride.
- RUN LEARNING (×N) — how fast the brain learns from domains during runs. Mostly sequence-length driven.
Tweak any chip and these all update live. The buttons at the bottom are positioned so the stats stay visible while you're experimenting.
Note: SPEED (tok/s) and CLICK BOOST — how many extra tokens each tap adds during pretrain — no longer live on this panel. They now appear on the Pre-Training screen itself, next to the SPEED UP button, where the numbers are actionable.
Sweet spot — and why two identical setups don't land at the same epoch
During the run, the engine indicates a sweet-spot epoch — its estimate of where the loss curve will plateau before overfitting starts costing quality. Stop at or near it for the best brain.
The general shape:
- The sweet spot moves later with bigger models, bigger datasets, smaller batch, longer sequence — anything that gives the model more room to converge.
- It moves earlier with bigger batch, shorter sequence, smaller dataset, stride-skip configs.
- It is not a hard stop. You can train past it, but each extra epoch starts costing quality (quadratic in how far past you go). Going slightly past is fine on huge datasets; going way past on a tiny dataset is a fast way to ruin a brain.
But — and this is deliberate — two pretrains with the same config don't land at the same sweet-spot epoch. The engine bakes in a small per-brain variability around the calculated value. Retrain the same setup three times and the three brains will plateau at slightly different epochs. That's not a bug; it's load-bearing design.
There's similar variability in two other places:
- Run Ru income — every run rolls a small "session luck" modifier on top of its base Ru reward. The same brain on the same domain won't print exactly the same Ru twice in a row.
- Brain sale price — every brain gets a tiny "buyer mood" modifier when sold. Stable per brain (Black Market preview, Brain Lab, and the sale screen all show the same number until you sell), but no two brains land at exactly the same price.
All three are deterministic per state — reload your save and you'll see the same numbers. Save scumming doesn't get you anything.
Why the variance exists
Without it, the sweet-spot indicator would be a fixed, predictable number you could pre-compute from the config. The Forecast and Alert utility items — the in-game tools designed to help you find the sweet spot — would be useless: why pay for a prediction when the answer is already a known formula? The variance is what makes those items meaningful and the sweet-spot read a real decision instead of a memorized lookup.
It also keeps the texture of the simulation alive. "I trained a Huge model on a 1024 batch and got Y" is a story, not a spreadsheet row.
📊 Utilities — Forecast, Alert & Checkpoint
During Manual pretrain, a UTILITIES modal on
the Pre-Training screen sells three lines of one-shot help
items. Each line has the same 3-tier shape: a Cu option (⚡),
a free 🎮 Packet Filter minigame round, and a premium 🚀 Nu
option. All items are per pretrain, with a
daily limit printed on each row (e.g. 0/1
today).
FORECAST — "tells you the stop window in advance"
Reveals a predicted sweet-spot range before training runs long. Three tiers from widest / cheapest to tightest / premium:
| Item | Window | Cost |
|---|---|---|
| ⚡ Estimate | ±5 epoch | Cu |
| 🎮 Packet Filter | ±4 epoch | free (play the minigame) |
| 🚀 Oracle | ±3 epoch | Nu |
ALERT — "blinks near sweet spot"
Flashes a warning as the actual sweet-spot epoch approaches during training:
| Item | Trigger window | Cost |
|---|---|---|
| ⚡ Basic Alert | ±4 epoch | Cu |
| 🎮 Packet Filter | ±3 epoch | free (play the minigame) |
| 🚀 Precision | ±2 epoch | Nu |
CHECKPOINT — "roll back to a better epoch"
Buy first to start tracking best epochs. Once armed, the engine remembers which epochs had the best loss — and if you overshoot the sweet spot, a Checkpoint item lets you rewind the pretrain to a previous best instead of restarting from scratch:
| Item | How close to best | Cost |
|---|---|---|
| 🎮 Snapshot | −7 from best | free (play the minigame) |
| ⚡ Backup | −5 from best | Cu |
| 💎 Rewind | −2 from best | Nu |
| 💎 Perfect Recall | exact best | Nu (premium) |
Perfect Recall lands you exactly on the best epoch the pretrain ever saw. The cheaper tiers land you close, but not necessarily on it — that's the trade-off.
How to use them
Forecast and Alert are complementary: Forecast gives you the plan (where the sweet spot probably is), Alert gives you the trigger (when to act on it). Checkpoint is your safety net — if you miss and overshoot, it walks you back. Buy all three lines and you basically can't lose a pretrain to bad timing.
Common patterns:
- Cheap path — Estimate + Basic Alert. Wide windows, Cu only, gets you there without much commitment. Good for casual mid-game farming.
- Free path — Packet Filter Forecast + Packet Filter Alert (+ Snapshot if you want a free safety net). Each costs one round of the minigame, lets you skip Cu entirely. Good if you're already playing Packet Filter for training-speed boost stacks.
- Tight path — Oracle + Precision Alert. Both Nu, both tight, basically guarantees you stop within a couple of epochs of the actual optimum. Good for trophy brains where you don't want to overshoot.
- Perfect path — Oracle + Precision + Perfect Recall. You get the plan, the trigger, and if you still overshoot, you snap back to the exact best epoch. The most Nu-hungry pattern, and the closest thing to a guaranteed peak-quality brain.
- Eyes-only path — buy nothing, watch the loss curve, stop when it flattens. Works fine, but on long pretrains it means staring at the graph for hours.
All utility items are per pretrain — they don't carry over. Decide on your strategy up front, buy what you need, train, repeat.
⚡ Recommended Setup — sane defaults, one tap
The cyan Recommended Setup button picks a balanced configuration for your current hardware:
- The largest model your GPU can run
- A dataset matched to that model's capacity
- A balanced batch and sequence length
- Stride 2 (Detailed) — thorough but not punishing
It's not the absolute optimal config — there's no single "best" once you start considering whether you want a Ru factory or a trophy brain — but it's a safe one. Two situations where it's the right call:
- Early game — before you've internalized what each dial does. One tap gets you a functional first brain you can sell, fund the next hardware step, and learn the system on a working baseline.
- Endgame quick farms — when you've upgraded hardware and want to bang out brains for contract grinding without manually re-picking five dials each time.
Override any dial afterwards — Recommended Setup just sets the starting point.
☁ GPU Rental hint — the long-cycle escape hatch
When the engine calculates that your configured setup will take roughly an hour or more per epoch, a yellow hint card appears between the stats panel and START TRAINING with a rental recommendation:
→ Rent Cloud A100: ~15 min/epoch · 25% of model price
The engine picks the rental that actually shortens the cycle (Cloud A100 for most cases, Cloud H100 Cluster for extreme configs that even A100 can't dent meaningfully). A4000 is reserved for a future rental tier and isn't part of this auto-pick.
The A100 and A4000 costs are percentages of the model price, not fixed amounts — the bigger the model you're training, the more the rental costs in Cu. H100 is the exception: it's a flat 300 Nu (premium currency) regardless of model size, so it's the right call when the per-epoch time is so high that Cu-based options struggle to keep up. See the Hardware Shop rental section for the full rental pricing reference.
If a rental is already active, the card switches to a cyan banner showing the active rental and what it gives you per epoch.
The card never shows total training time — only per-epoch. Sweet-spot variation (see Sweet spot above) means total time is something you estimate from the indicator during the run, not something posted up front.
Stacking with training boosts
GPU Rentals stack multiplicatively with the SPEED BOOST items on the Pre-Training screen — three per-brain, per-day, per-type slots (up to 3× each):
| Item | Effect | Cost |
|---|---|---|
| ⚡ Overclock | +110% training speed | Cu |
| 🎮 Packet Filter | +140–225% (by minigame result) | free (play the minigame) |
| 🚀 Neural Acc. | +350% training speed | Nu |
A rental on its own gives you the per-epoch number quoted in the hint card; a rental combined with a maxed-out boost stack pushes the per-epoch number much further still, at the cost of Cu, Packet Filter rounds, Nu — or all three — per training run.
You don't have to engage with this — Recommended Setup + maybe one rental works perfectly fine for most playstyles. But the stack is there if you want the "I want this Colossus brain finished before I go to bed" path.
Quick tips
- Pick model first — it sets the ceiling for everything else. The other four dials configure around it.
- Dataset matched to model — Micro on Infinite is mostly wasted RAM; Colossus on Tiny overfits in minutes. Match the scales.
- Batch high, seq mid → Ru farm. Seq high, batch mid → quality / contract brain.
- Stride 1–2 for keepers, stride 4–8 for fast sale brains, stride 16 only when you genuinely need the speed and don't care about quality.
- Recommended Setup is the right first tap on any new hardware tier — it'll tell you what your gear can actually handle.
- Watch the VRAM bar — it's the only hard ceiling on the screen. Everything else is a soft trade-off.