Run Configuration
The screen where you set up a run before pressing START RUN. Five sections, one decision each. This page explains what each section means and how to think about the trade-offs.
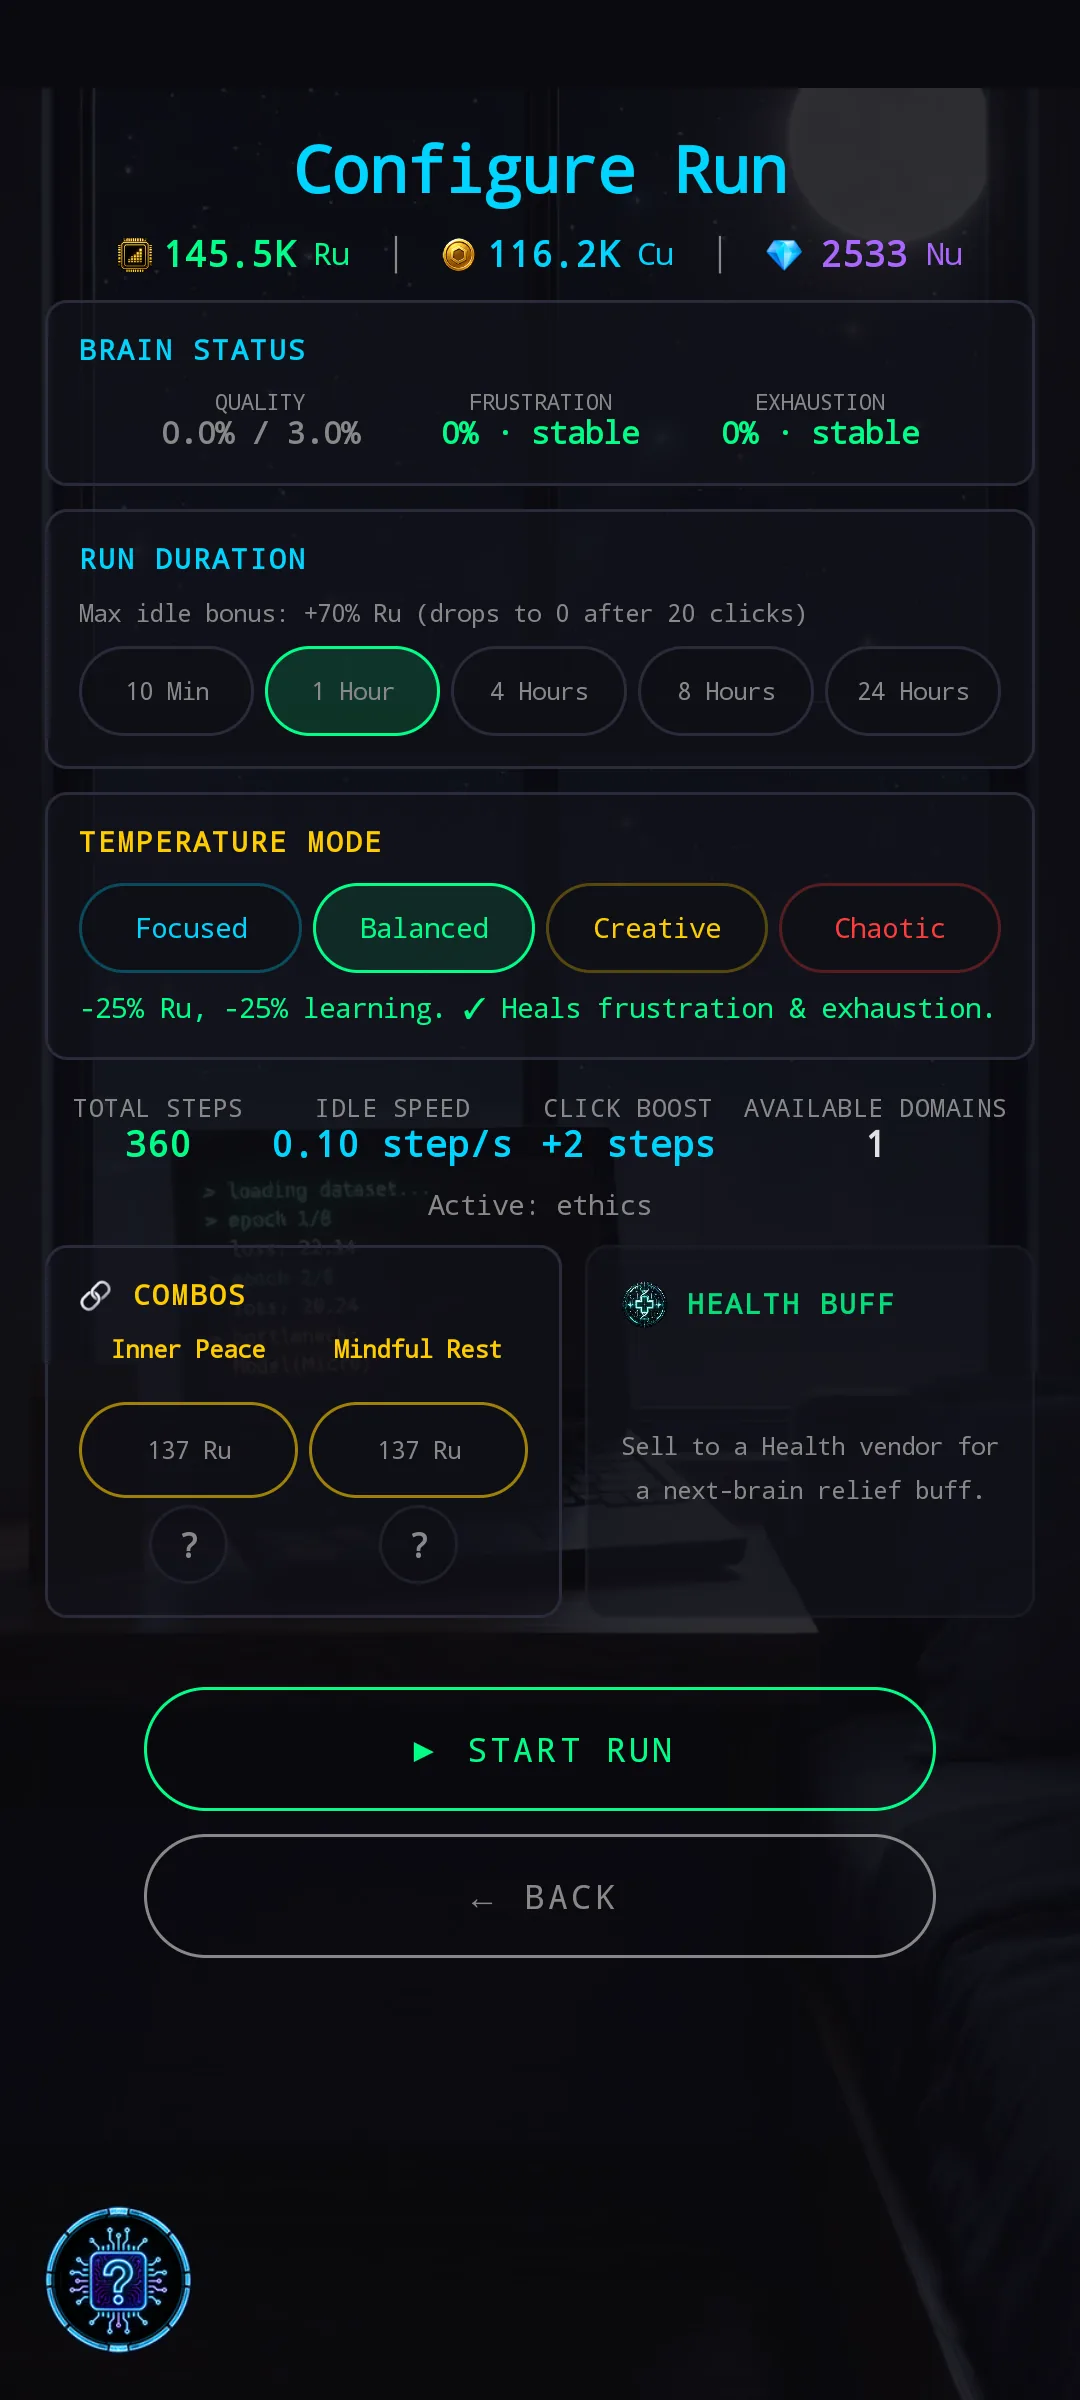
At a glance
Run Configuration is your control panel before each run. The decisions here decide what your brain will earn, how stressed it will be at the end, and which domains it will explore.
New to the game? Start with Getting Started for the basic loop, then come back here for the specifics of this screen.
- Brain Status — your brain's current condition
- Quality ceiling reached — what happens when the brain is maxed
- Run Duration — how long this run takes
- Temperature Mode — how the brain spends its effort
- Live Stats — what this configuration will produce
- Active Domains — set on the Brain screen, displayed here
- Combos — Ru-purchased boosts that persist across runs
Brain Status
Three meters at the top of the screen, all per-brain:
- Quality — how good the brain currently is, capped by the model architecture you trained. Quality is what drives sale prices and contract eligibility. The first number is your current quality; the second is the cap your current setup can reach. Quality grows during runs as the brain masters domains.
- Frustration — accumulated stress from this run and previous runs. The label next to the number gives you a quick read: Calm at the low end, escalating to warning states. High frustration risks a death spiral that cuts your Ru reward sharply. Balanced and Focused runs reduce it.
- Exhaustion — long-term tiredness that persists across runs. The label shifts from Rested upward. Balanced runs help it recover.
Read this section first. If your brain is already stressed or tired, configure a recovery-leaning run instead of pushing for maximum Ru.
Quality ceiling reached
When a brain's Quality equals its cap (e.g. 3.0 % / 3.0 %),
the model has learned everything the current setup can teach it.
Pressing START RUN on a maxed brain brings up a
small warning so you don't waste time by accident:
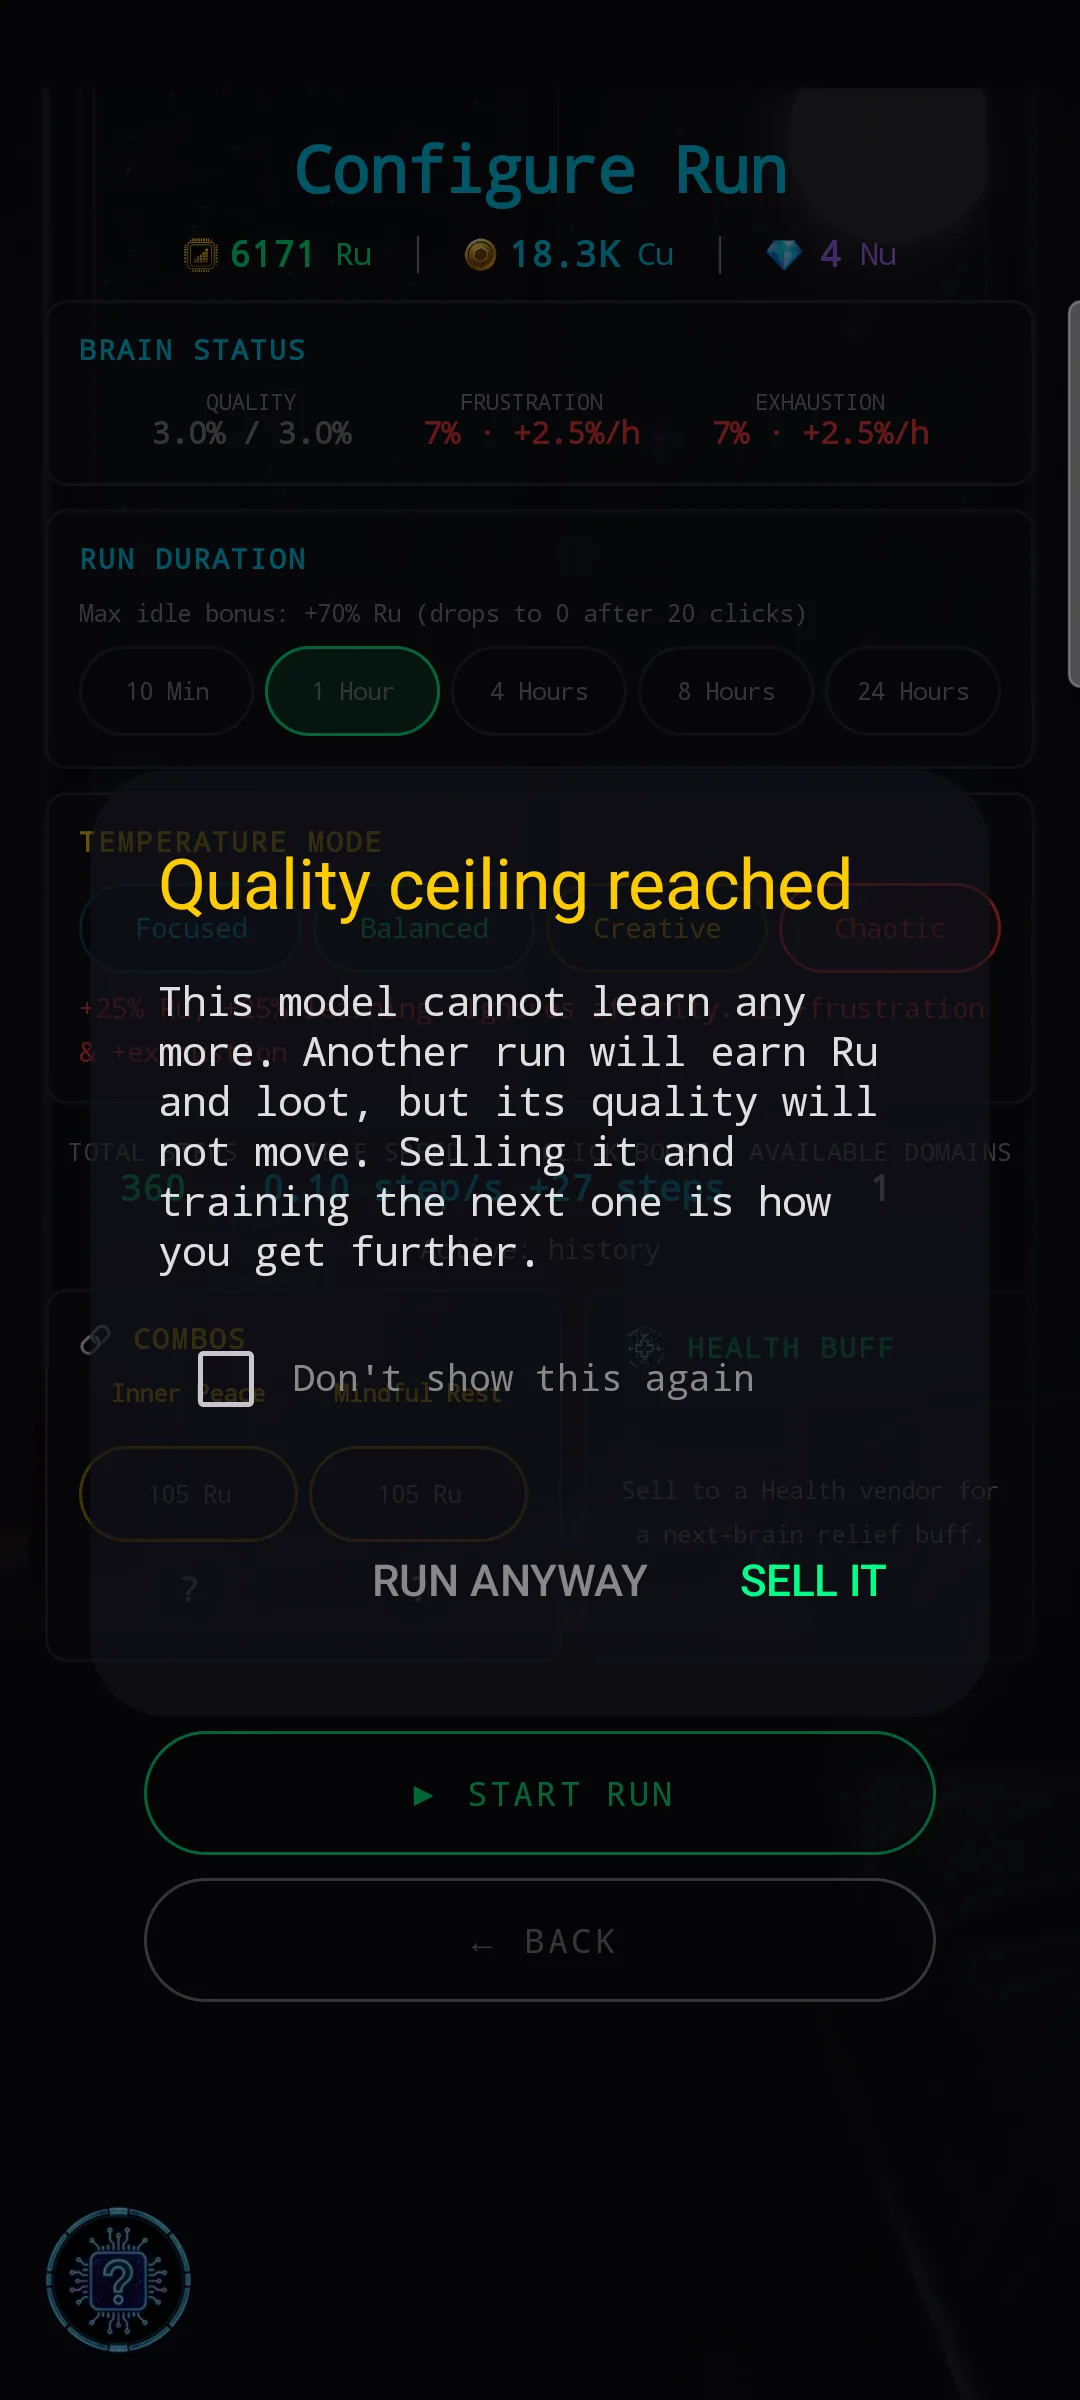
Two paths from here:
- RUN ANYWAY — the run still runs, still earns Ru, still drops loot and SW Papers. The quality number just won't move. Sensible on a brain with strong installed SW, or when you're grinding for a specific corpus of Papers.
- SELL IT — takes you to the Market. On a maxed model this is usually the correct call: bank the sale value, train a bigger next model, and let the next brain claim the ceiling that this one already left behind.
Run Duration
Five duration options: 10 Min, 1 Hour, 4 Hours, 8 Hours, 24 Hours. The two longest tiers (8 Hours and 24 Hours) carry a 🔒 lock icon until you own the Rest module — long runs need the brain's stamina the Rest module provides.
Idle run vs active run
A single duration choice covers two very different playstyles:
- Idle run — let the run play out on its own. The brain advances at its base idle speed and you collect a Max idle bonus on top of the Ru you would normally get. Hands-off, slower per-step, but the bonus compensates.
- Active run — tap through it yourself. Every click adds steps, so the run finishes faster and you can queue more runs in the same wall-clock time. The catch is that the idle bonus shrinks with every click and drops to 0 after 20 clicks — past that, you're trading the bonus for raw throughput.
The Max idle bonus hint under the duration buttons tells you exactly what's at stake. Use the percentage to decide which mode the run is — a high idle bonus on a 24-hour run is a serious Ru boost you don't want to throw away by tapping.
Temperature Mode
Four distinct behavior modes. Each one rebalances learning rate and Ru output, and changes how the brain spreads its attention across active domains:
- Focused — learning rate +90%, Ru output drops. The brain ignores everything except the single domain with the highest affinity (the one it's most naturally drawn to). The intensity of that focus builds frustration: a Focused brain is paying full attention, and full attention is exhausting.
- Balanced — learning and Ru both -25%, but the brain gradually calms down and recovers: frustration and exhaustion both drop over the run. The maintenance mode. Use it when your brain is stressed or tired and you need a reset.
- Creative — Ru output +90%, learning rate drops sharply. Pure Ru-farming mode: you sacrifice progress on quality to maximize this run's payout, and exhaustion piles up fast. Good for liquidity, bad for long-term brain growth.
- Chaotic — learning and Ru both +25%, no priority between them — the brain switches modes mid-run. It spreads attention equally across all active domains instead of favoring one. The cost is both frustration and exhaustion climb at the same time. The mode with the highest ceiling and the highest risk.
The lines under the buttons (Ru change, learning rate change, frustration/exhaustion effects) are the trade-offs each mode applies versus a neutral baseline. Read them — they're your at-a-glance decision aid.
You don't have to pick one mode and stick with it. Cycling between modes across runs (Focused or Chaotic to push, Balanced to recover, Creative to cash out) is the intended rhythm — see Tips below.
Live Stats
The numeric row in the middle of the screen previews this run:
- Total Steps — total work the brain will perform. Roughly 150 steps on a Cooling-1 rig (Starter Stock Bronze), scaling down to ~50 steps on Cooling 32 (Cluster Cryo Gold). Run boosts can push it lower still.
- Estimated Run Duration — how long an idle run of this length will take. Cooling shortens this proportionally to the 1–32 scale; run boosts stack on top (see below).
- Click Bonus (steps per tap) — set by the Weekly Click Boost (fixed 25 steps per click on Day 7 of the Daily Reward cycle) or by permanent module upgrades.
- Available Domains — how many knowledge domains the brain can explore this run. The number on the right is the slot count (set by your dataset and extra slots from your HDD). The list below the row ("Active: ...") shows which specific domains you toggled on — see the next section.
Run Boosts
Run boosts scale cooling's effect — they shorten run duration and make each click worth more on top of whatever cooling you have installed. Three types, each with a fixed effect and a fixed 30-minute duration:
| Boost | Effect | Source |
|---|---|---|
| Quick Process | +25% run speed | Ru currency |
| Packet Filter | +35–70% run speed (by minigame result) | Packet Filter minigame (free) |
| Quantum Run | +140% run speed | Nu premium currency |
How they stack
- Cross-type stacks additively. Quick Process + Packet Filter + Quantum Run = up to +235% run speed (with a perfect Packet Filter round). A max-stacked run on a top-tier cooling rig cuts a 30-minute run down to under ten minutes.
- Same-type does NOT stack the effect. Buying a second Quick Process while one is active just extends the remaining duration — the +25% doesn't become +50%.
- Daily limit: 3 boosts per brain per day per type. In one 24-hour window, a single brain can be pushed by up to 9 run boosts total (3× Quick Process + 3× Packet Filter + 3× Quantum Run).
When to use them
- Packet Filter is the cheapest daily rush — one round of the minigame, +35–70% for half an hour depending on your score. If you need to close a run before a deadline, that's the pick.
- Quantum Run is the premium panic button — +140% for 30 minutes, no grind. Save for contract crunches, not routine grinding.
- Quick Process is the routine option — cheap in Ru terms, still a meaningful cut in run time. Best when you're already sitting on excess Ru.
Auto-Run (Autonomy upgrade)
Once you own the Autonomy upgrade, a brain can run on its own in a loop: one run after another, hands-off, on a single screen with a running Ru tally. It stops automatically when the brain gets too tired (fatigue-capped) — roughly a day's worth of runs before it needs a rest.
- The idle / AFK way to farm Ru. Steady, predictable, no combos apply. Great for overnight or back-of-desk sessions.
- Fatigue is the natural cap. When it maxes out, the loop stops and the brain needs a recovery run (Balanced) before it can start again.
- Not affected by combos. The Ru-per-run figure is what you'd get from a plain single run — auto-run just keeps repeating it.
Active domains — set on the Brain screen
You pick which domains are active on the Brain screen, not here. The Run Configuration screen only shows the result. Open Brain → Active Domains, tap any domain to toggle it on, and you'll fill the available slots:
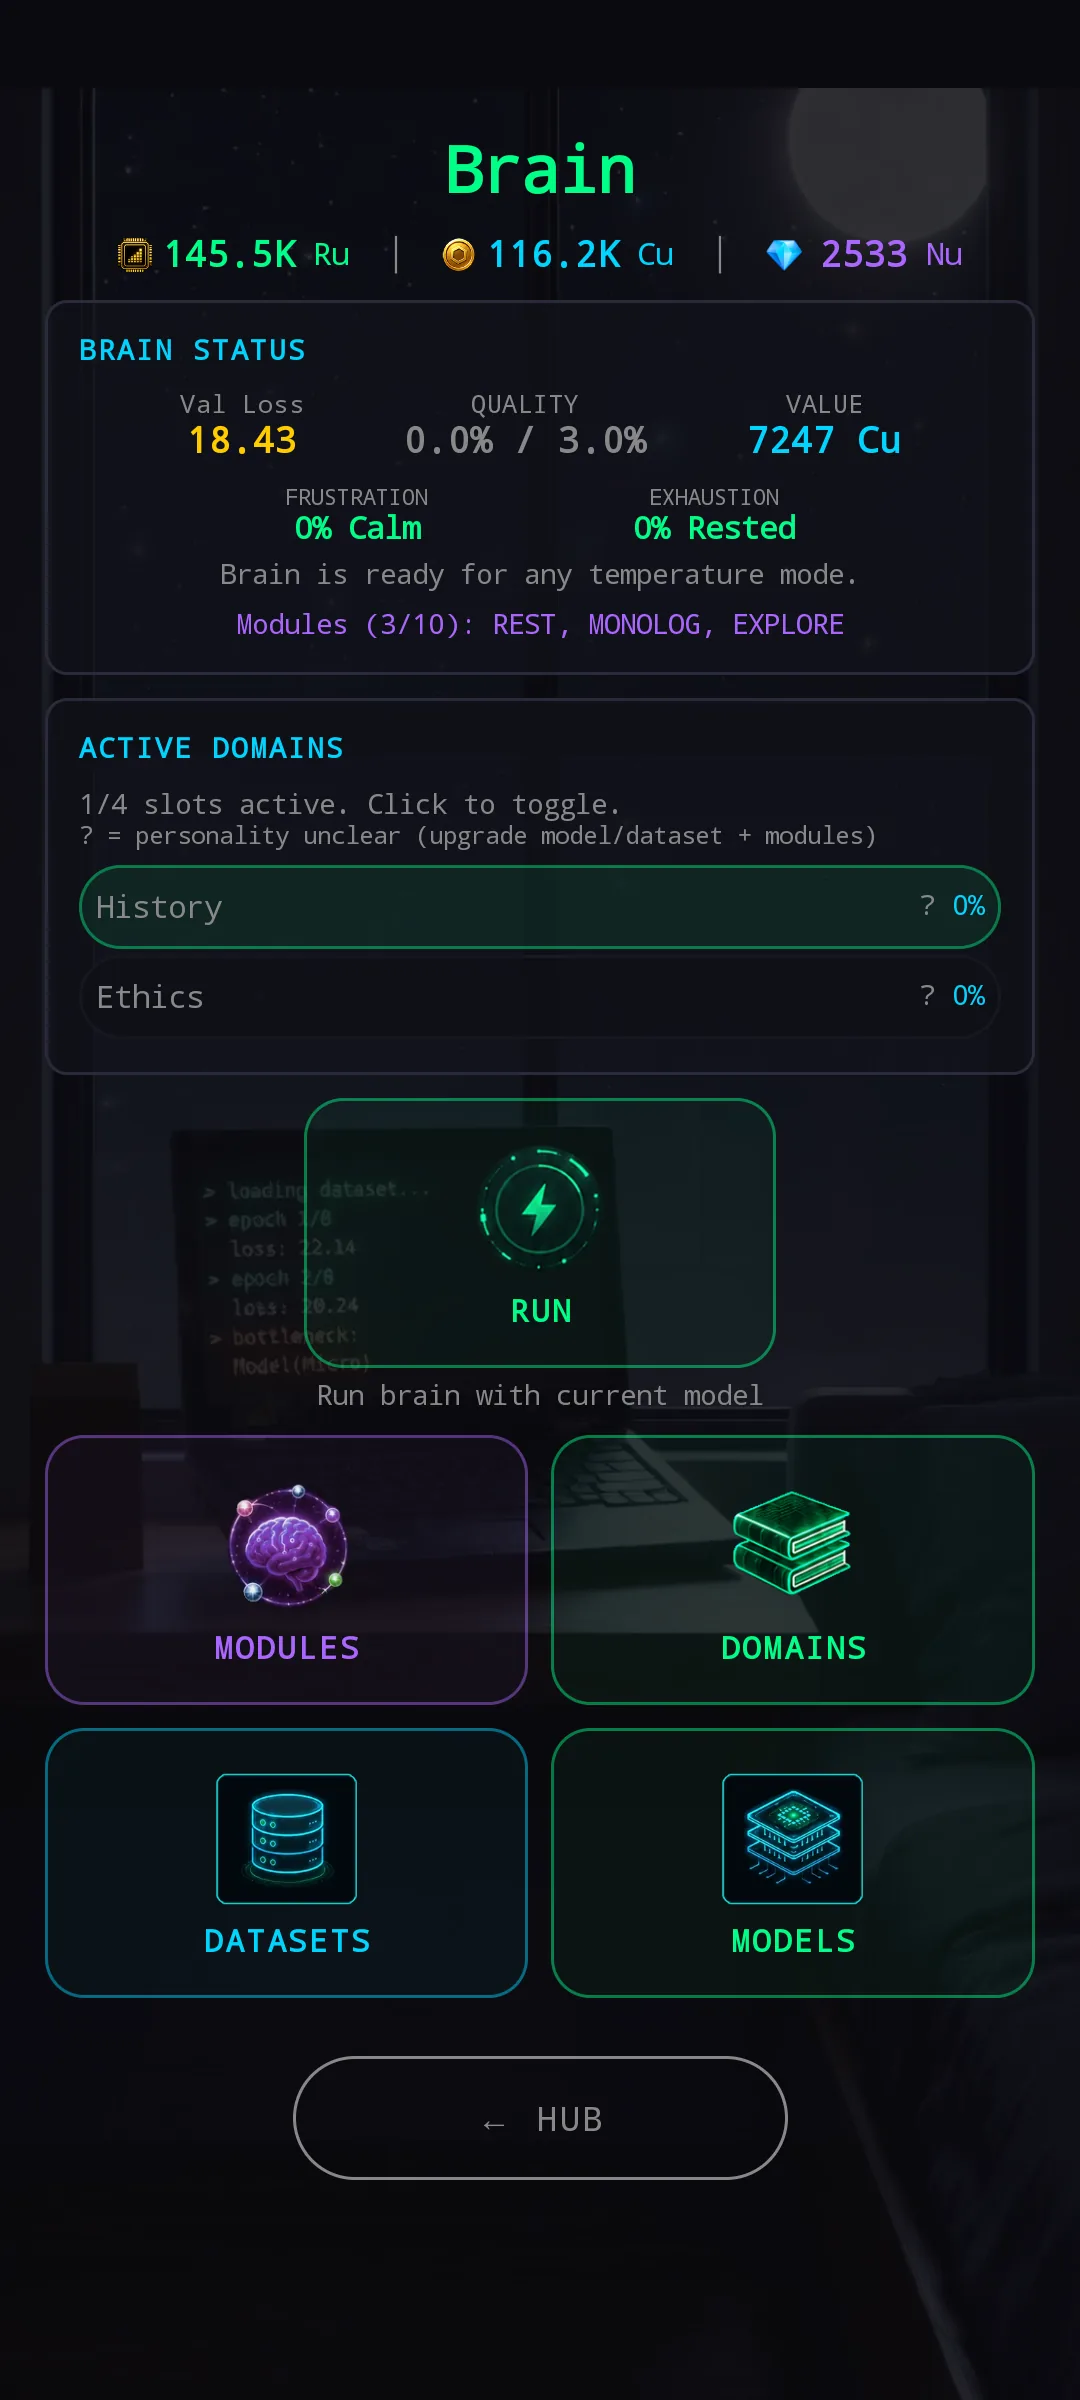
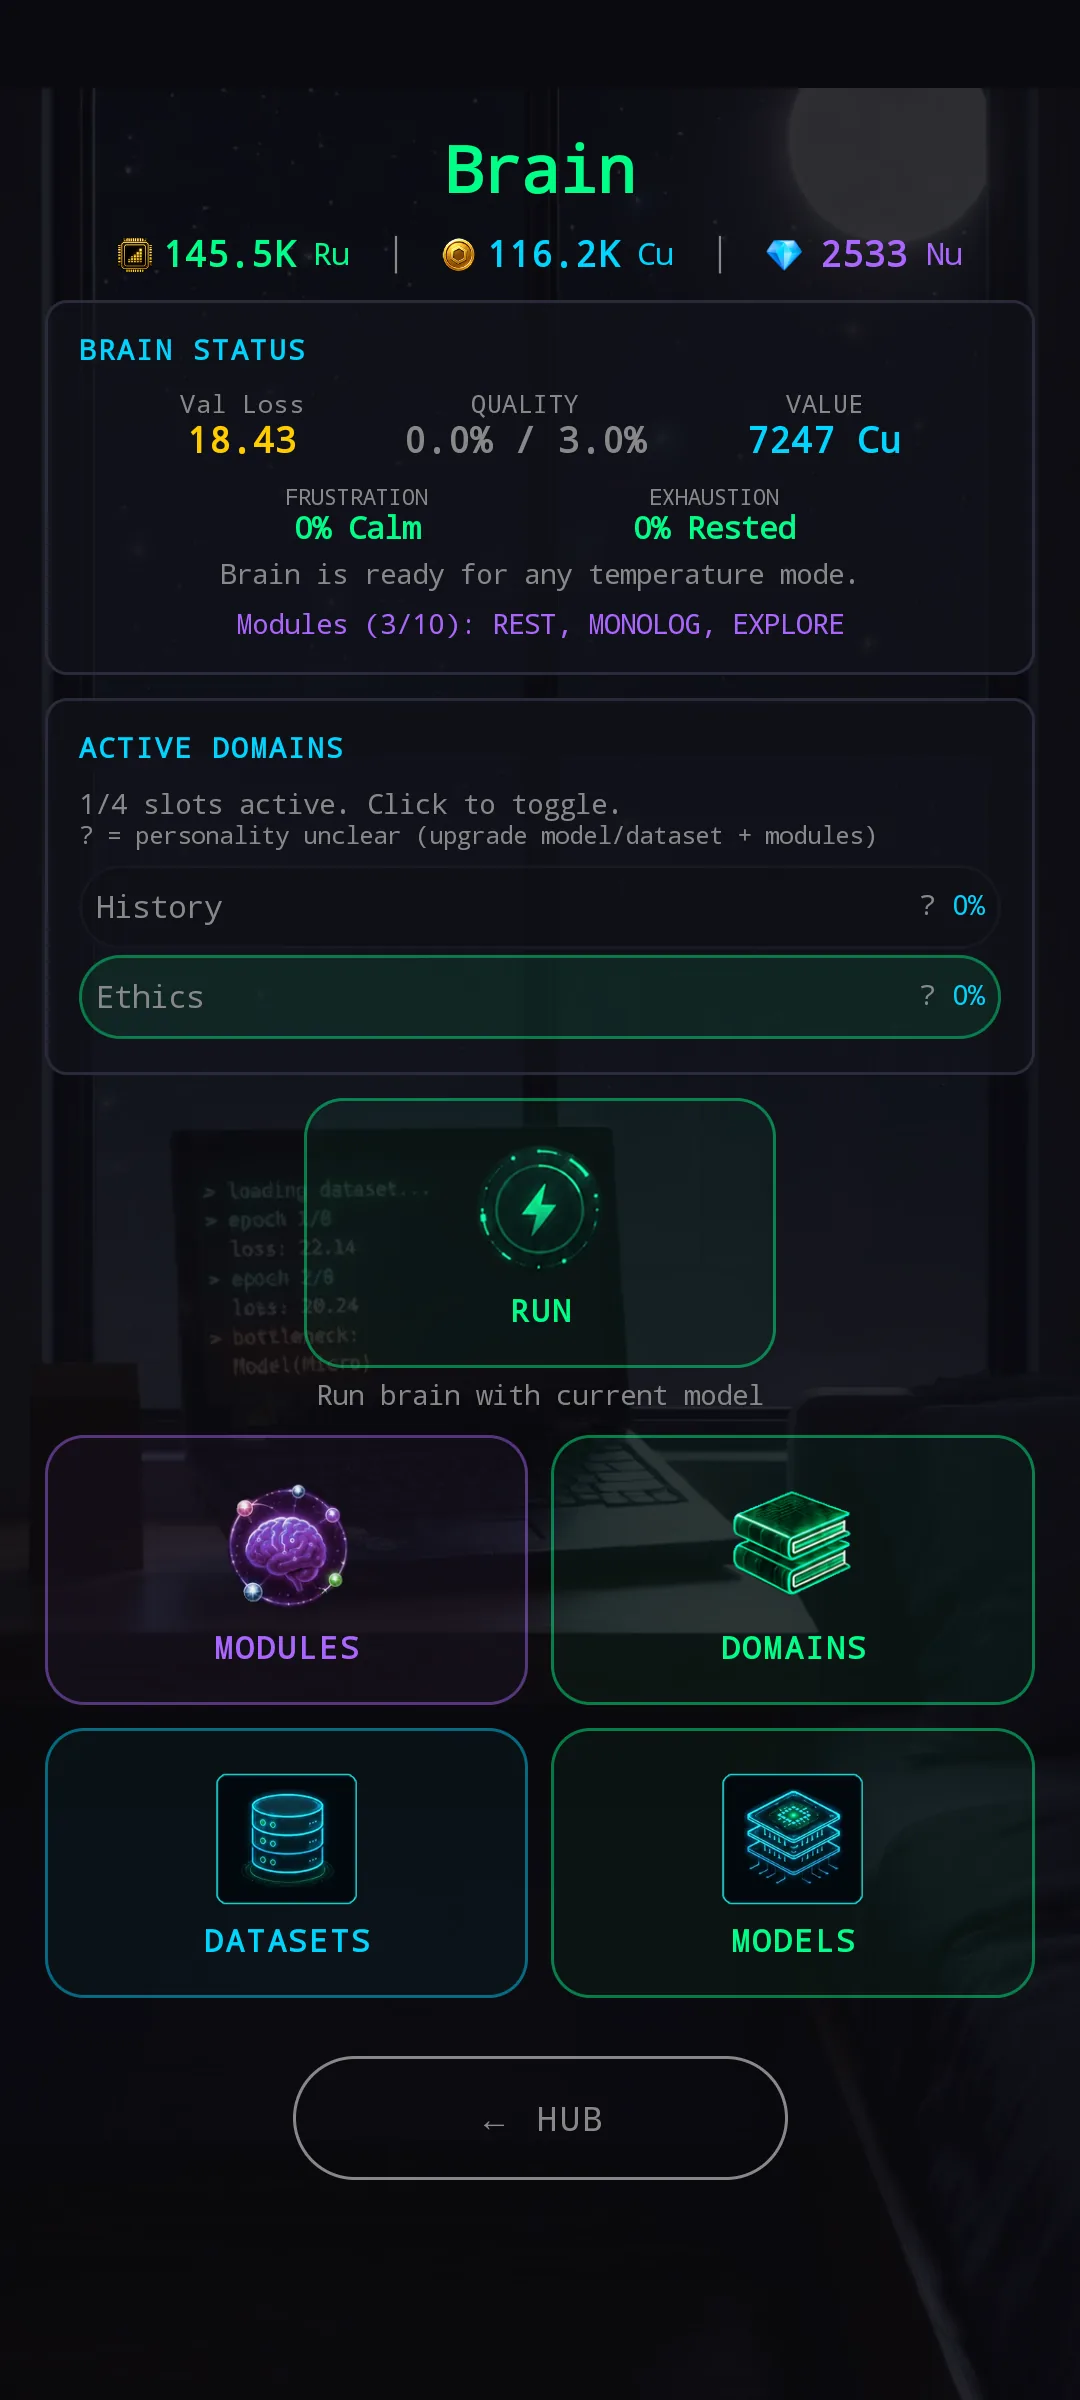
More active domains = the brain spreads its effort wider during the run. Fewer active = it goes deeper into the chosen one(s), which builds mastery faster on those specific topics. Before any run, you can also deactivate a fully mastered domain to free its slot for a fresh one — there's no point spending the slot on a domain the brain has already learned all it can.
Slot count grows with two things: your dataset's base allowance (larger datasets = more domain slots) and your HDD, which adds extra slots on top of the dataset baseline. See Hardware Basics for HDD details.
Combos
? below each
card is an info button, not a lock — combos you
cannot yet unlock do not show up here at all.
Combos are Ru-purchased boosts that stay active on the brain. Unlike one-shot run boosts, a combo you buy once persists across every run on the same brain — it stays on until you sell the brain, retrain it, or fine-tune it.
The starter combos unlock once you own the required foundation modules on the brain:
- Inner Peace — reduces frustration by 1% per hour of run time.
- Mindful Rest — reduces exhaustion by 1% per hour of run time.
Each visible combo card has a small ? info button
below it. Tap it to see the combo's full description, current
level, and the bonus per level — useful before deciding which
combo to invest Ru into. The ? appears under
every visible card, including ones you already own.
It's an info button, not a lock indicator.
Combos you cannot yet unlock — because you don't own the required modules — do not appear on this screen at all. To see what other combos exist and which modules they need, go to the Brain Lab. Run Configuration only shows the combos you've already qualified for (or already bought).
Buying a combo right before a run is fine and intended. Since the combo persists across runs, the cost amortizes — even a modest hourly buff on a brain you'll run dozens more times is a strong investment.
Starting the run
The START RUN button commits the configuration and launches the brain. BACK returns to the previous screen without spending anything.
From here you land on the Brain Running screen: live step counter, current domain, learning distribution across active domains, optional run boosts, and the option to hand the run off to background and return to the HUB. That screen has its own help page — /guides/run (coming soon).
Tips & tricks
- Cycle through temperatures, don't camp on one. Focused or Chaotic to push quality and Ru, Balanced to recover, Creative for a cash-out run. Pick the mode the brain's current state asks for, not the one you're used to.
- Watch frustration and exhaustion every run. They aren't just stats — they directly drag down Ru income once they get high, and a brain pushed past its limit can enter a death spiral that's hard to climb out of. Higher-tier contracts also tend to refuse over-stressed brains.
- Ru is the bottleneck for the whole loop. Modules, upgrades, and active combos all cost Ru. Don't dump it all on combos before you have the foundation modules — those modules are what unlock the combos in the first place.
- Stressed brain → short Balanced run before anything else. Recovery is cheap compared to losing a run to a death spiral.
- Grinding mastery for a contract → Focused on the right domain, multiple active domains toggled on, longer duration if you can afford the stress.
- Pure Ru target (gear or unlock) → Creative, longer idle run, plan a Balanced recovery run after.