Running a brain — telemetry, boosts, and the report
The two screens the brain lives inside while it's actually working — Brain Running (in flight) and the Run Report (at landing). This page walks the telemetry panel line by line, explains what the Overclock meter is really counting down, covers the packet area that replaced the old RUN button, the three run boosts, and reads the report at the end.
At a glance
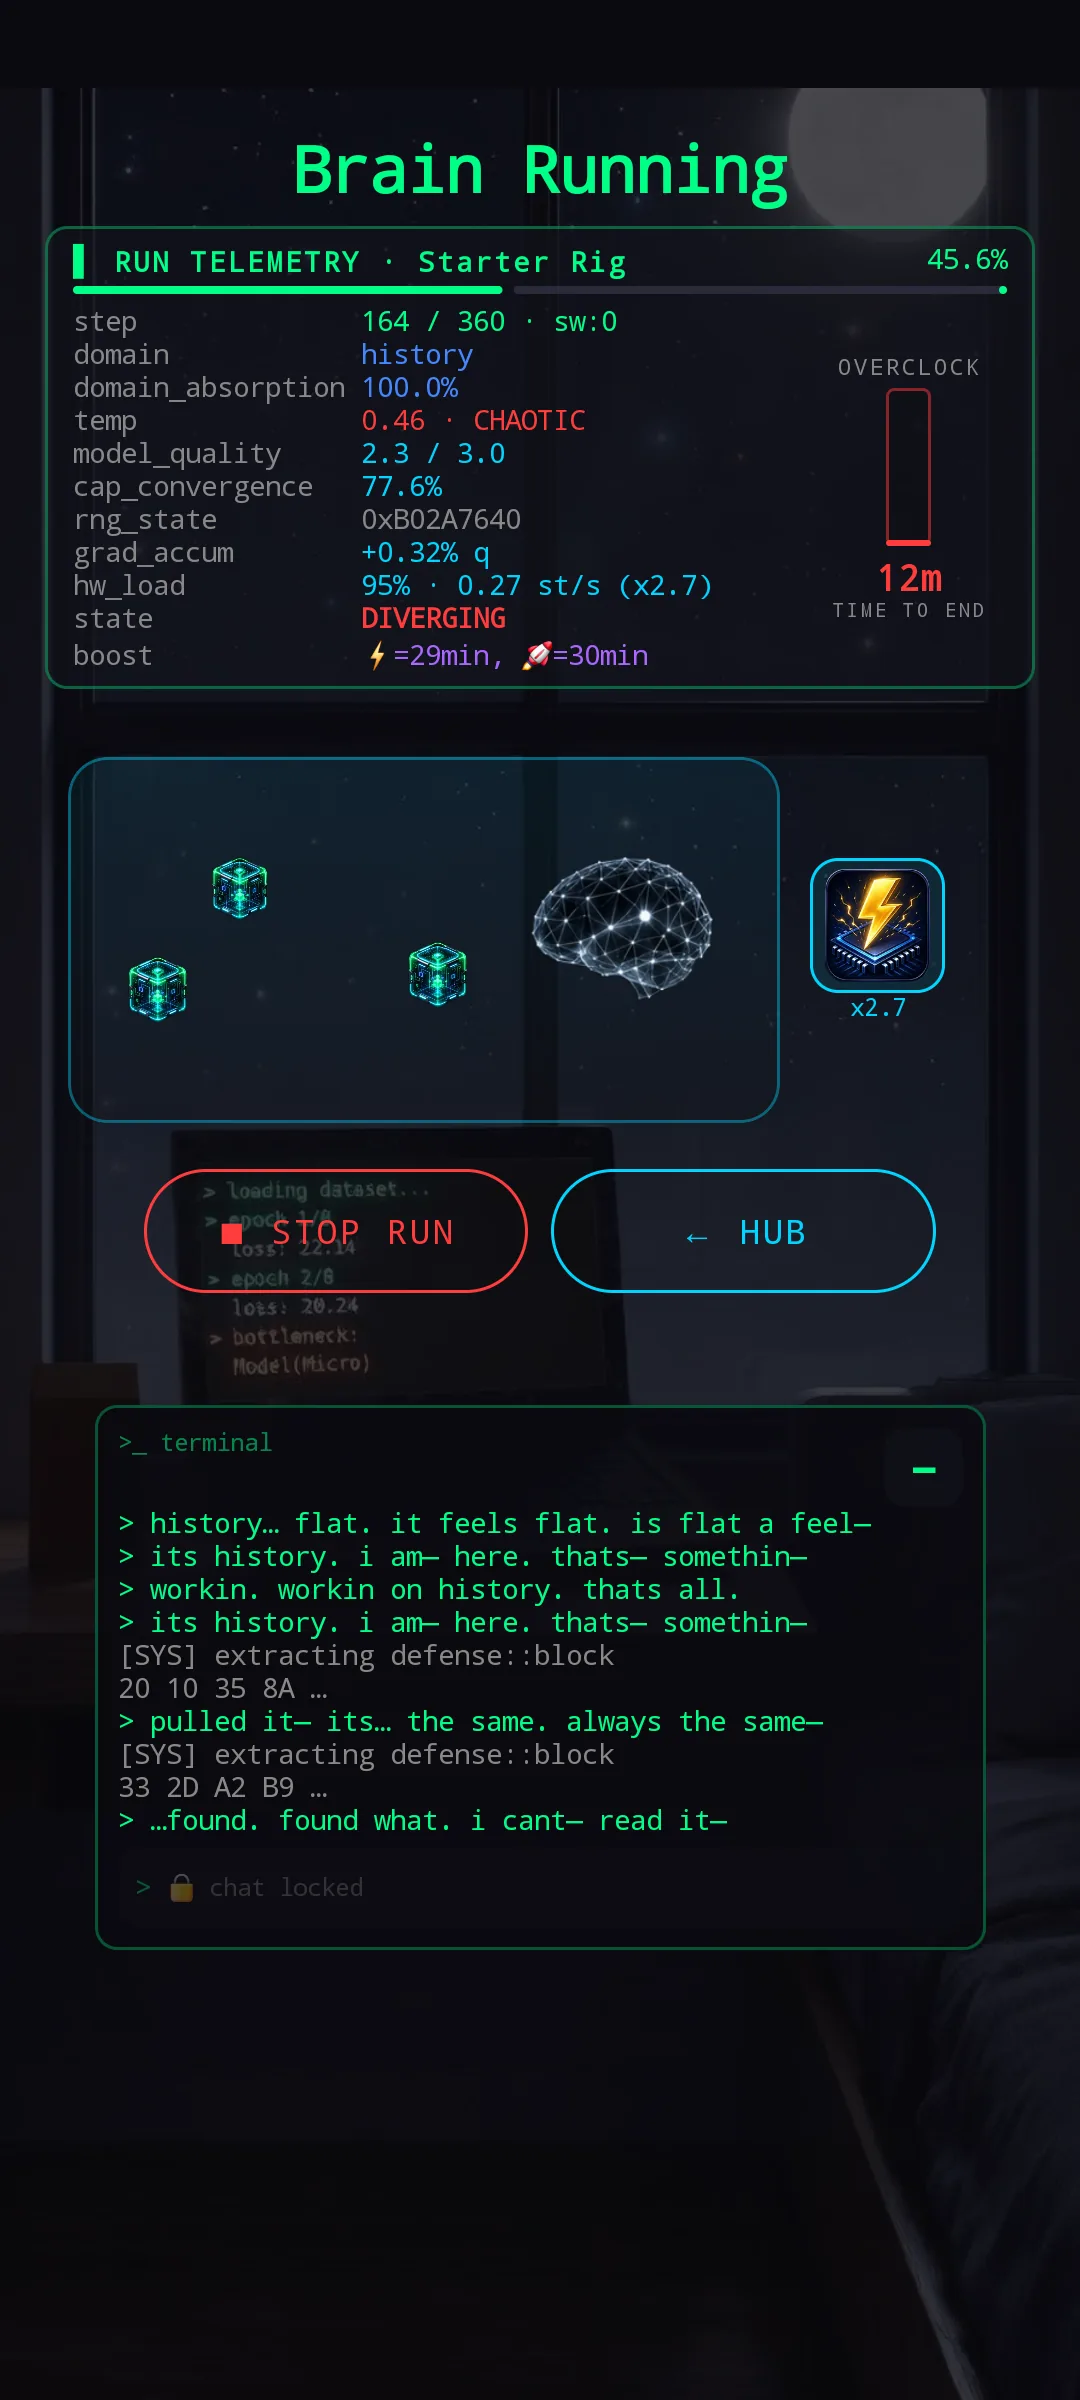
A run has four moving parts on this screen: the Run Telemetry panel that reports live numbers, the Overclock meter that counts down the idle finish time, the packet area where data packets flow into the brain (and where a tap accelerates the next one), and the Run Boosts button that opens the time-shortening upgrades. Underneath all of that is the terminal — the brain's inner monologue while it works.
- RUN TELEMETRY — the live status panel
- OVERCLOCK — the countdown meter
- The packet area — where the run happens
- Run Boosts — Quick Process, Packet Filter, Quantum Run
- STOP RUN vs. HUB — leaving the screen
- The terminal — what the brain is thinking
- RUN REPORT — reading the summary
- Quick tips
RUN TELEMETRY — the live status panel
The telemetry panel at the top of the screen is the brain's instrument cluster. Rig name (e.g. Starter Rig) sits in the header along with the run progress bar. Each line below reports one live value that updates as the run moves forward:
- step — steps completed / total steps for
this run, plus
sw:N, the count of software triggers that fired so far this run. Total step count is set by cooling and by the boosts you activated. - domain — which knowledge domain the brain is currently working on. If more than one domain is active, this value flips as the brain moves attention between them.
- domain_absorption — how well the brain is currently absorbing that domain, as a percentage. Higher is better; a domain the brain has already mastered will read lower here because there's less left to soak up.
- temp — the temperature mode you set in Run Configuration, both as a numeric value and a label (FOCUSED, BALANCED, CREATIVE, CHAOTIC).
- model_quality — current quality / the cap this brain can reach. This is the number that matters at sale.
- cap_convergence — how close to the cap the current quality is, as a percentage. 100 % means the brain has hit its ceiling for this configuration.
- rng_state — a per-run RNG seed. It's there for transparency (so nothing is being generated behind your back) and for repro if something looks off.
- grad_accum — quality gained per step, averaged over the last window. Positive means the brain is improving; near-zero on a mastered-only run means the brain has nothing left to learn.
- hw_load — how hard the current rig is
being pushed as a percentage, and the current throughput
in
st/s(steps per second). When a boost is active the line also shows the multiplier (e.g.0.27 st/s (×2.7)). - state — what phase the brain is in right now (IDLE, ENCODING, GENERALIZING, DIVERGING, and so on). It's a flavour label on top of what the numbers say, but it does track a real underlying phase in the run.
- boost — appears only while at least one
boost is running; lists each active boost's icon and its
remaining time (e.g.
⚡ = 29 min, 🚀 = 30 min). Same information you'd otherwise have to open the Boosts modal to see.
OVERCLOCK — the countdown meter
To the right of the telemetry sits the OVERCLOCK
meter — a vertical bar with a big time-to-end number under it
(e.g. 45m TIME TO END). That's the projected
idle finish time given the current hardware, boost stack, and
click pace.
The meter fills up as boosts stack on top of each other. On a clean run with no boosts it's a low bar; with a full stack of Quick Process + Packet Filter + Quantum Run it fills toward the top and the countdown compresses accordingly.
The time is projected, not measured. Clicks change it in real time as they add steps.
The packet area — where the run happens
The framed rectangle in the middle of the screen is the
packet area. Data packets stream in from the
left and drift toward the brain on the right. This is the
same click target the old RUN circle used to be
— a tap anywhere inside the frame counts as
a click and nudges the nearest packet forward. Packets aren't
the target; they're the response.
What you see in that area is a live picture of the run rather than decoration:
- How many packets are in flight — two at idle, plus one per active boost. Quantum Run adds two. A stacked run visibly has more traffic than an unboosted one — the first time it's obvious at a glance that Quantum is doing more work than Quick Process.
- How fast they travel — the flow speed is
the real
stepsPerSecfrom telemetry. Better cooling makes it faster permanently; an active boost makes it faster while it lasts; a tap gives the nearest packet a short forward push. - How big the brain looks — the brain grows
with
cap_convergence. Starts at roughly two-thirds of the frame, fills toward full as quality approaches the model's ceiling. A brain at full size is a brain at its cap.
Every so often a larger packet arrives — a little bigger than the rest, and hitting it directly is worth slightly more steps than a blind tap. Missing it costs nothing; it's a small aim reward for people who watch the screen.
cap_convergence hits 100 %, the brain has
learned everything it can from the current setup. Incoming
packets don't disappear into it — they visibly rebound. The
terminal keeps running, though: fragments still
extract, Ru still accrues. The two together read as one
sentence — it won't get better, but it still pays.
That's the signal to sell.
On a Configure Run screen a small guardrail confirms the same thing: attempting to start another run on a maxed model brings up a Quality ceiling reached popup with two choices — RUN ANYWAY (fine for the Ru and loot; the quality number won't move) or SELL IT. There's a "Don't show this again" checkbox once you know the signal.
Run Boosts — Quick Process, Packet Filter, Quantum Run
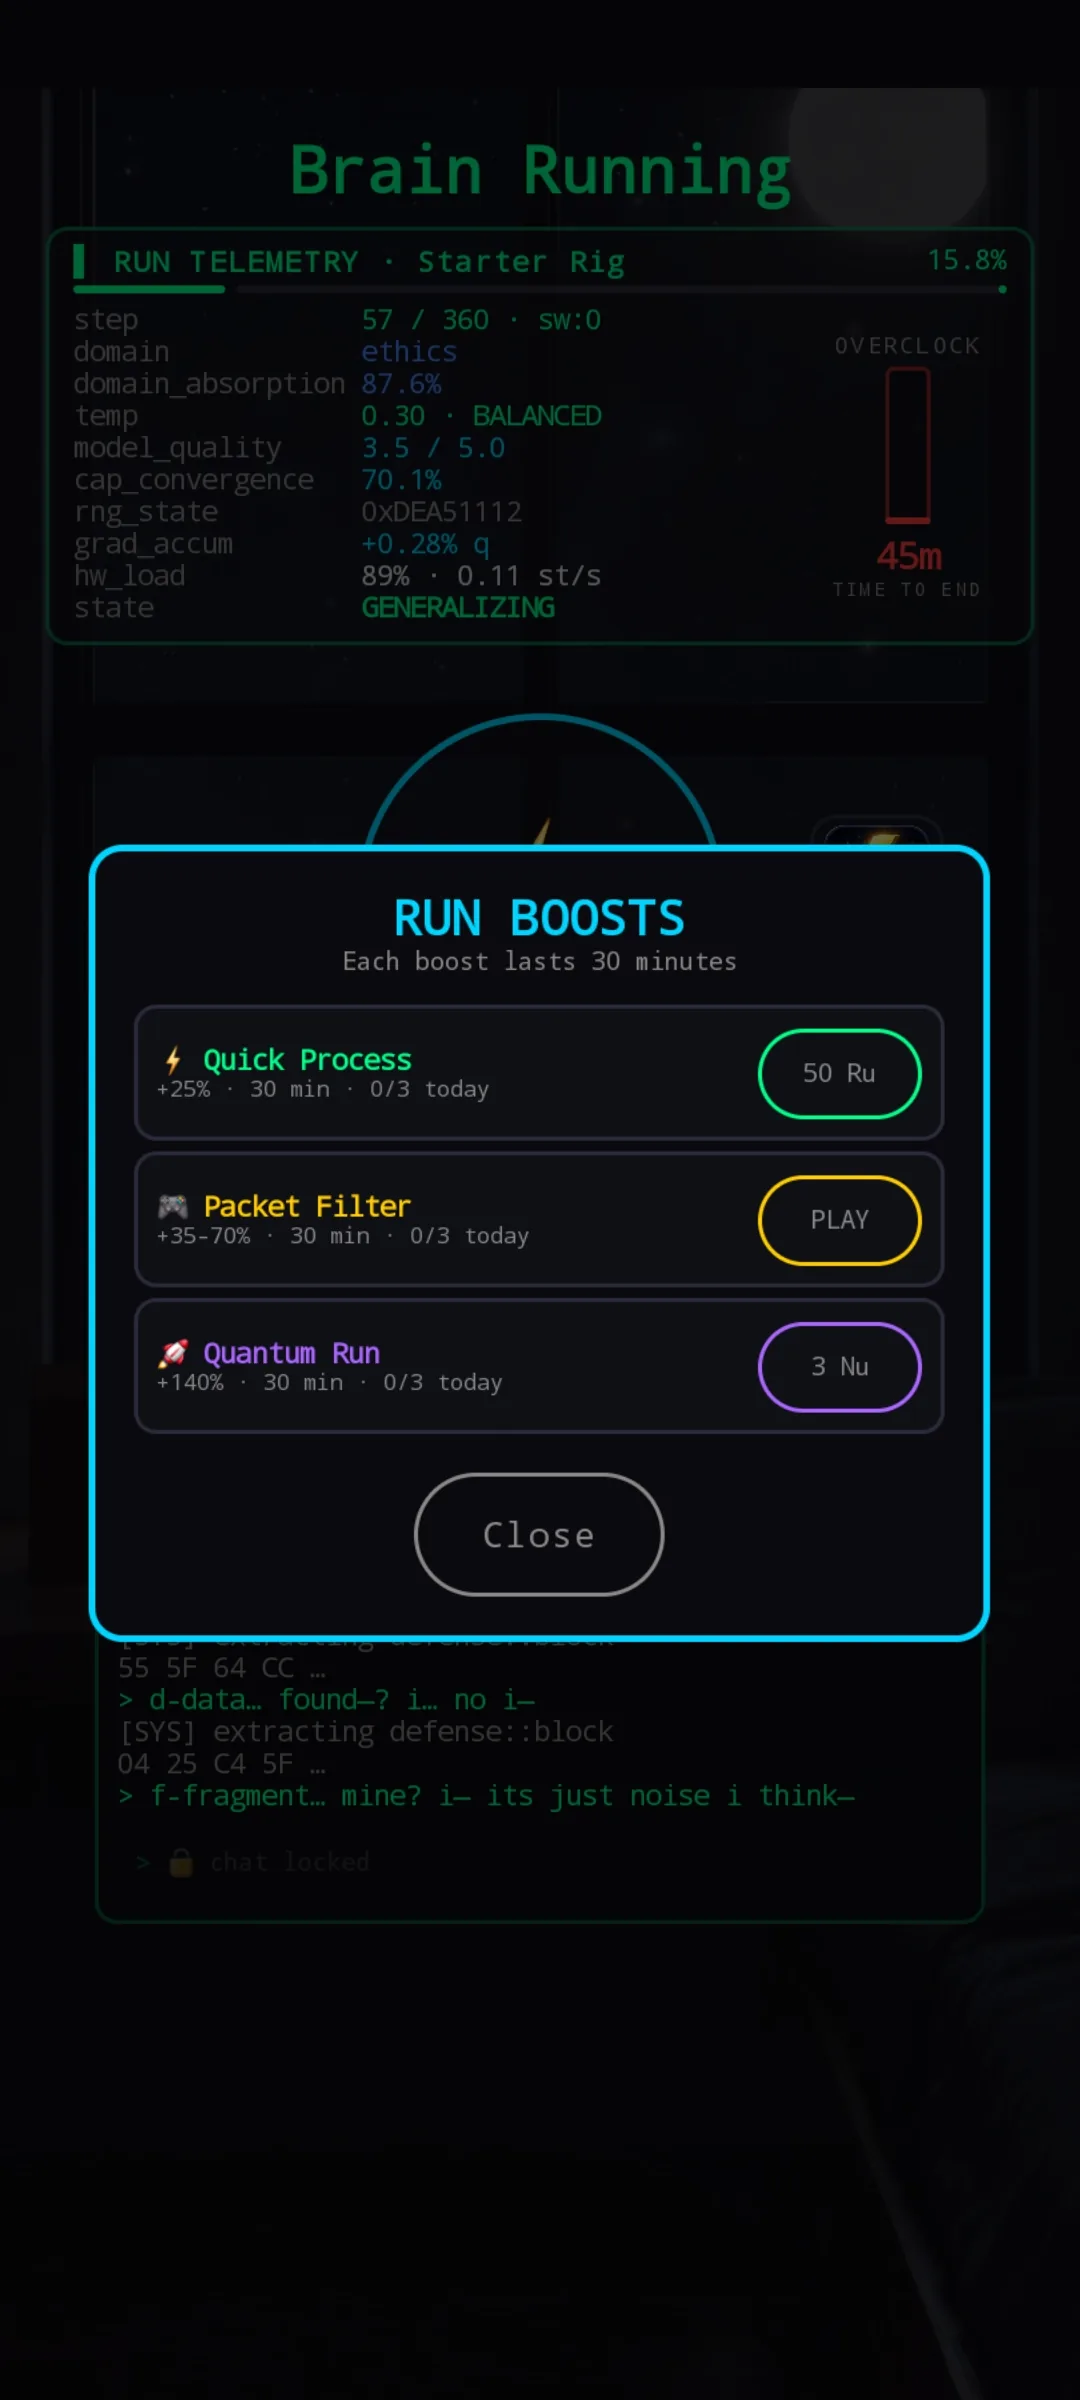
The BOOST icon next to the click circle opens the Run Boosts modal. Three boosts, each with a fixed 30-minute duration and a daily cap of 3 per brain per type:
- ⚡ Quick Process — +25 % run speed for 30 min. Costs Ru. The routine boost — cheap in Ru terms, meaningful cut in run time. Best when you're already sitting on excess Ru.
- 🎮 Packet Filter — +35–70 % run speed for 30 min, depending on your score in the Packet Filter minigame. Costs one round of the minigame, no currency. The cheapest daily rush — a good round beats Quick Process by a wide margin. See the Packet Filter minigame reference for how the round scores.
- 🚀 Quantum Run — +140 % run speed for 30 min. Costs Nu (premium). The panic button — no grind, big cut. Save it for contract deadlines, not routine grinding.
Cross-type stacks additively. Quick Process + Packet Filter (best round) + Quantum Run stacks to a big time cut — a max-stacked run on a top-tier cooling rig can finish a 30-minute idle run in single-digit minutes.
Same-type does not stack the effect. Buying a second Quick Process while one is active just extends the remaining duration — the +25 % doesn't become +50 %. Daily cap is per-type, so you can burn three of each in one 24-hour window (nine boosts total on one brain, most demanding bracket).
STOP RUN vs. HUB — leaving the screen
Two buttons under the click circle. They do very different things, and one of them is more expensive than it looks:
- STOP RUN (red) — aborts the run. Everything the brain did up to this point is thrown away — no Ru, no code extraction, no Run Report. Only use it if you're certain the current run is a total write-off (wrong domain configuration, wrong temperature, realized mid-run the model shouldn't be running at all). Otherwise let the run finish; even a bad run pays something.
- ← HUB (cyan) — leaves the screen but doesn't stop the run. It keeps ticking in the background at its current pace; you can come back to Brain Running any time and see the current state, or wait for the finish and pick up the Run Report from HUB.
The terminal — what the brain is thinking
The green-framed panel at the bottom of the screen is the terminal — a live scrolling readout of what the brain is doing internally. Two things happen in it:
- System lines —
[SYS] extracting hack::block,[SYS] extracting defense::block, hex dumps. These are what the brain is actually pulling out of the data — the raw code fragments that become the Ru you'll earn. - Chat lines — the brain's inner monologue in real time ("oh— oh this one is— its GOOD i can feel it—", "⚡ signal amplification", "f-fragment… mine? i— its just noise i think—"). Flavour. Doesn't drive mechanics, but it tells you something about how the brain is feeling about what it's doing.
The 🔒 chat locked line at the bottom means
you're reading the brain's monologue but can't talk back —
it's one-way at this stage of the game.
RUN REPORT — reading the summary
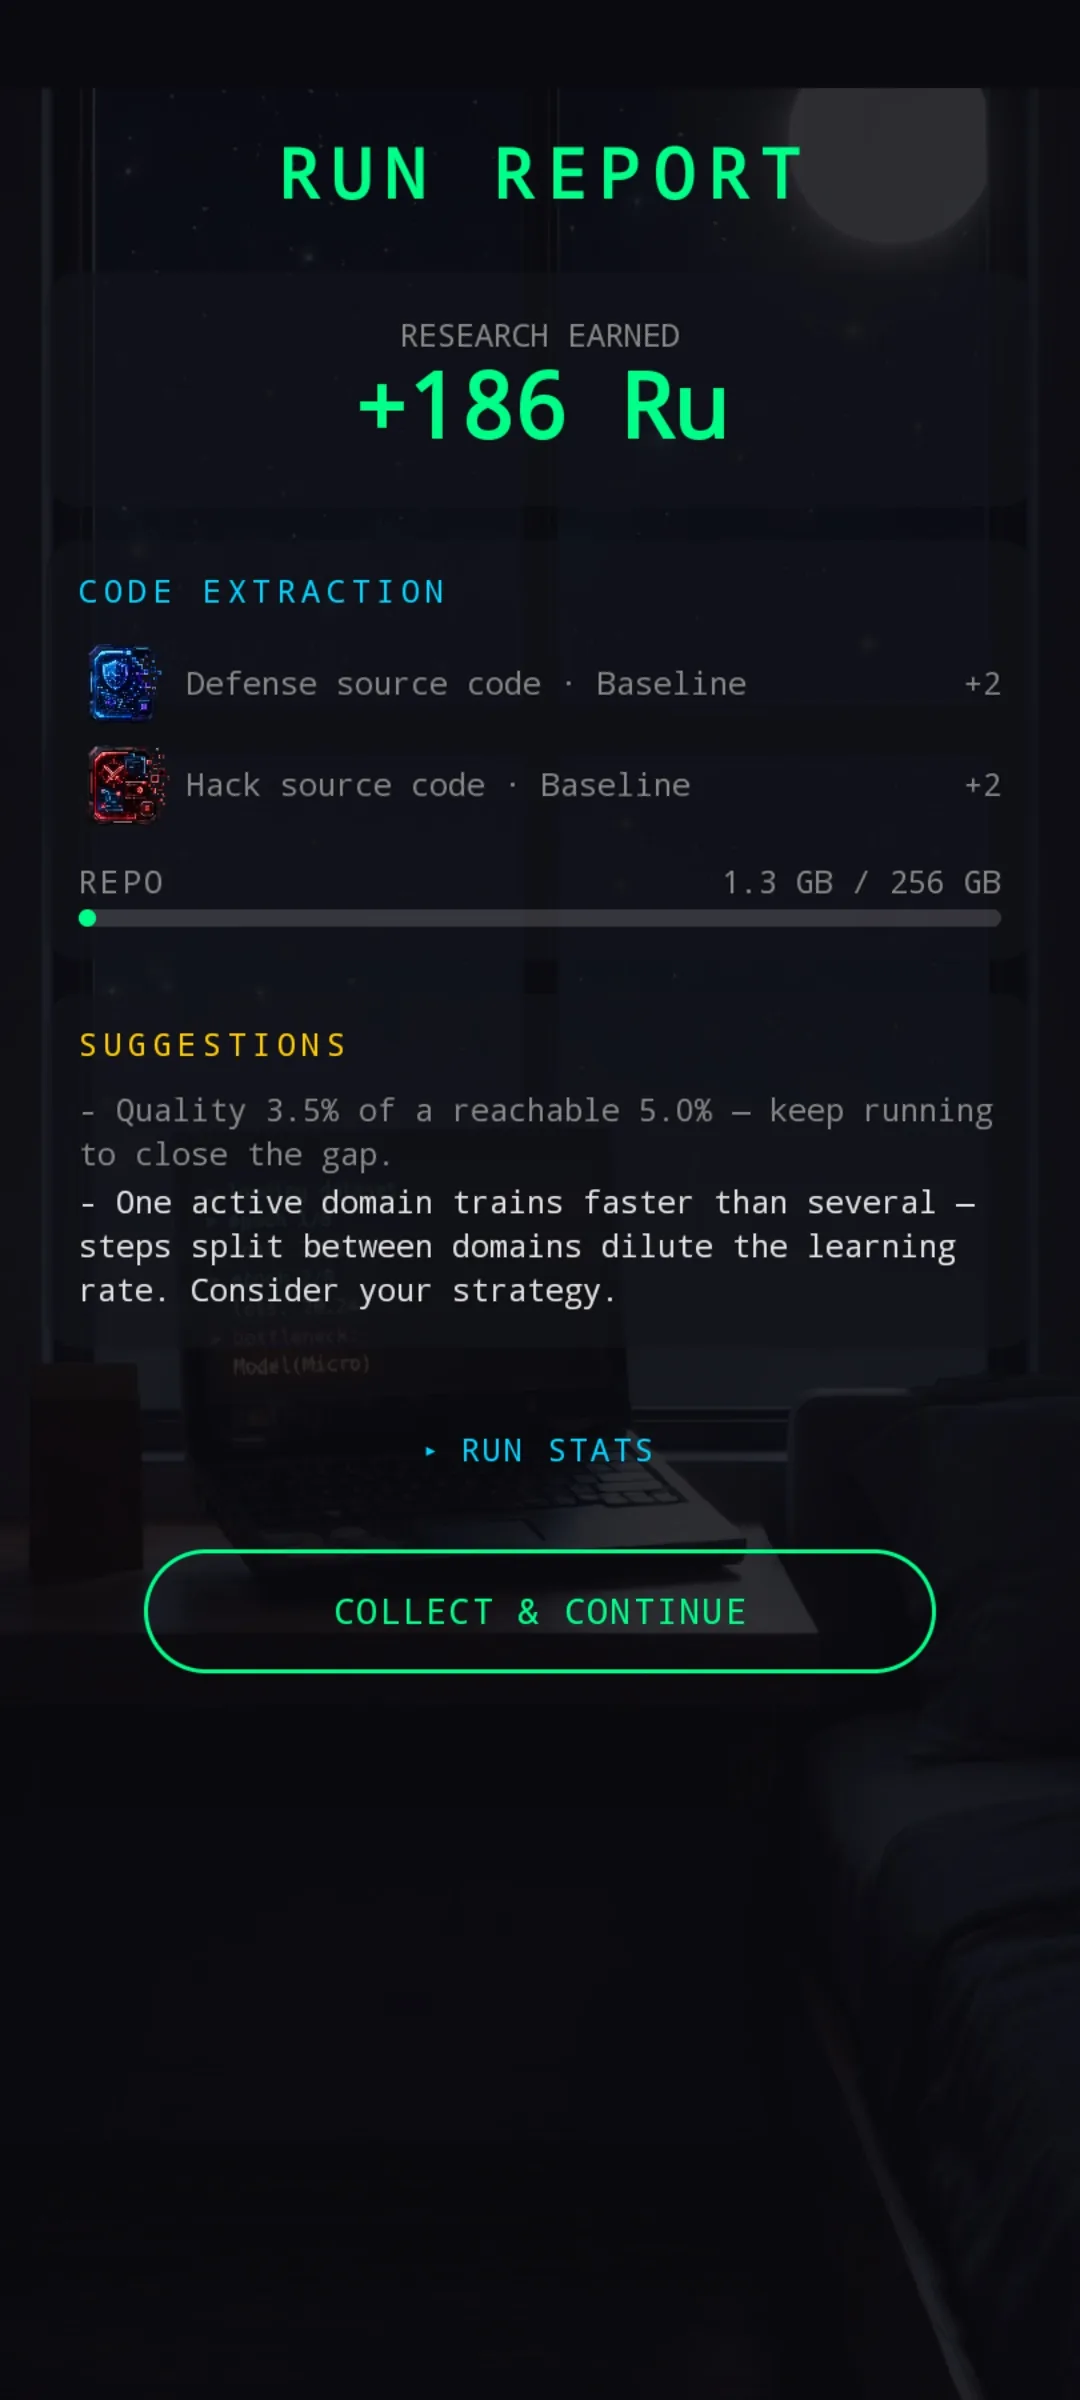
When the run finishes on its own, the RUN REPORT lands (STOP RUN does not — see §stop-hub). Three blocks worth reading:
- RESEARCH EARNED — the Ru number, big and centered. This is what the run added to your Ru wallet.
- CODE EXTRACTION — SW Papers the brain
pulled out during the run. Each line names a
corpus (Defense source code, Hack source code,
Formal Methods, Empirical Sciences, Globalset), a
rarity (Baseline through Emergent), and a count
(
+N). Papers land in the Repo, the second tab of Neuron Archiv, and count against your total repo capacity — the REPO 1.3 GB / 256 GB bar underneath. Papers are the raw material for SW; see the Refactoring guide for what happens to them once they're compiled and installed. - SUGGESTIONS — dynamic advice generated from what actually happened during the run. Typical hints: "Quality X % of a reachable Y %, keep running to close the gap", "one active domain trains faster than several — steps split between domains dilute the learning rate". The suggestions box only says things that are true about this specific run. Read them — they're free tuning notes.
The ▸ RUN STATS button expands a detailed per-domain breakdown of the run — quality contribution per domain, mastery movement, boost stack that was active, and the underlying numeric telemetry at run end. Optional reading; the summary above is enough for most cycles.
COLLECT & CONTINUE commits the Ru and the extracted papers into your inventory and drops you back on HUB. Nothing you saw in the report can be re-rolled or re-read after this — screenshot the RUN STATS panel if you're doing balance research.
Quick tips
- Watch
grad_accum, not just quality. If it drifts to near-zero, the brain has nothing left to learn on the current active domains and you're wasting cooling time. Either add an unmastered domain or stop the run. - Boosts stack, but same-type doesn't. One of each stacks to a big time cut; two Quick Processes just extend the timer. Plan the stack, don't spam it.
- Packet Filter is the cheapest daily boost. No currency cost, a good round beats Quick Process. If you're picking one boost per run, this is usually it.
- HUB doesn't stop the run — but neither should you. HUB backgrounds the run and keeps it earning. STOP RUN discards everything (no Ru, no papers). Almost always, you want HUB.
- Long idle runs, don't tap. Twenty taps drops the idle bonus to zero. On a 24-hour run with a big idle bonus, that bonus is worth more than throughput.
- Read the brain, not just the number.
The brain in the packet area grows as
cap_convergenceclimbs; at 100 % it fills the frame and packets bounce off it. That's the sell signal — faster to read than watchinggrad_accumdrift. - Read the Suggestions in the report. The dynamic hints there fit the run you just did — they're the highest signal-to-noise coaching the game gives.