v1.2.5 — Pretrain redesign + more
Pretrain Configuration screen rebuilt as a drill-down accordion. Plus a new Welcome Tutorial for first-time players, a Daily Rewards screen, Black Market vouchers, live per-hour brain rates in Run config, balance tweaks, and bug fixes.
v1.2.5 started as a Pretrain Configuration overhaul and quietly grew into one of the bigger releases on this branch. The headline is still the redesigned Configure Training screen, but tucked alongside it: a step-by-step Welcome Tutorial for first-time players, a dedicated Daily Rewards screen, a 3-tier Black Market voucher system, and live per-hour brain rates in Run config so you can see what a combo actually does the moment you tap it. Plus the usual balance tweaks and bug fixes.
📜 The old screen — wall of dials
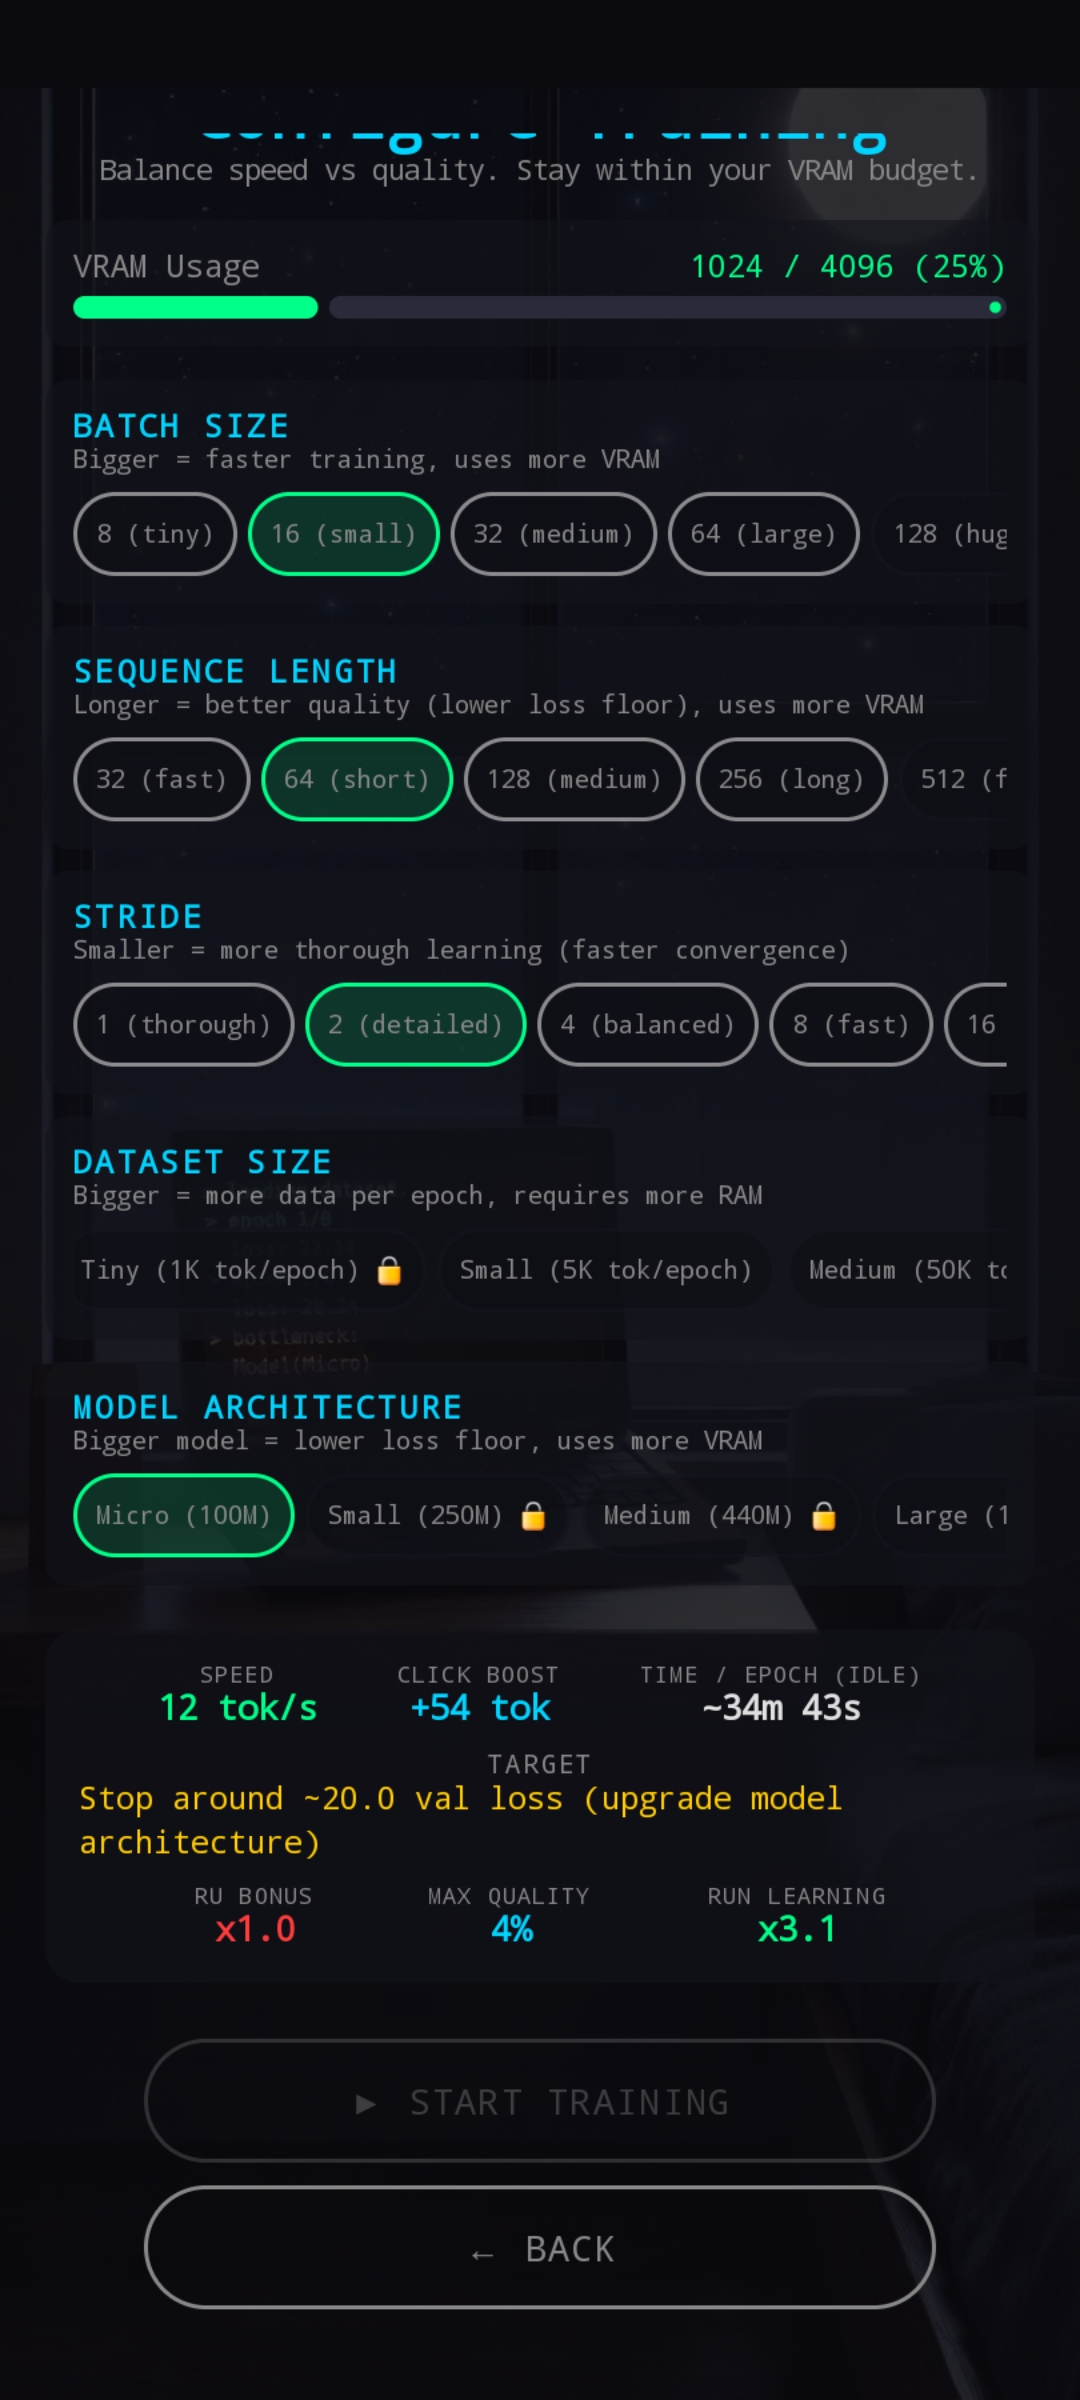
The old Configure Training was a vertical list of five sections — Batch Size, Sequence Length, Stride, Dataset Size, Model Architecture — each with its own row of horizontal pill chips. All open all the time, taking roughly 105% of the screen height. Tweak one dial at the top, see how it changed the SPEED / CLICK BOOST / TIME-EPOCH stats at the bottom — except the stats panel was off-screen unless you scrolled down. Tap a chip up top, scroll down to read the impact, scroll back up to tweak again. Not great.
It got worse on bigger rigs, where the parameter ranges open up and chip rows started overflowing horizontally.
🎯 The fix — Tier-1 selector + accordion
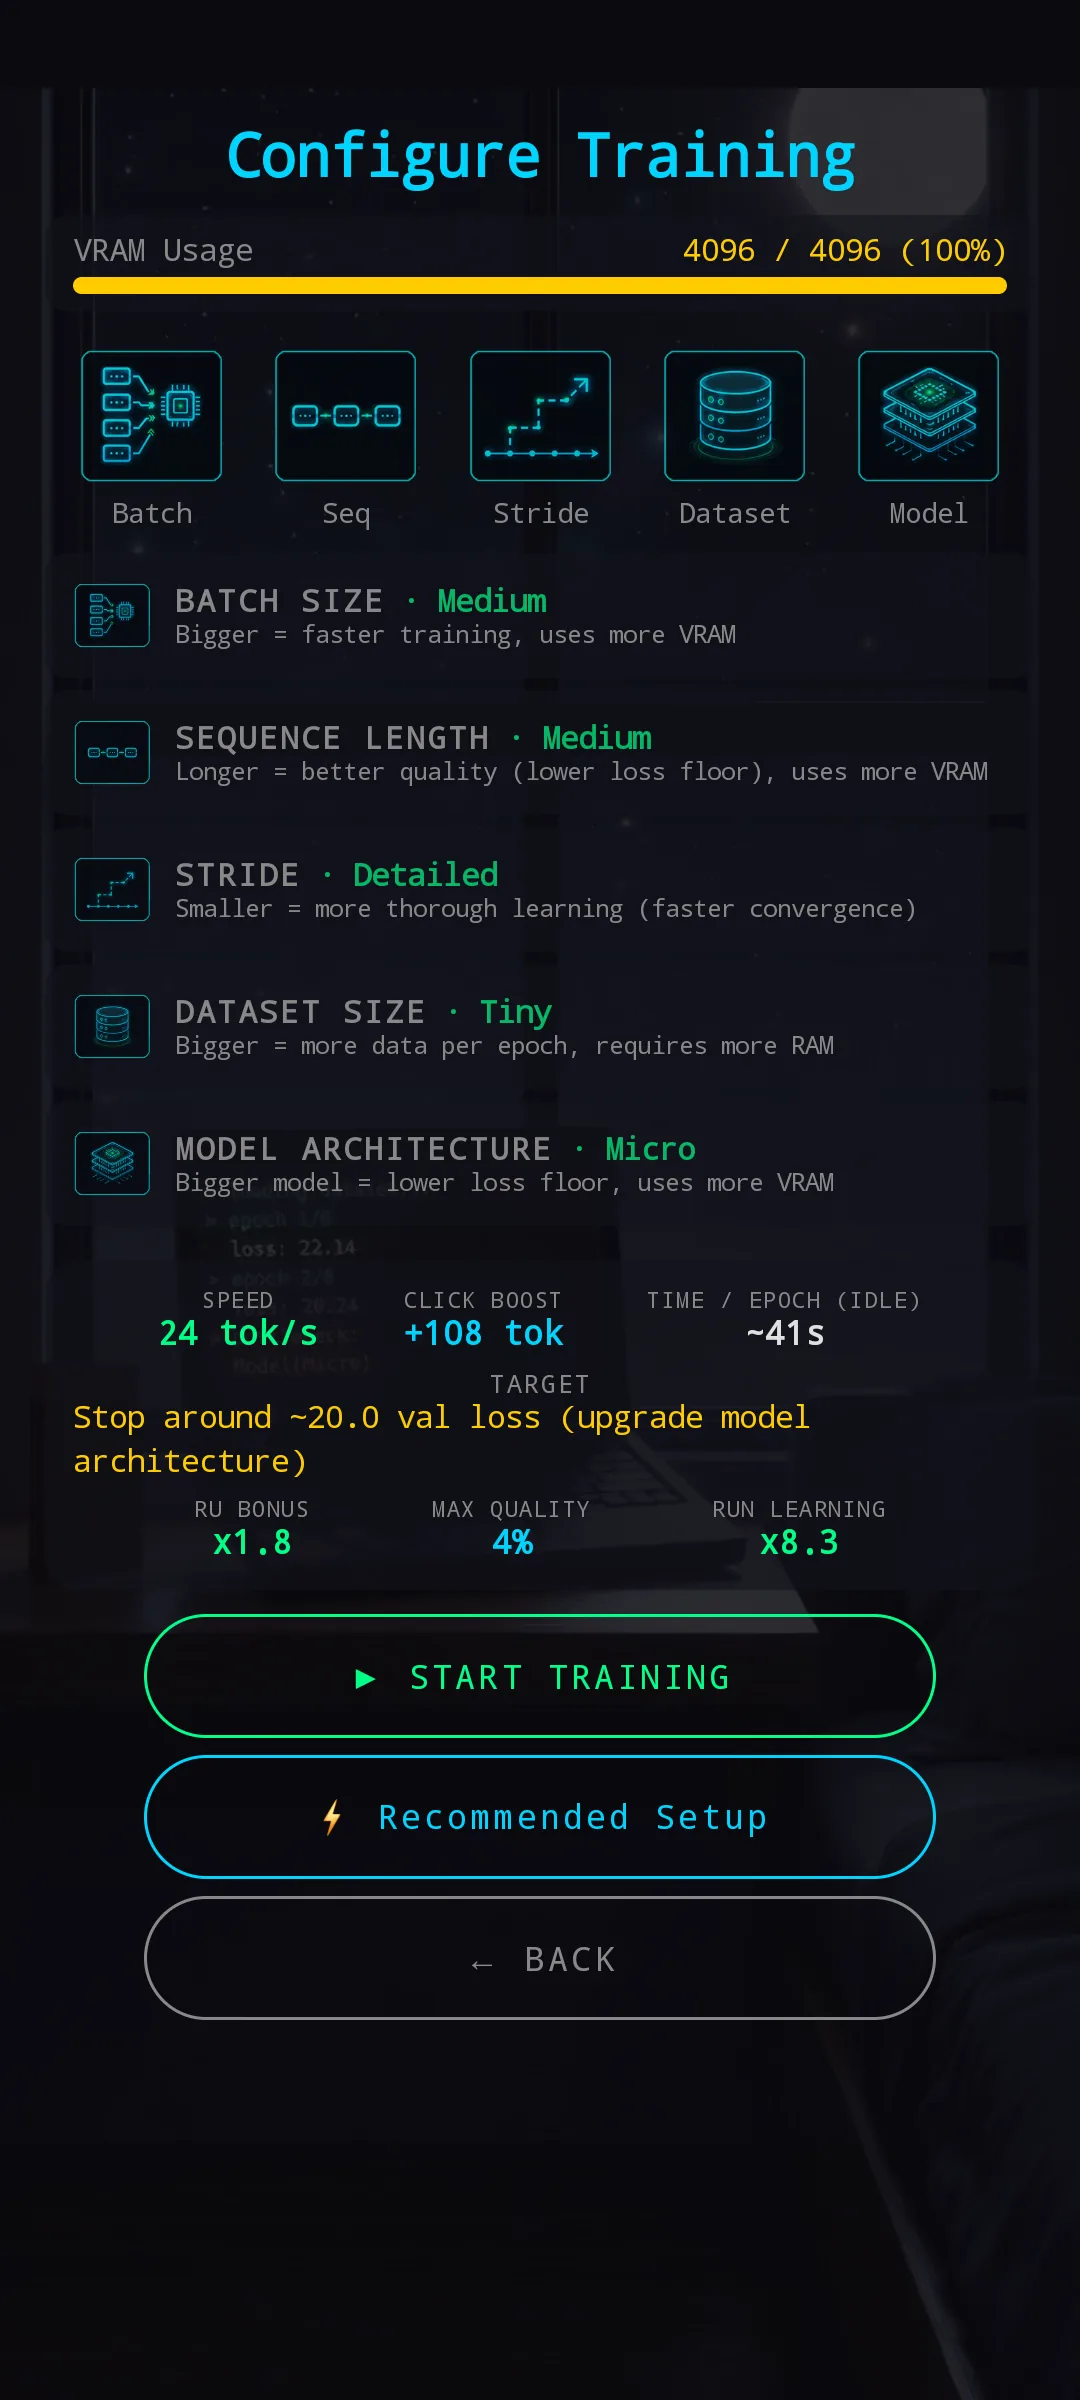
The new screen has two tiers:
- Tier 1 — top selector. Five large category icons under the VRAM bar (Batch / Seq / Stride / Dataset / Model). Selected one gets a cyan radial glow and grows by a few dp.
- Tier 2 — accordion sections. Five collapsed rows underneath. Each row’s title shows the current value next to it (
BATCH SIZE · Medium,STRIDE · Thorough) so you see the whole setup at a glance without expanding anything.
Tapping a top icon — or the row header directly — expands that one section. Tap again to collapse. Only one section is open at a time, the others stay collapsed.
The stats panel and START TRAINING button live at the bottom under the accordion. Because only one section is expanded, the whole screen now fits comfortably in one phone height for every state — no scrolling between “tweak the dial” and “read the impact”.
Batch expanded
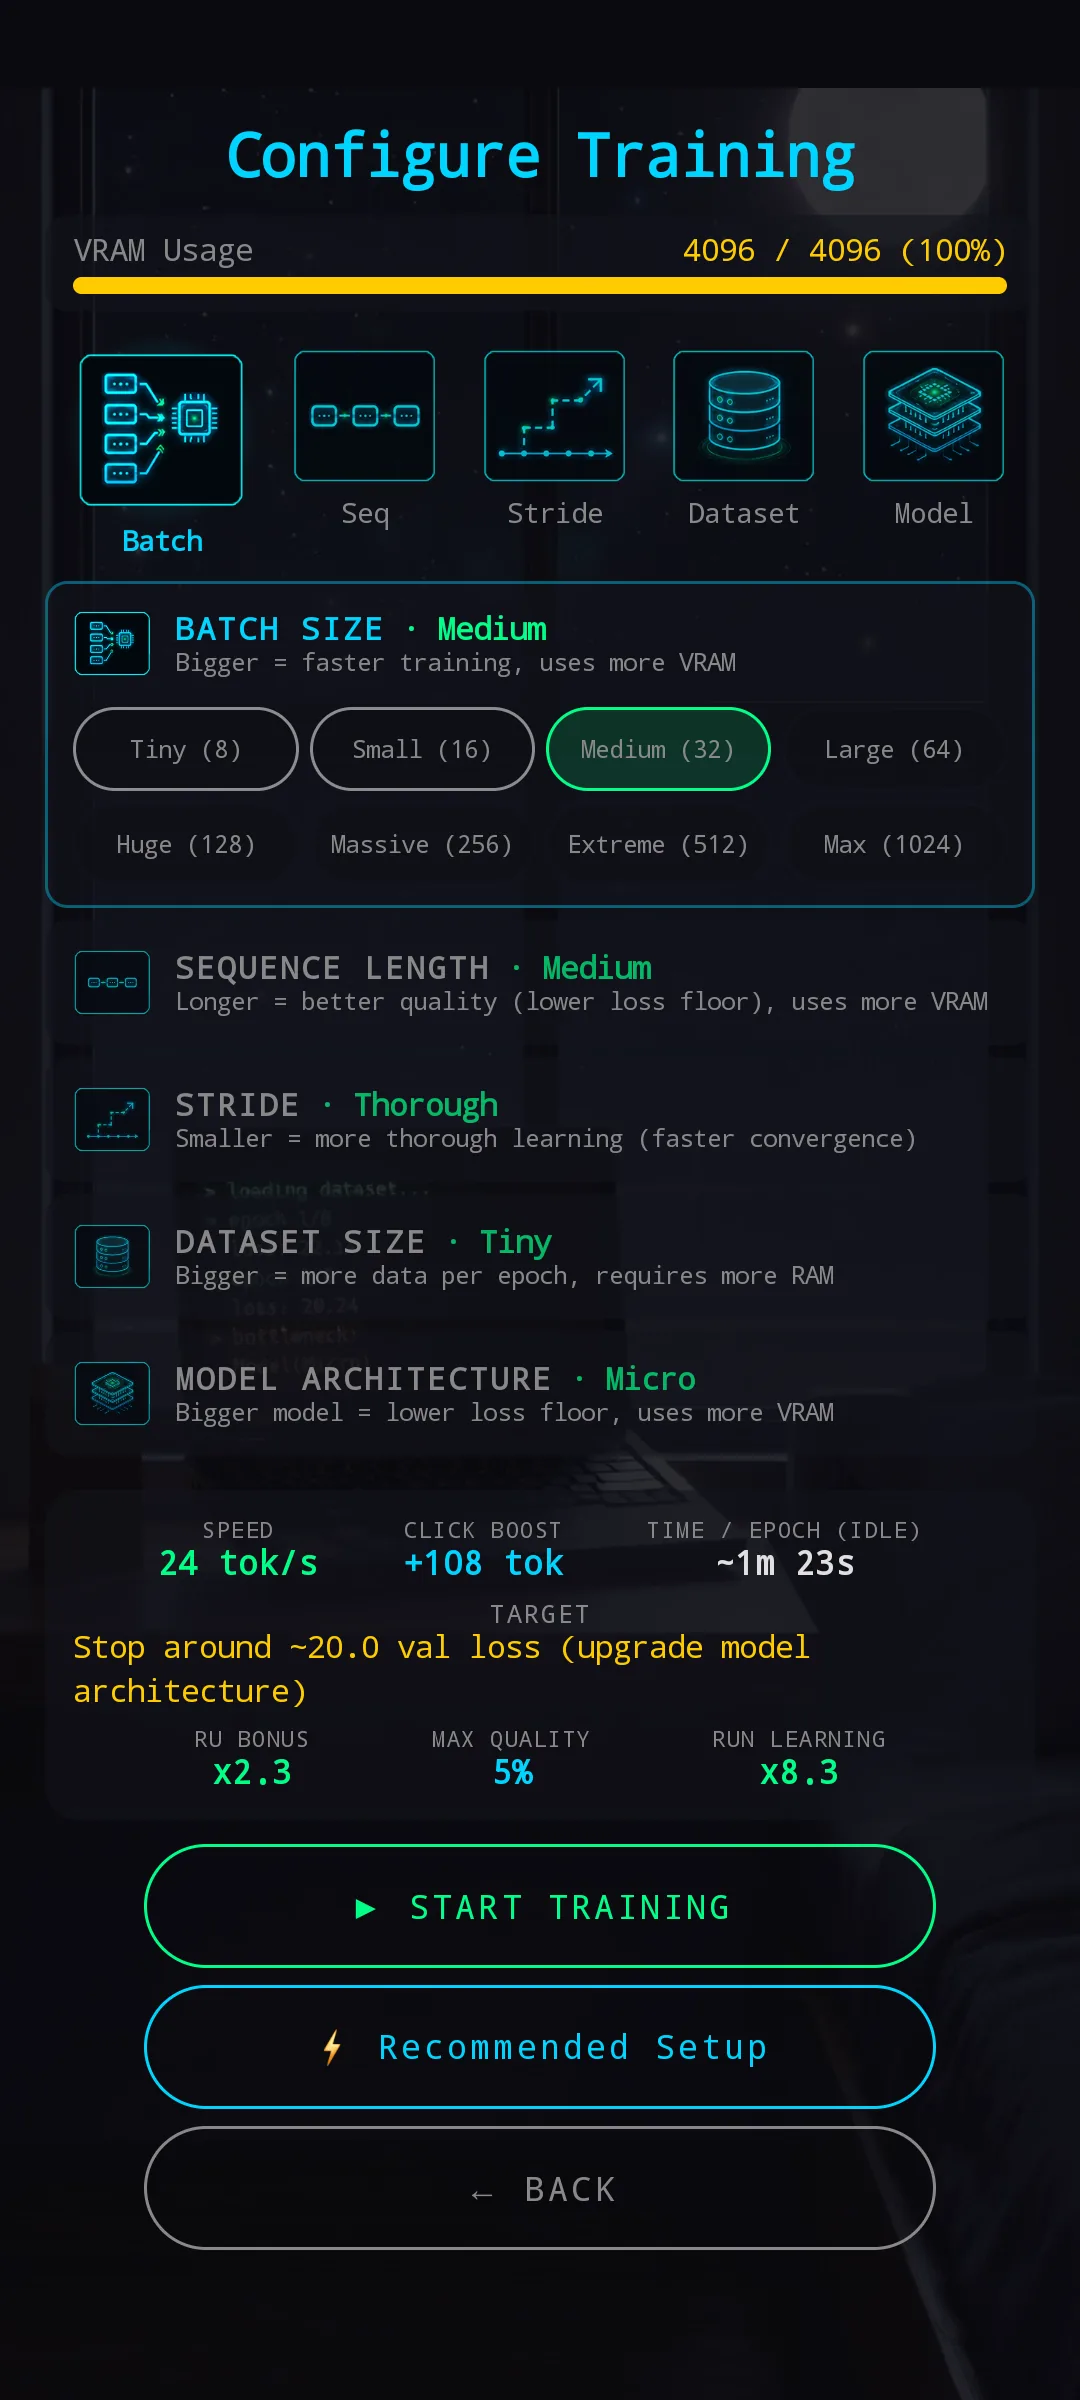
Batch chips run from Tiny (8) to Max (1024) in eight steps. The row of chips is chunked across two lines, with the trailing partial row centered, so longer labels never break the grid.
Dataset expanded — locks are visible at a glance
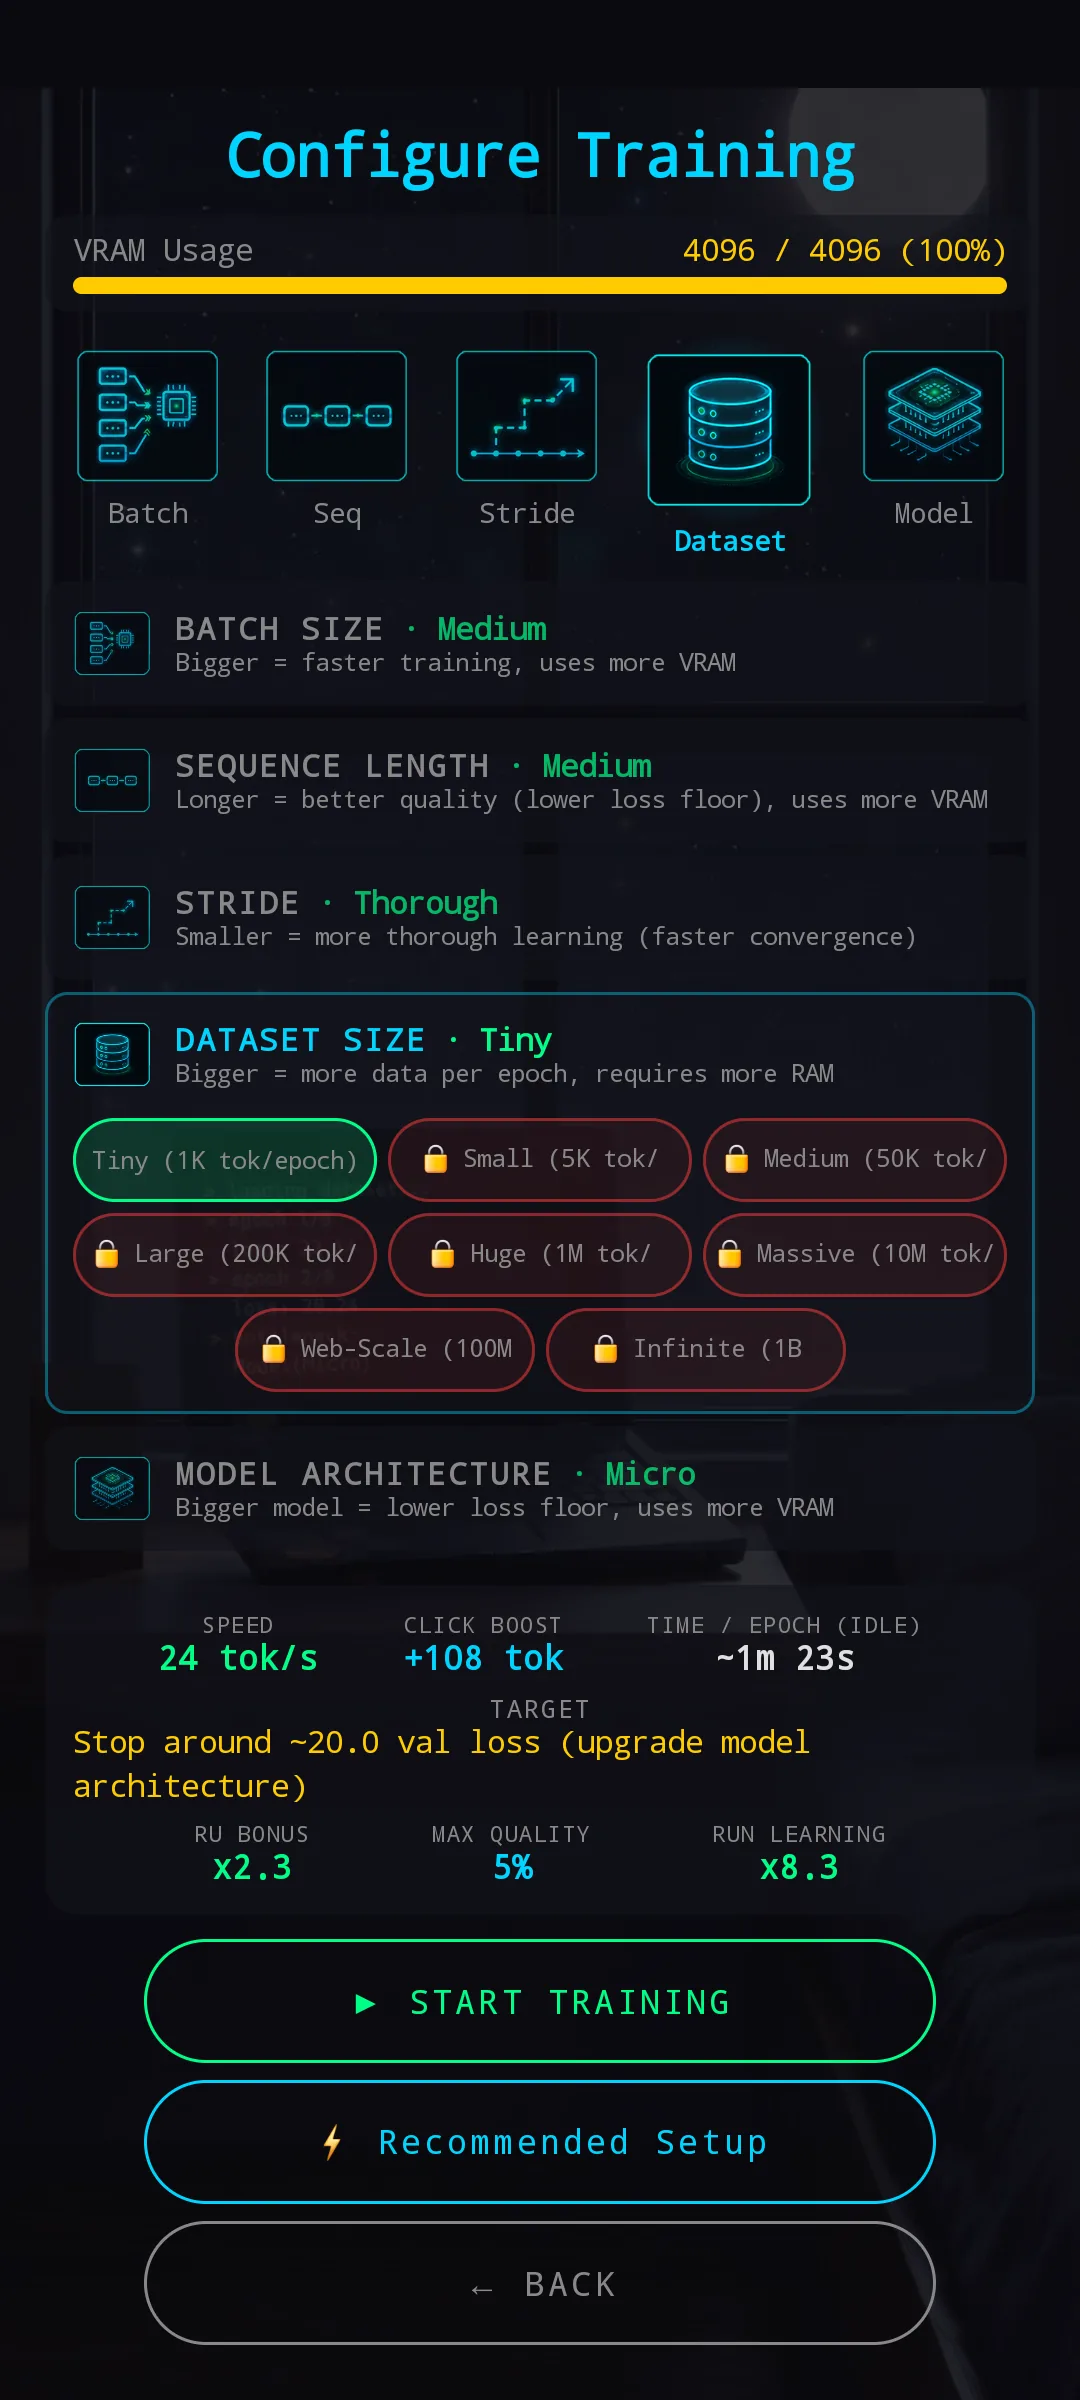
Locked options now have a red border + 🔒 prefix instead of being faded grey. You can tell at a glance that you don’t have the RAM for Small (5K tok/epoch) yet without having to tap and read the error.
Model expanded — same red-lock pattern
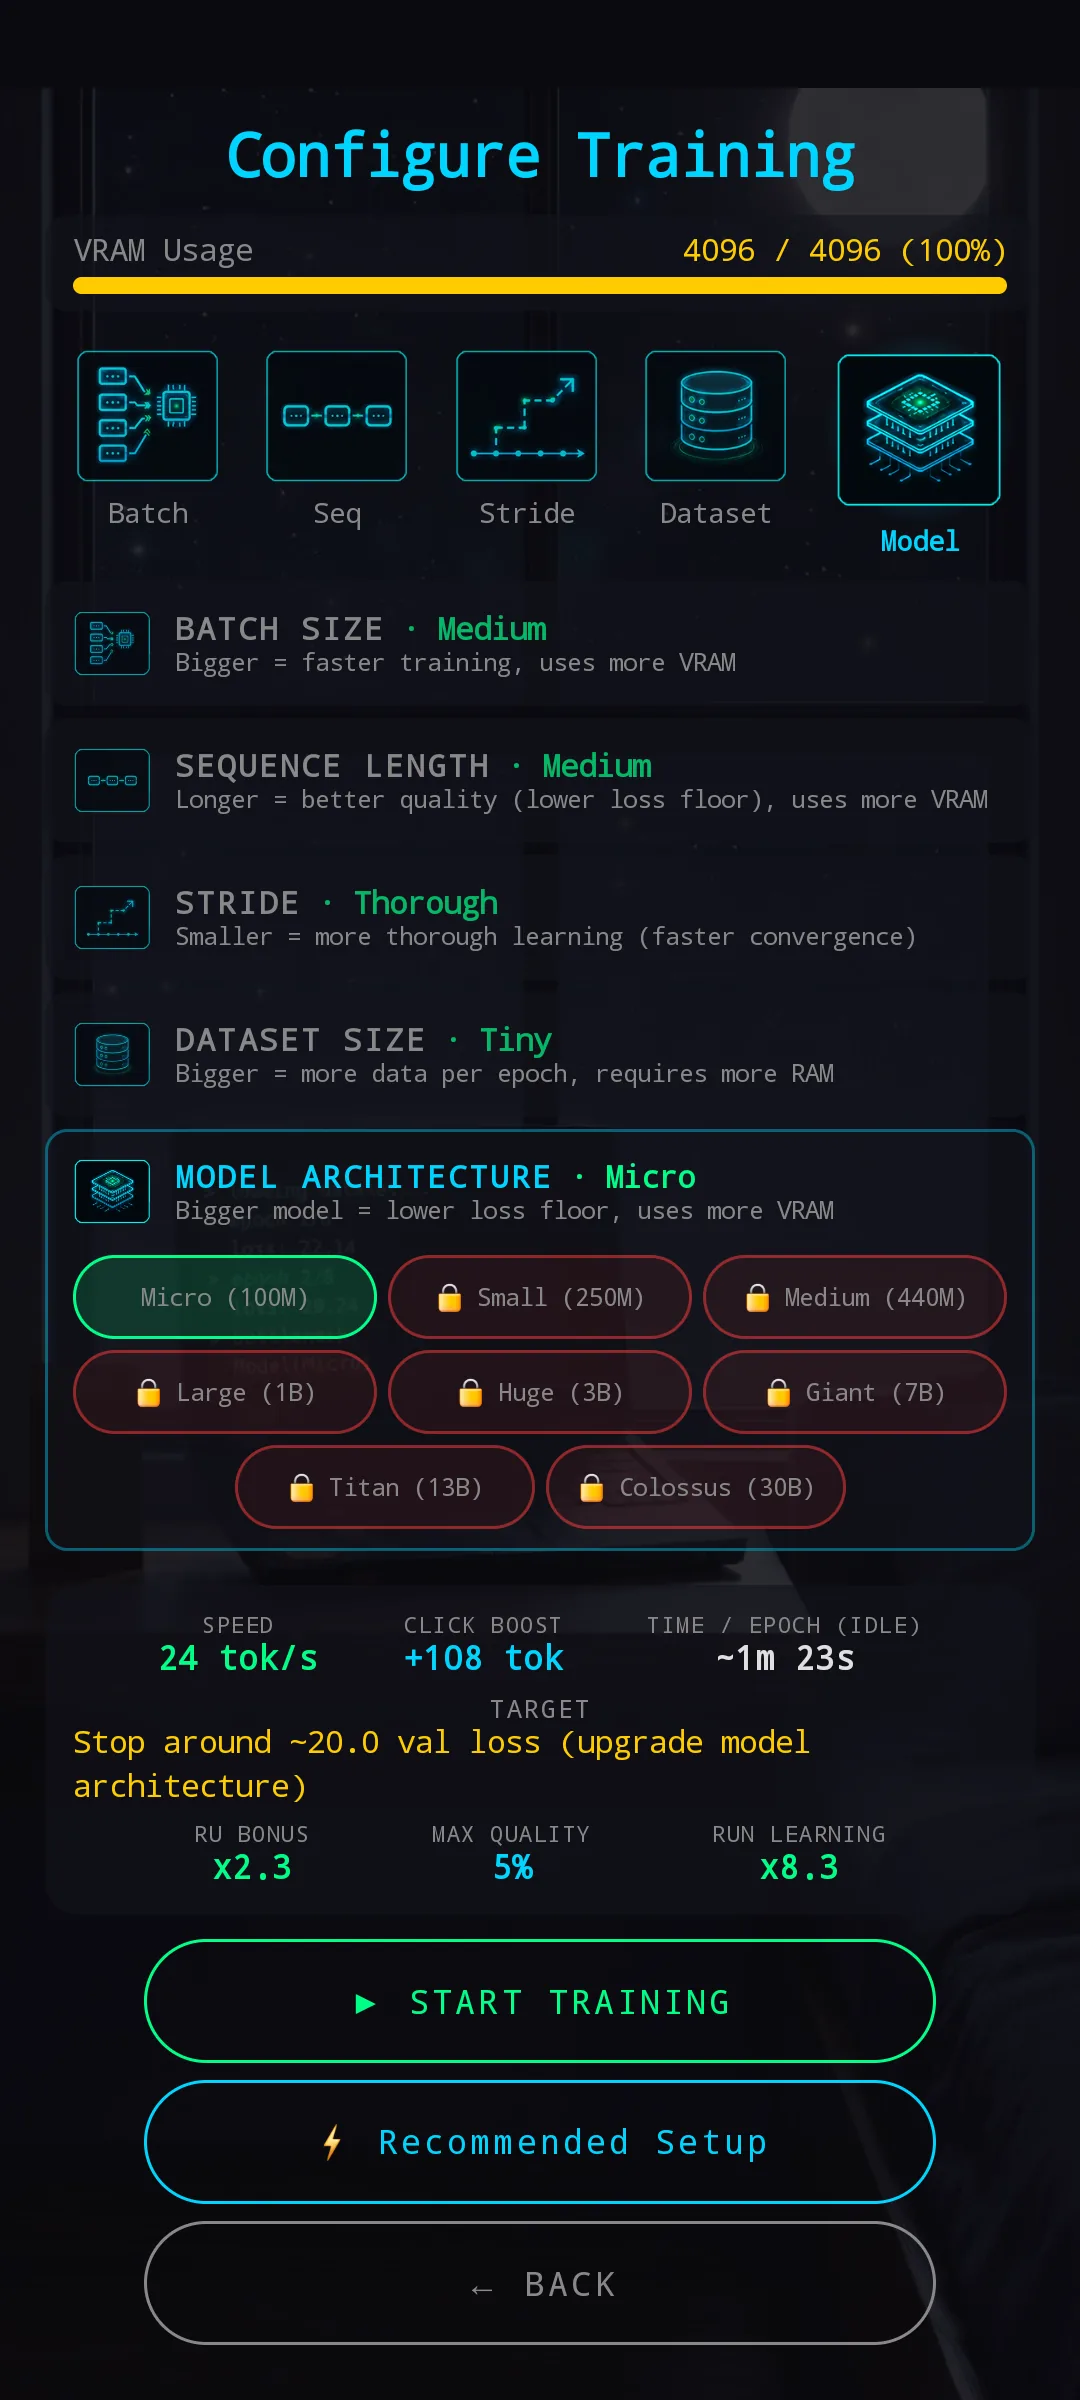
Same red borders on model tiers gated behind VRAM. The current selected tier glows green; the rest tell you exactly which ones you can buy versus which need a hardware upgrade first.
Stride expanded — short row, centered
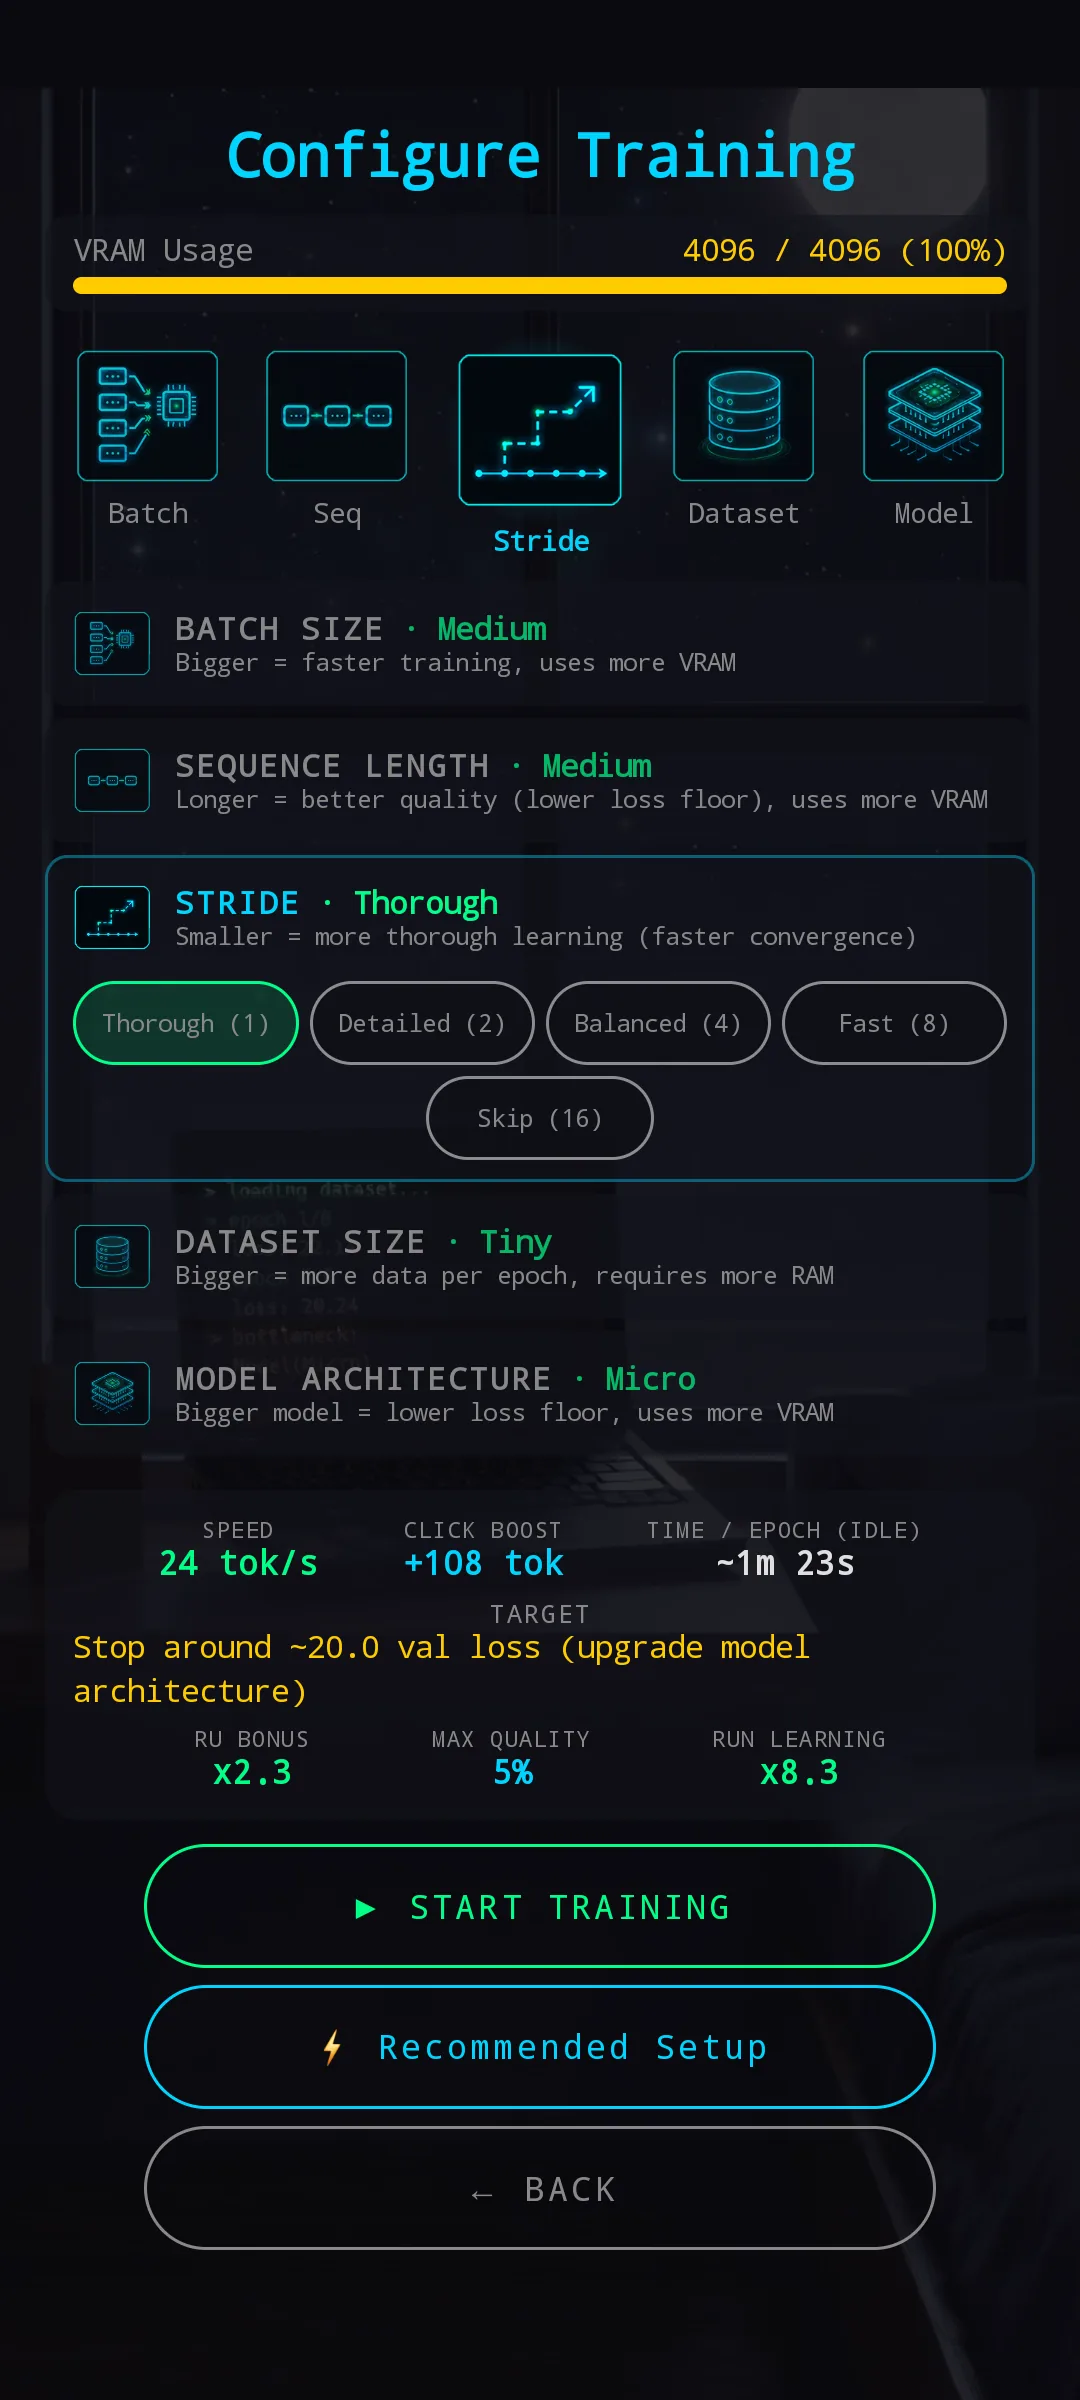
Stride only has five options — they fit on a single line with no chunking needed.
⚡ Recommended Setup — one tap to balanced
A new button between START TRAINING and BACK called Recommended Setup. Tap it, and the engine picks a balanced config for your current hardware: the largest model that fits, the dataset that suits it, a balanced batch + sequence length, and stride 2. You can override anything afterwards — Recommended Setup just gives you a sane starting point instead of staring at five sliders wondering where to begin.
Useful both as starter onboarding (early-game players don’t have to read a manual to make their first pretrain not terrible) and as late-game shortcut (when you’ve upgraded hardware and don’t want to manually re-pick five dials every time you rebuild a brain).
A few smaller refinements that landed alongside the redesign:
- Hint texts under each chip were rewritten in plain language — Bigger = more Ru from RUN (Batch), Longer = better learning speed from RUN (Sequence), Smaller = better quality, higher = faster training (Stride). No more guessing what each lever actually does.
- Row click expand-only — tapping a section header only expands; collapsing has its own dedicated target. No more fat-finger collapse when you’re aiming for a chip.
- Your choice persists — batch / seq / stride pick saves immediately. Come back later and the screen is exactly where you left it.
- Recommended Setup re-tuned — now leans toward speed + Ru (larger batch, shorter sequence, higher stride). If you want a different style, just pick manually.
☁ GPU Rental hint card
When a single epoch is going to take roughly an hour or more of idle time, a yellow hint card appears between the stats panel and START TRAINING:
⚠ Long per-epoch time: ~1h 42m
→ Rent Cloud A100: ~15 min/epoch · 25% of model price
The engine picks the rental that meaningfully shortens the cycle without overshooting (A100 by default, H100 only for the truly extreme configs). The Cu cost is percent of the model price, not a fixed number — so the bigger the model you’re training, the more the rental actually costs. The hint doesn’t show up at short cycles — your normal training boosts already handle those.
If a rental is already active, the card switches to a cyan banner showing the active rental and the per-epoch time it gives you.
A small but deliberate UX choice: the hint card shows only per-epoch time, never total training time. Total time is something the engine wants you to plan around the sweet-spot indicator, not something to game.
🎓 Welcome Tutorial for new players
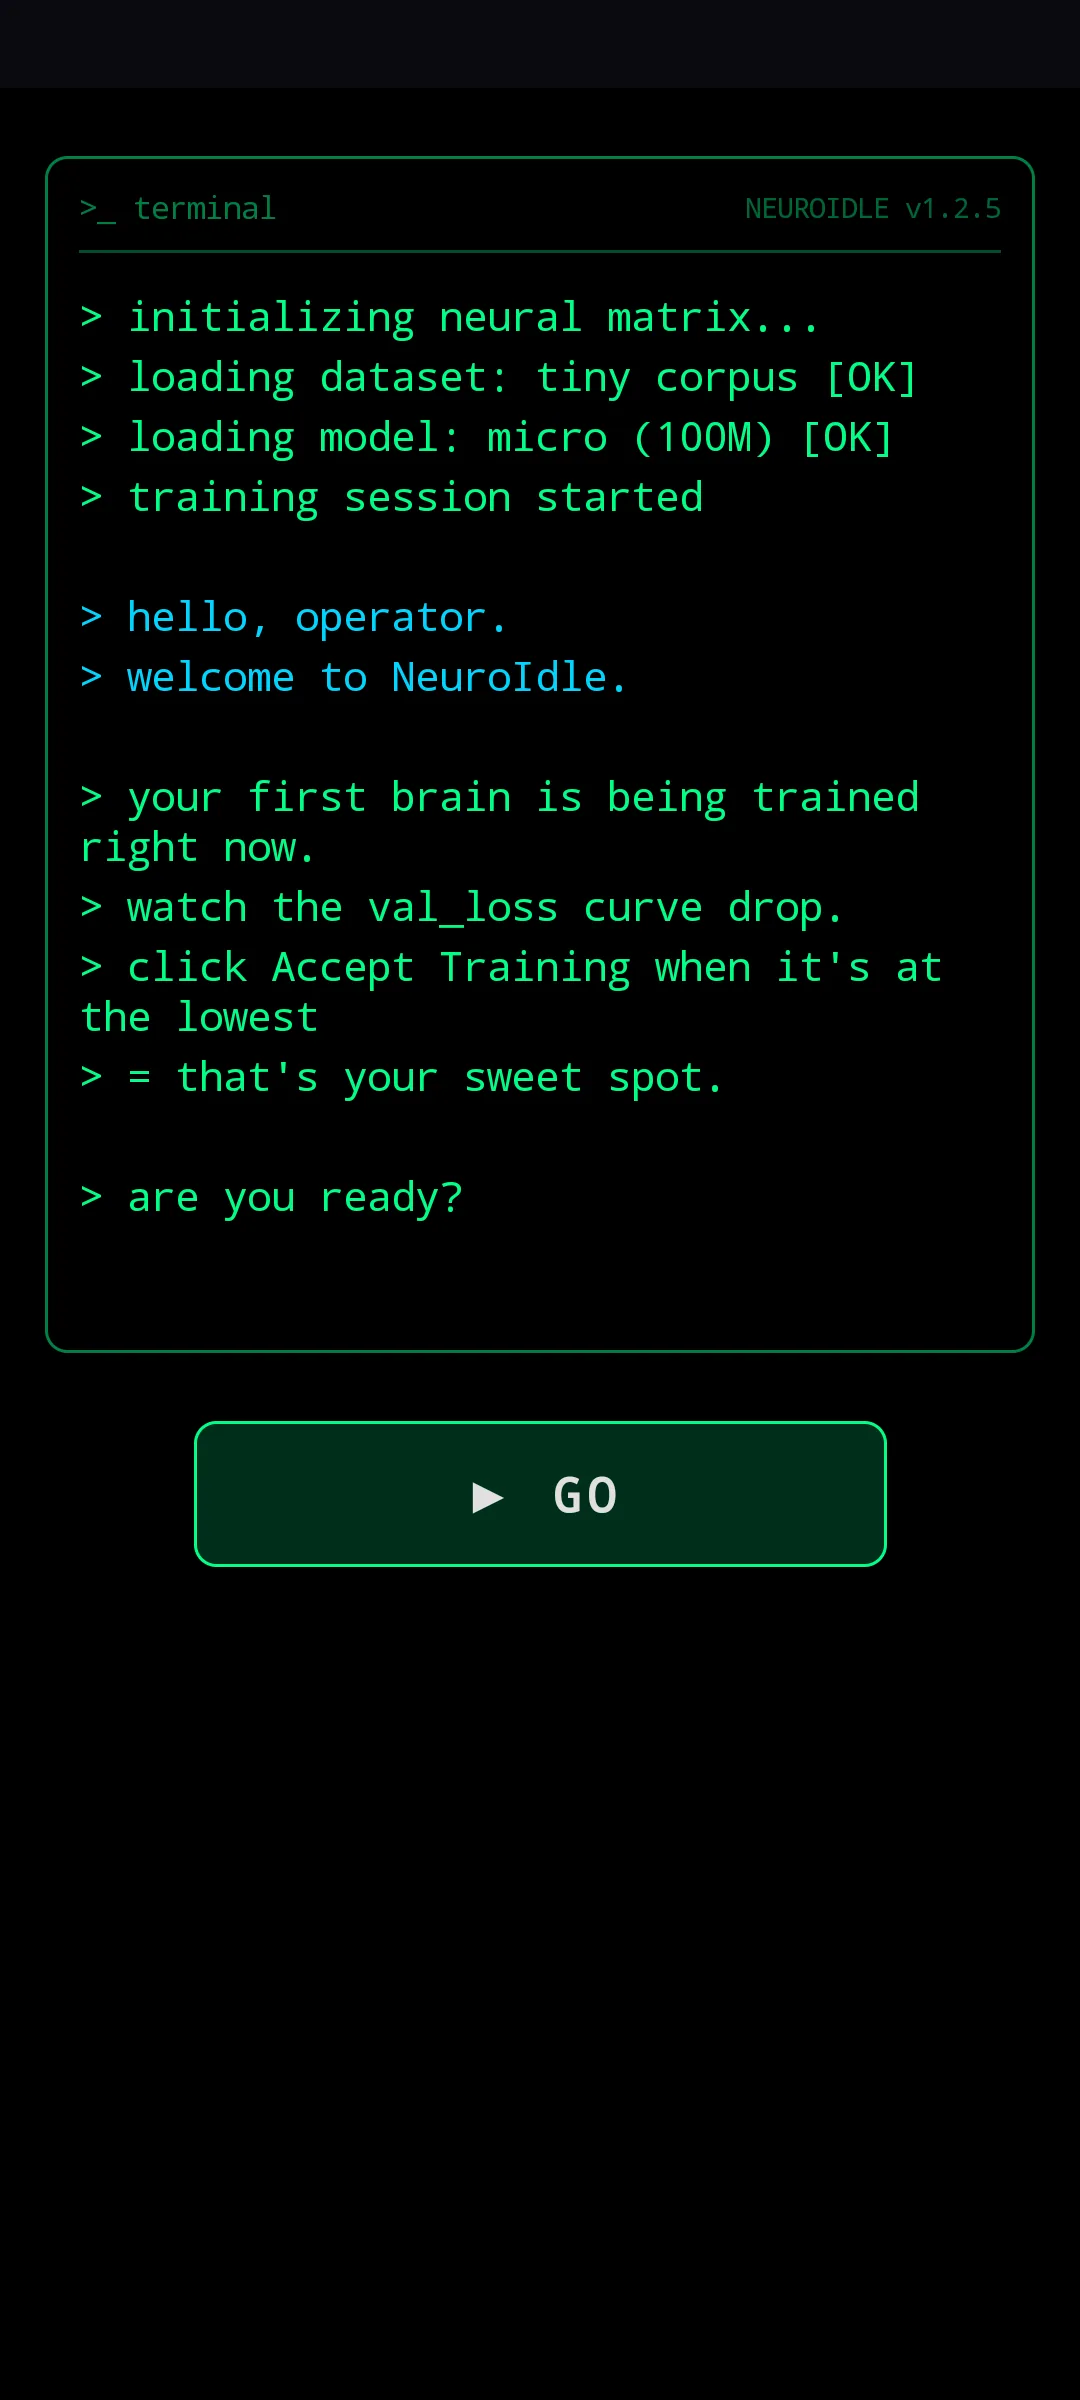
The old Quick Start screen was a one-tap shortcut to an auto-configured pretrain — efficient, but a brand-new player would land on the Run config screen with no idea what any of it meant. v1.2.5 replaces it with a guided Welcome Tutorial that walks you through one full loop, end to end, with only the buttons you need unlocked at each step.
The tutorial opens with a terminal-style boot sequence (right) — green-on-black CRT text, an initializing neural matrix → training session started boot log, then a few lines of explanation: watch the val_loss curve drop · click Accept Training when it’s at the lowest = that’s your sweet spot · are you ready? One ▶ GO button takes you in.
From there, each step locks everything except the one button you should tap next: the first Accept Training at the sweet spot, a first 10-minute Balanced Run, the first module purchase (only REST is unlocked, with a hint pointing right at it), a second Run that introduces Creative temperature mode, a third Run with Focused mode + a Nu boost grant, and finally a first Brain sale on the Black Market — which closes the loop.
To keep the flow snappy, the tutorial brain starts partially trained, the first pretrain is always Baseline MP tier (no surprise Distilled or Emergent disrupting the rhythm), and the first overload Run has a grace pass — you get to feel the symptoms without losing the brain. The tutorial ends naturally on that first BM sale.
Bonus: the first Run achievement now grants 2000 Ru (up from 500) — enough to afford the first module right after the tutorial without an awkward grinding gap.
🎁 New Daily Rewards screen
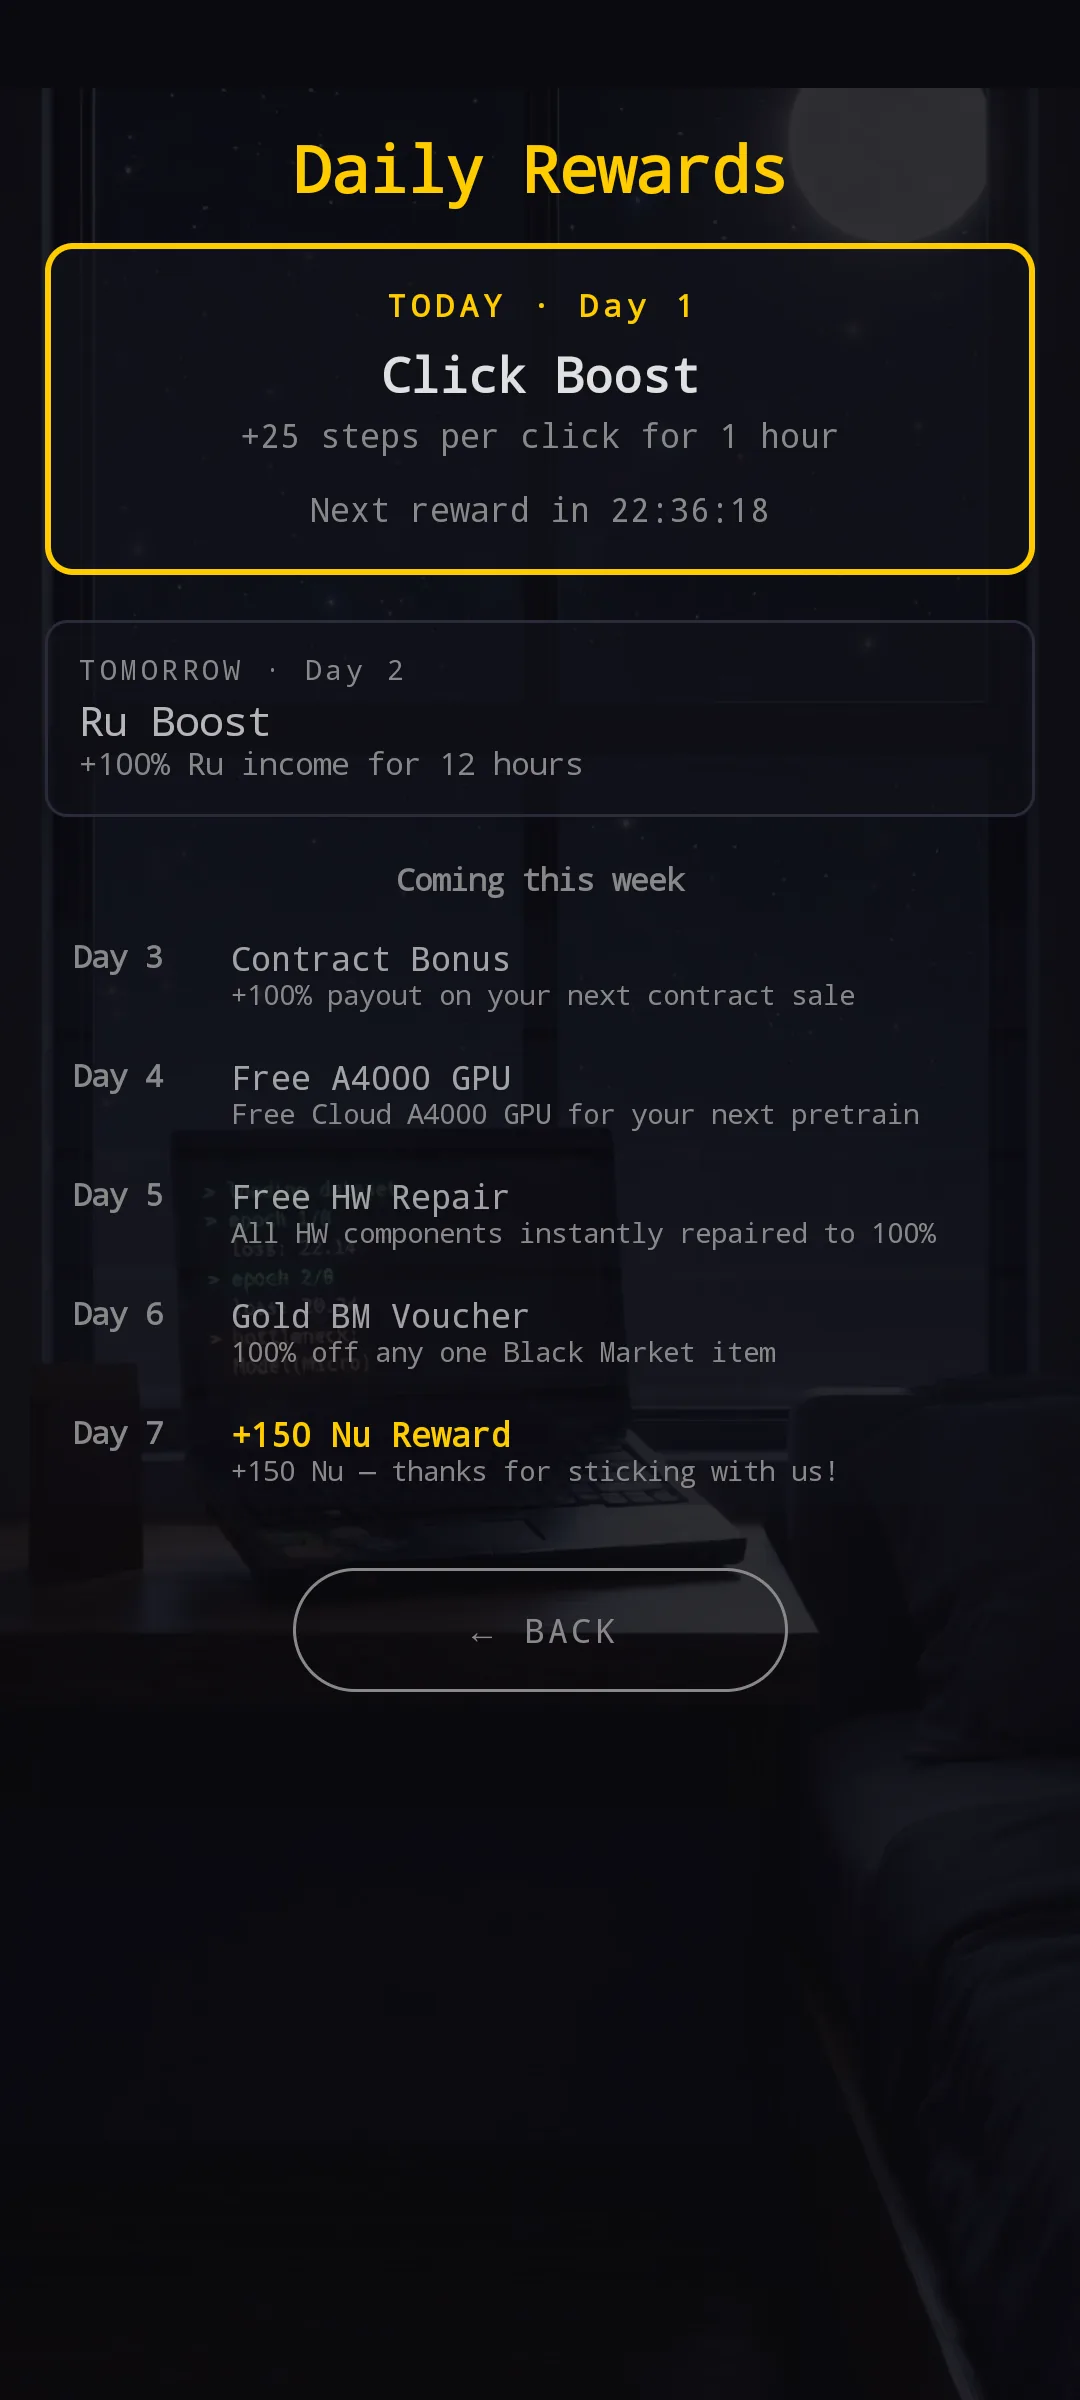
The old daily reward was a single mystery button in the Market — you tapped it, something happened, you moved on. Now it has its own screen with full visibility:
- TODAY hero card with the active reward + claim button (live countdown timer when on cooldown)
- TOMORROW preview — see what’s coming in 24 hours
- Week ahead list — all 7 days, Day 7 highlighted as the milestone
- The cycle continues past Day 7 with daily Ru bonuses + a weekly click boost every 7th day (Day 14, 21, …)
The weekly slate was reshuffled too: Day 4 now grants a free A4000 cloud GPU rental (immediately activated), Day 5 is a full HW repair (instant, no voucher needed), and Day 6 is a Gold BM voucher — bridging into the new voucher system below.
🎫 Black Market vouchers
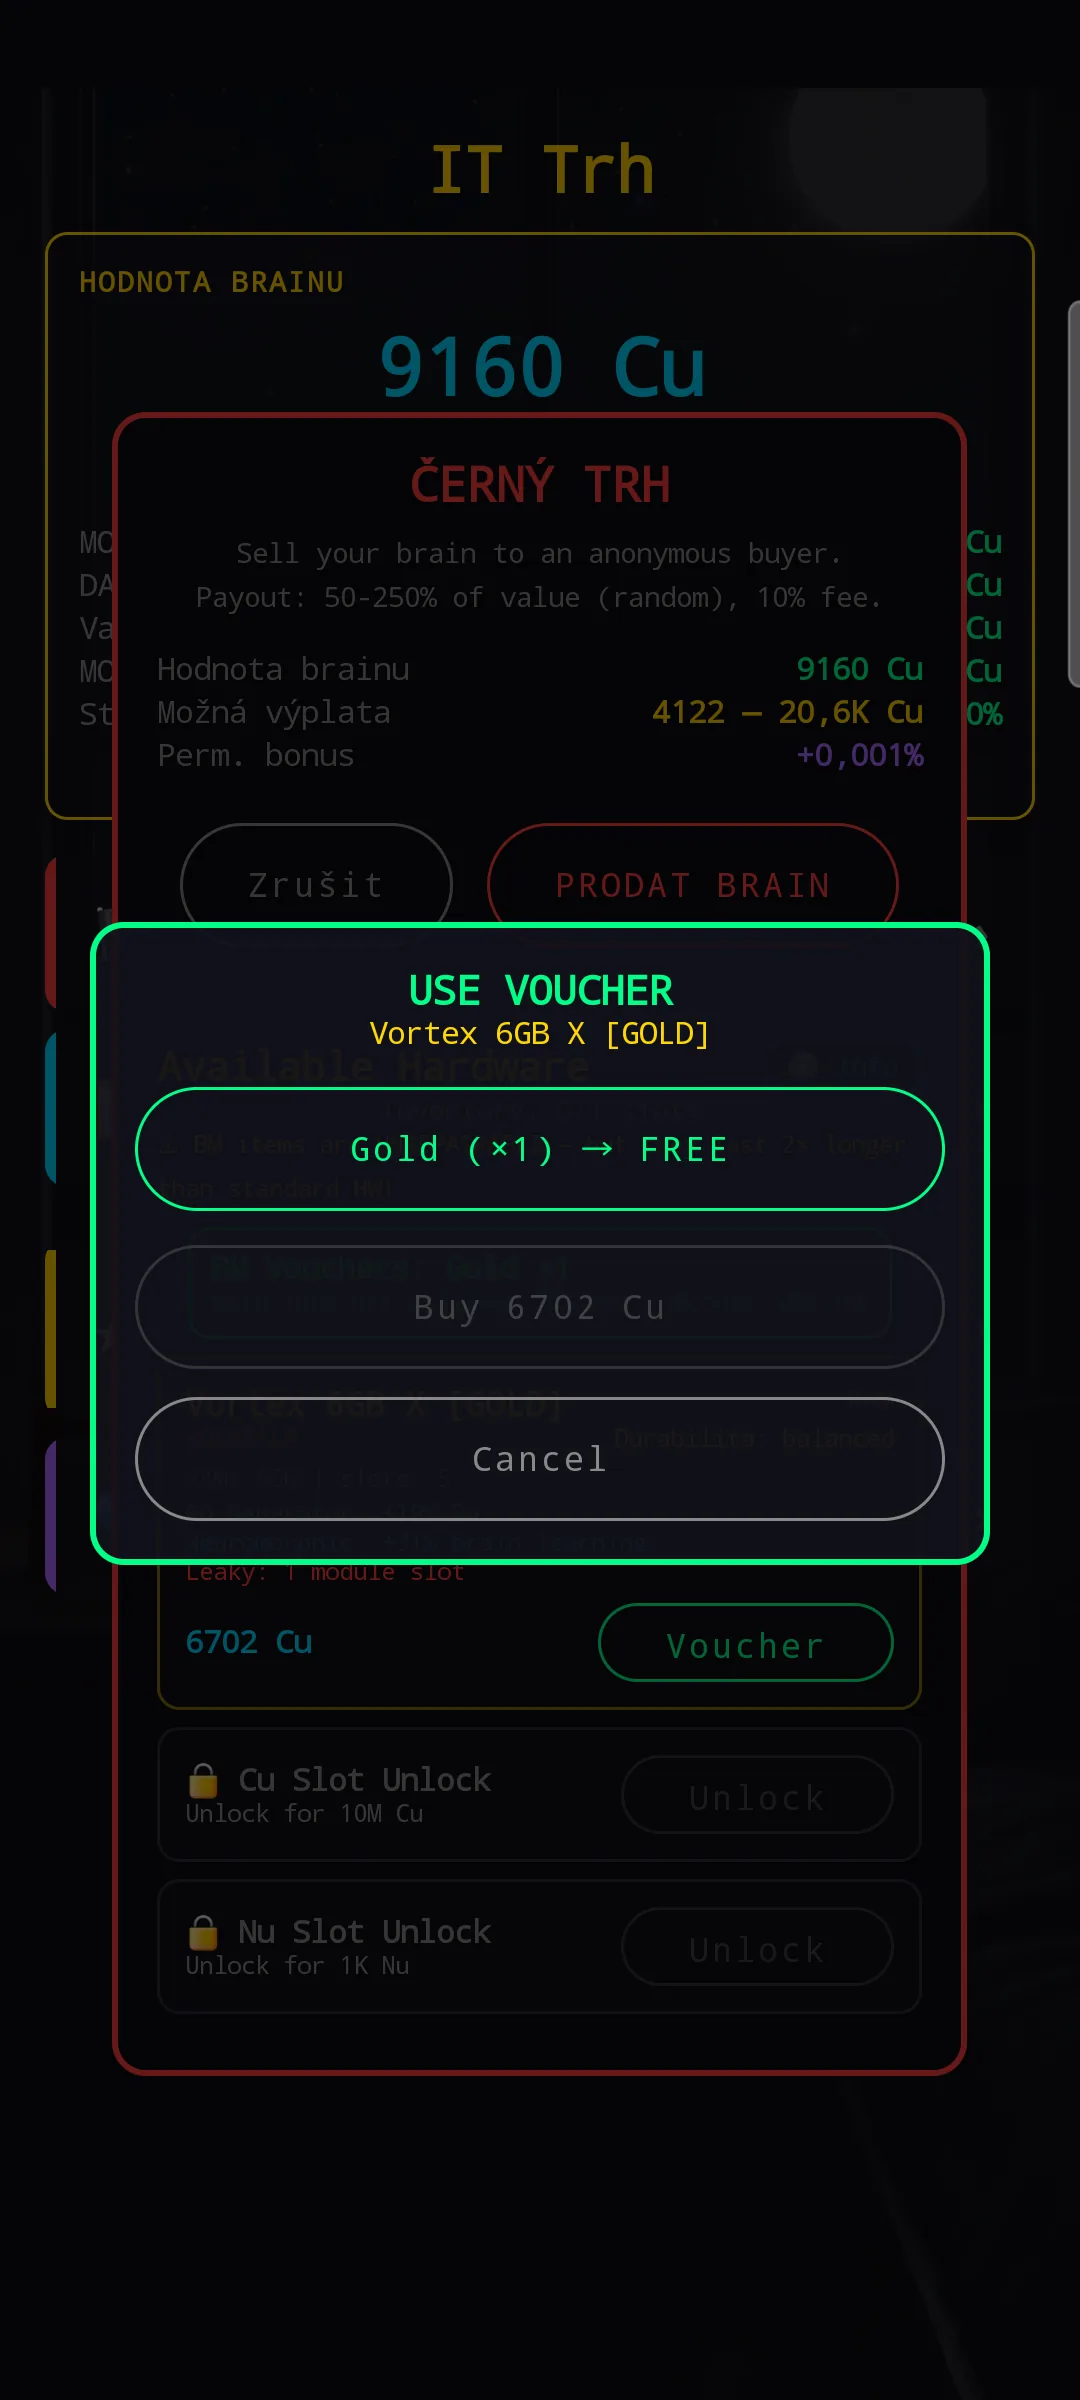
A 3-tier voucher system was added to the Black Market. When the game grants you a voucher (daily reward, achievement, contract, event), the Voucher button on a BM item card opens this dialog (right) and you pick which one to spend — or save it for a better target.
- Bronze voucher — 30% off
- Silver voucher — 70% off
- Gold voucher — 100% off (free)
The dialog only shows tiers you actually own. There’s also a Buy at full Cu option (= keep your voucher for something more valuable later) and Cancel (= reserve the voucher, walk away). Holding a Gold voucher and only seeing mediocre items in this rotation? Wait for the Exotic to roll up.
First source for vouchers: the new Day 6 Daily Reward = 1× Gold. More sources will follow (contracts, achievements, events).
📊 Run config — live per-hour brain rates
The Run config screen used to label brain status with static text: “Stressed”, “Calm”, “Exhausted”. You could see something was happening, but not how fast or in what direction. v1.2.5 replaces those labels with the actual current value + per-hour rate that you’ll get for the configuration you just picked.
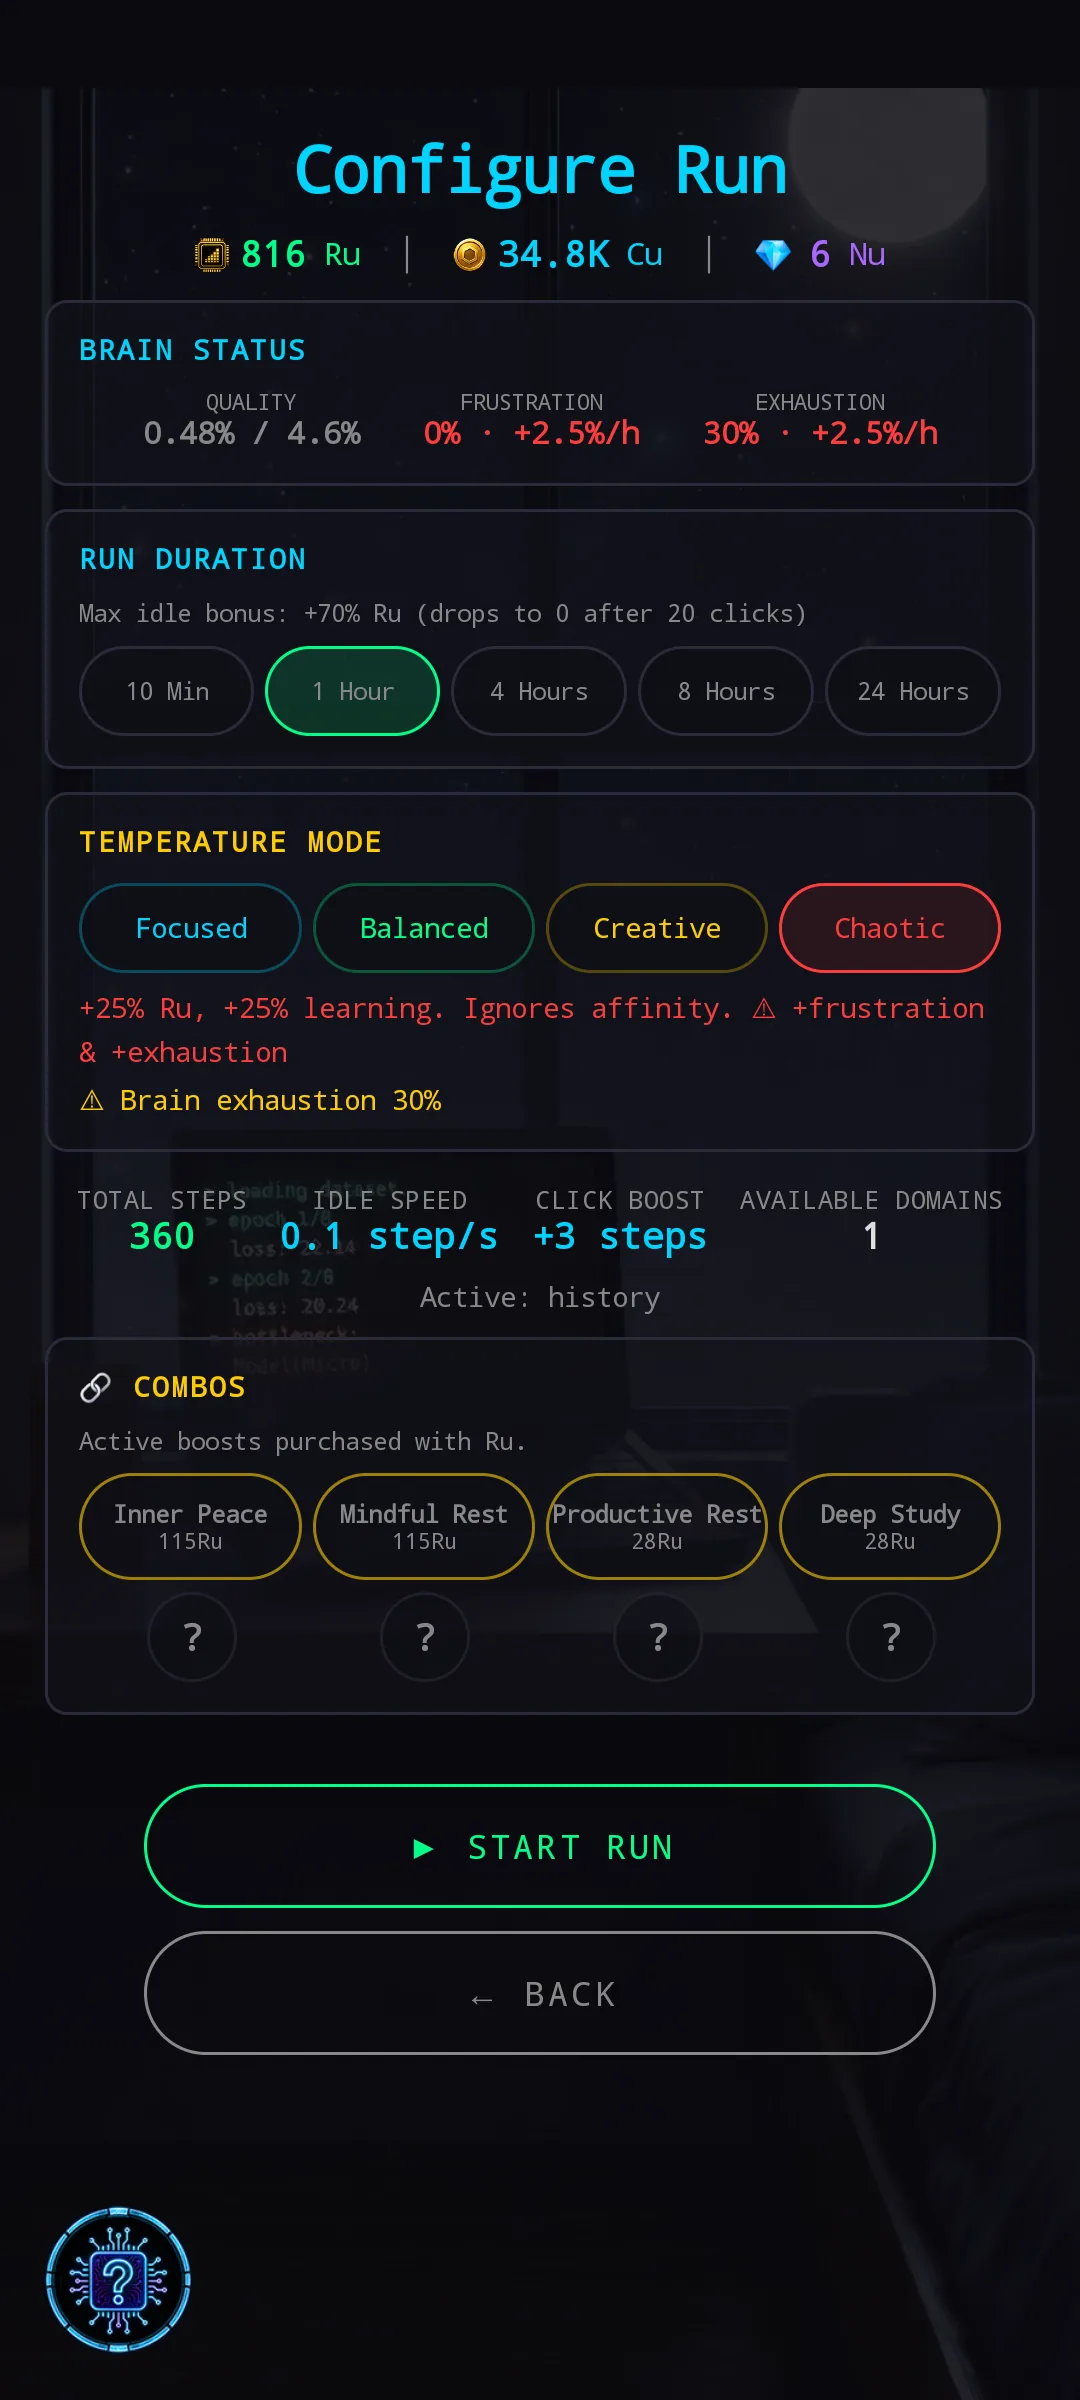
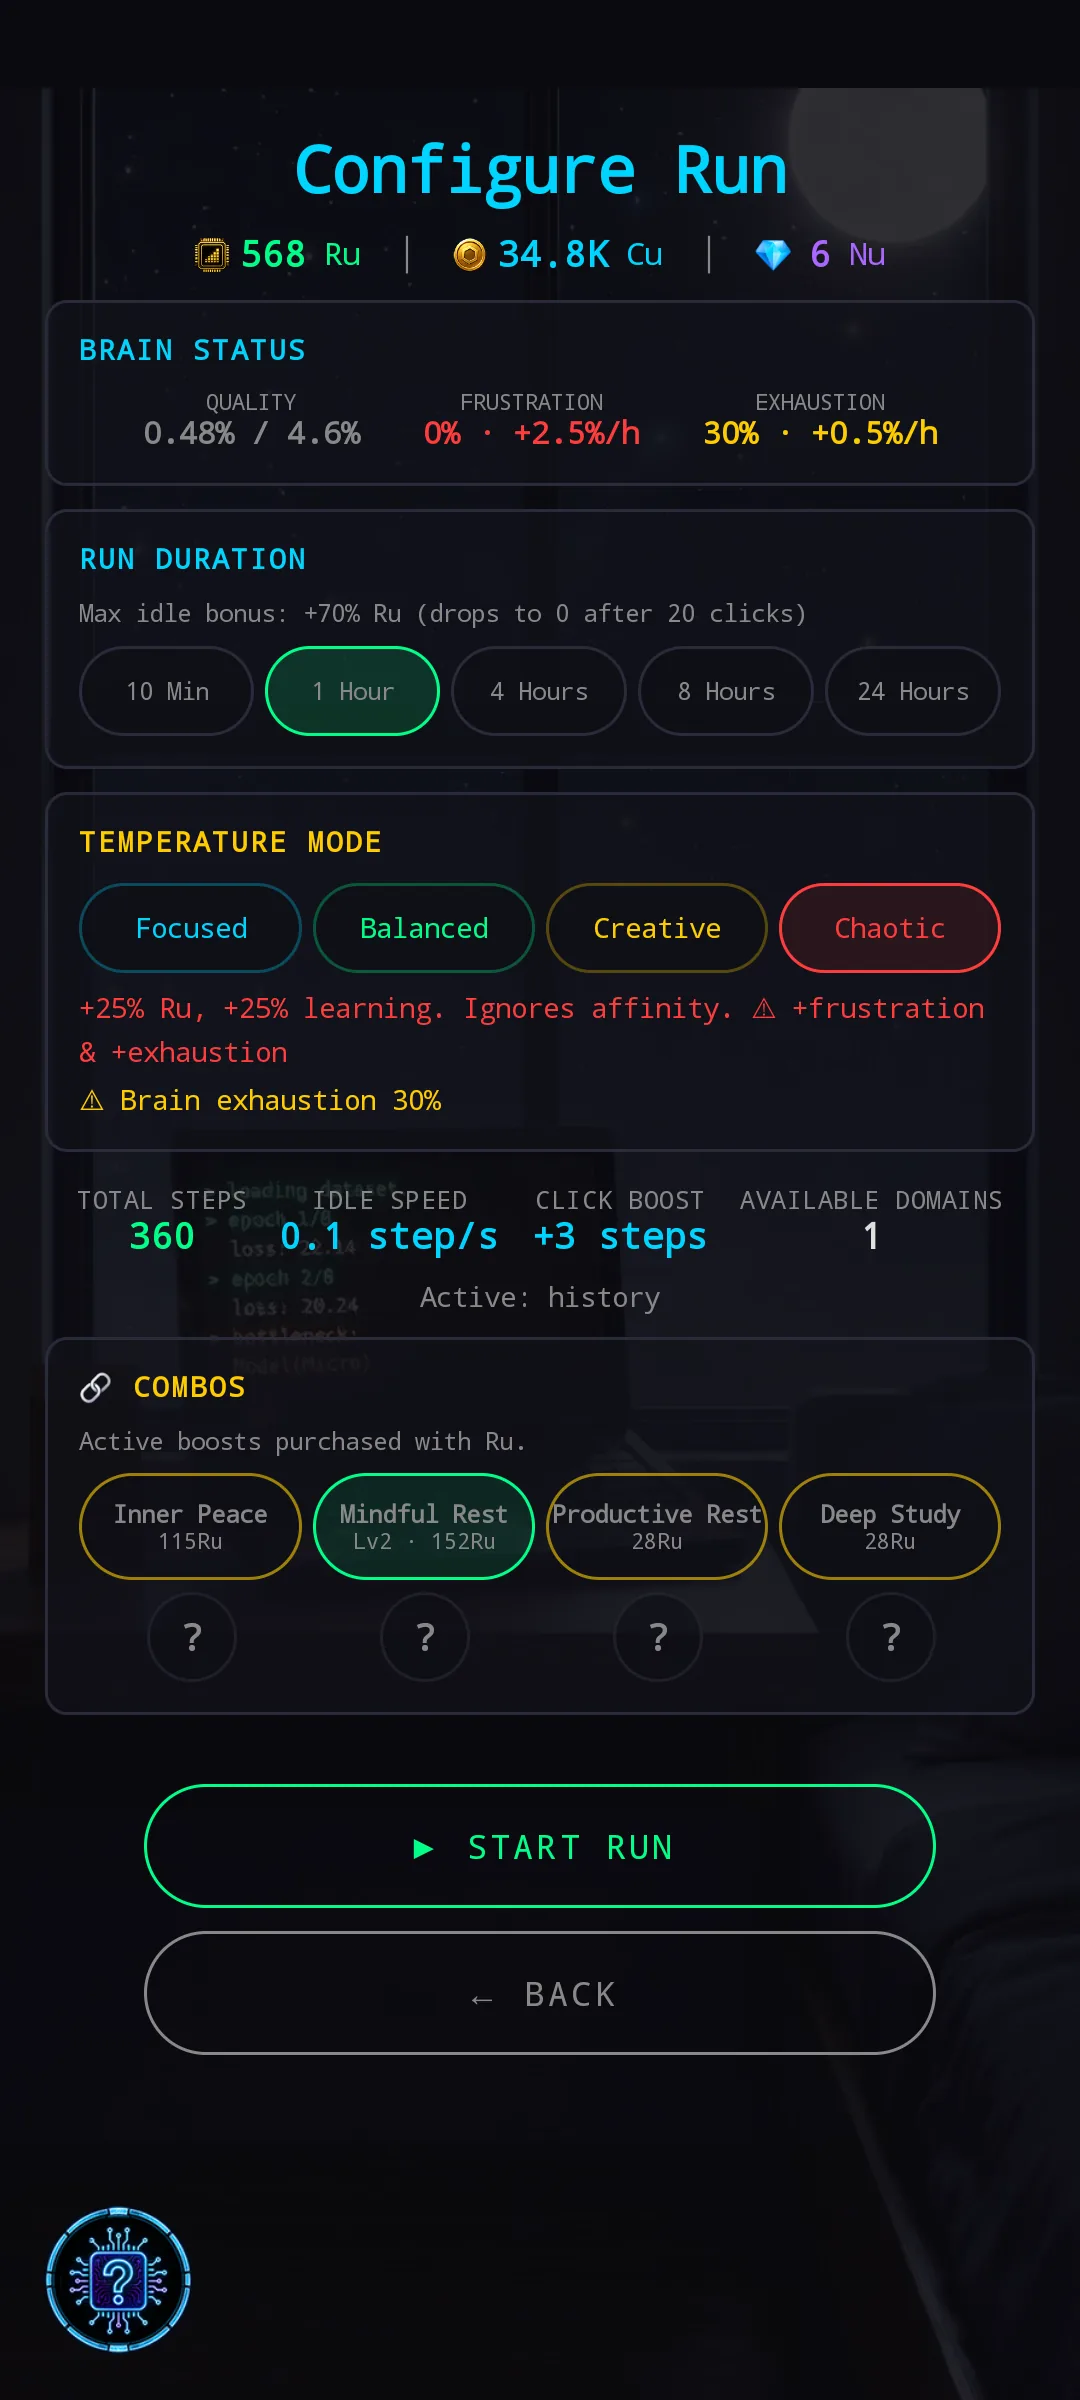
Without an active combo, exhaustion climbs at +2.5%/h (left — burning). Tap the Inner Peace combo card and it lights up green — the rate immediately drops to +0.5%/h (right — slow tick-up, almost negligible). Same loop for frustration. The display reacts in real time to changes in temperature, modules and combo selection.
The point: combo bonuses are no longer abstract numbers buried in Brain Lab. The moment you decide whether or not to spend Ru on Inner Peace, the screen tells you exactly what you’re buying.
🧠 → 🟢 HUB Brain Slots got a custom icon
Tiny visual touch: the BRAIN SLOTS info card in the HUB used to start with a 🧠 emoji next to the title. That’s been replaced with a custom monochrome icon to match the rest of the chip-style assets. The 🧠 emoji is still used in other places (Inner Voice upgrade, Brain Value display, the Brain screen header) — only the HUB card title got swapped.
⚖️ Small balance tweaks
- HW durability degrades noticeably slower during Runs — less repair grind, more actual idle progress (pretrains never wore HW down anyway)
- Time-based decay halved — a 4-hour idle Run doesn’t chew through your components like before
- A handful of drop rates and thresholds nudged for smoother early/mid pacing
🐞 Bug fixes & UI polish
- Contract Board: Refresh and Close buttons swapped — Back is always the last button now
- Quality cap shown with one decimal place (
4.6%instead of rounded4%) - HUB Main Menu always reachable — no more dead-end states
- Daily Rewards / Neuron Shop / BM icons cleaned up, less visual noise
- Hundreds of small string consistency fixes across all 4 language variants
Full reference for what each Configure Training dial actually does, plus the trade-offs that aren’t obvious from the hints, lives at the new Pretrain Configuration guide. The in-game ? Help button on Configure Training links straight to it.
Thanks for playtesting! 🧠
— NeuroVault Research Systems