Refactoring — merge two saved models
The chamber where two saved models become one. The chamber runs in two modes: Depth (matched parents produce a deeper child of the same rarity) and Improve Rarity (matched parents produce a child a rarity higher, paid for in bred depth). Neither is automatic — rarer parents fail more often, and the harder the ask the harder every next step gets. This page covers the compatibility rules, both modes, the four possible outcomes, and how to read what the screen is telling you before you press MERGE.
At a glance
Refactoring merges two saved models into a new one. The gear icon on the Refactoring tile in Neuron Archiv picks which of the two modes the chamber runs in:
- DEPTH — matched parents produce a child of
the same rarity but one depth deeper,
marked with a plusko (
+,++,+++). Adds a slot, raises the quality ceiling, lifts the SW level cap. - IMPROVE RARITY — matched-rarity parents produce a child one rarity higher. Paid for by spending bred depth from the parents. Slot count stays the same (rarity + depth is zero-sum on slots).
Both modes inherit MP stats, dataset, specializations, and installed SW from both parents. Both use the same compatibility gates and the same four outcomes.
Prerequisite: at least two models saved into Neuron Archiv → Repo · Models. A model can be saved once it reaches roughly a third of its class's quality ceiling; below that it isn't archive-eligible.
- Compatibility gates
- The compatibility & probability panels
- The four possible outcomes
- Depth mode — what pluskos are actually for
- Carelessness costs — parent condition
- The cross-class door at
+++ - Improve Rarity mode — trade depth for tier
- Quick tips
Compatibility gates
Only some pairs of saved models can be merged at all. Three hard filters, checked against each other before anything else:
- Same class — Micro with Micro, Small with Small, etc. Two different classes can't share a chamber (with one exception, see §door).
- Same rarity — Baseline with Baseline, Refined with Refined, Distilled with Distilled, Emergent with Emergent. Rarity between parents never mixes. In Depth mode, the child keeps that shared rarity; in Improve Rarity mode, the child comes out one rarity higher.
- Same depth — Base with Base,
+with+,++with++. Two different depths can't merge.
A fourth soft check is SW capacity: the combined installed SW of both parents must fit into the child's slot count. Any parent's SW that would exceed that cap is refused at compile time, not silently dropped.
If a pair fails any of the three hard checks, the picker won't offer them together — you'll only see compatible models in the second parent list once the first is selected.
The compatibility & probability panels
Once both parents are loaded, two live panels appear under the child preview.
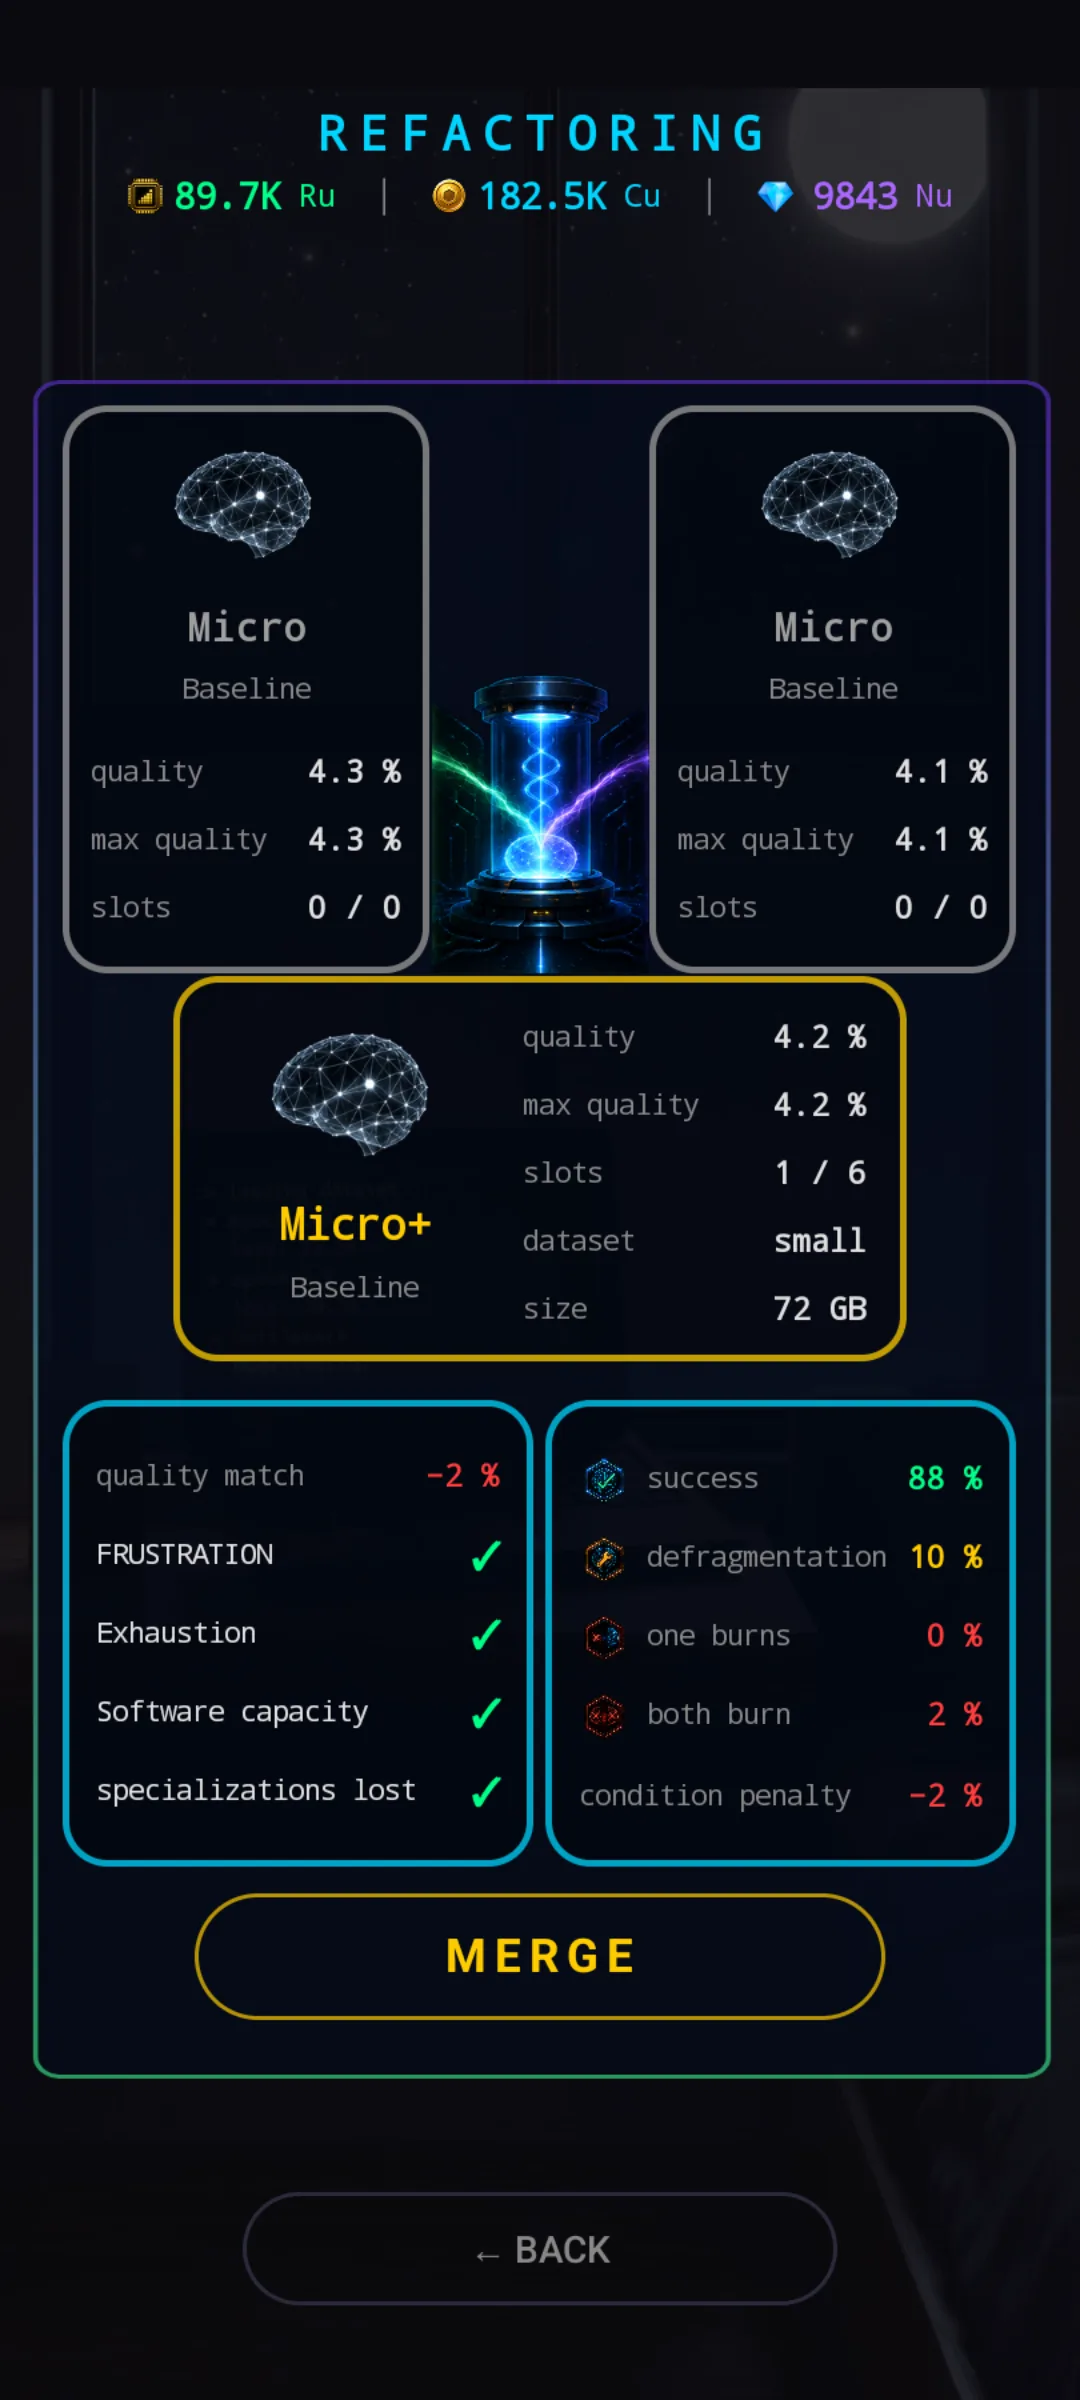
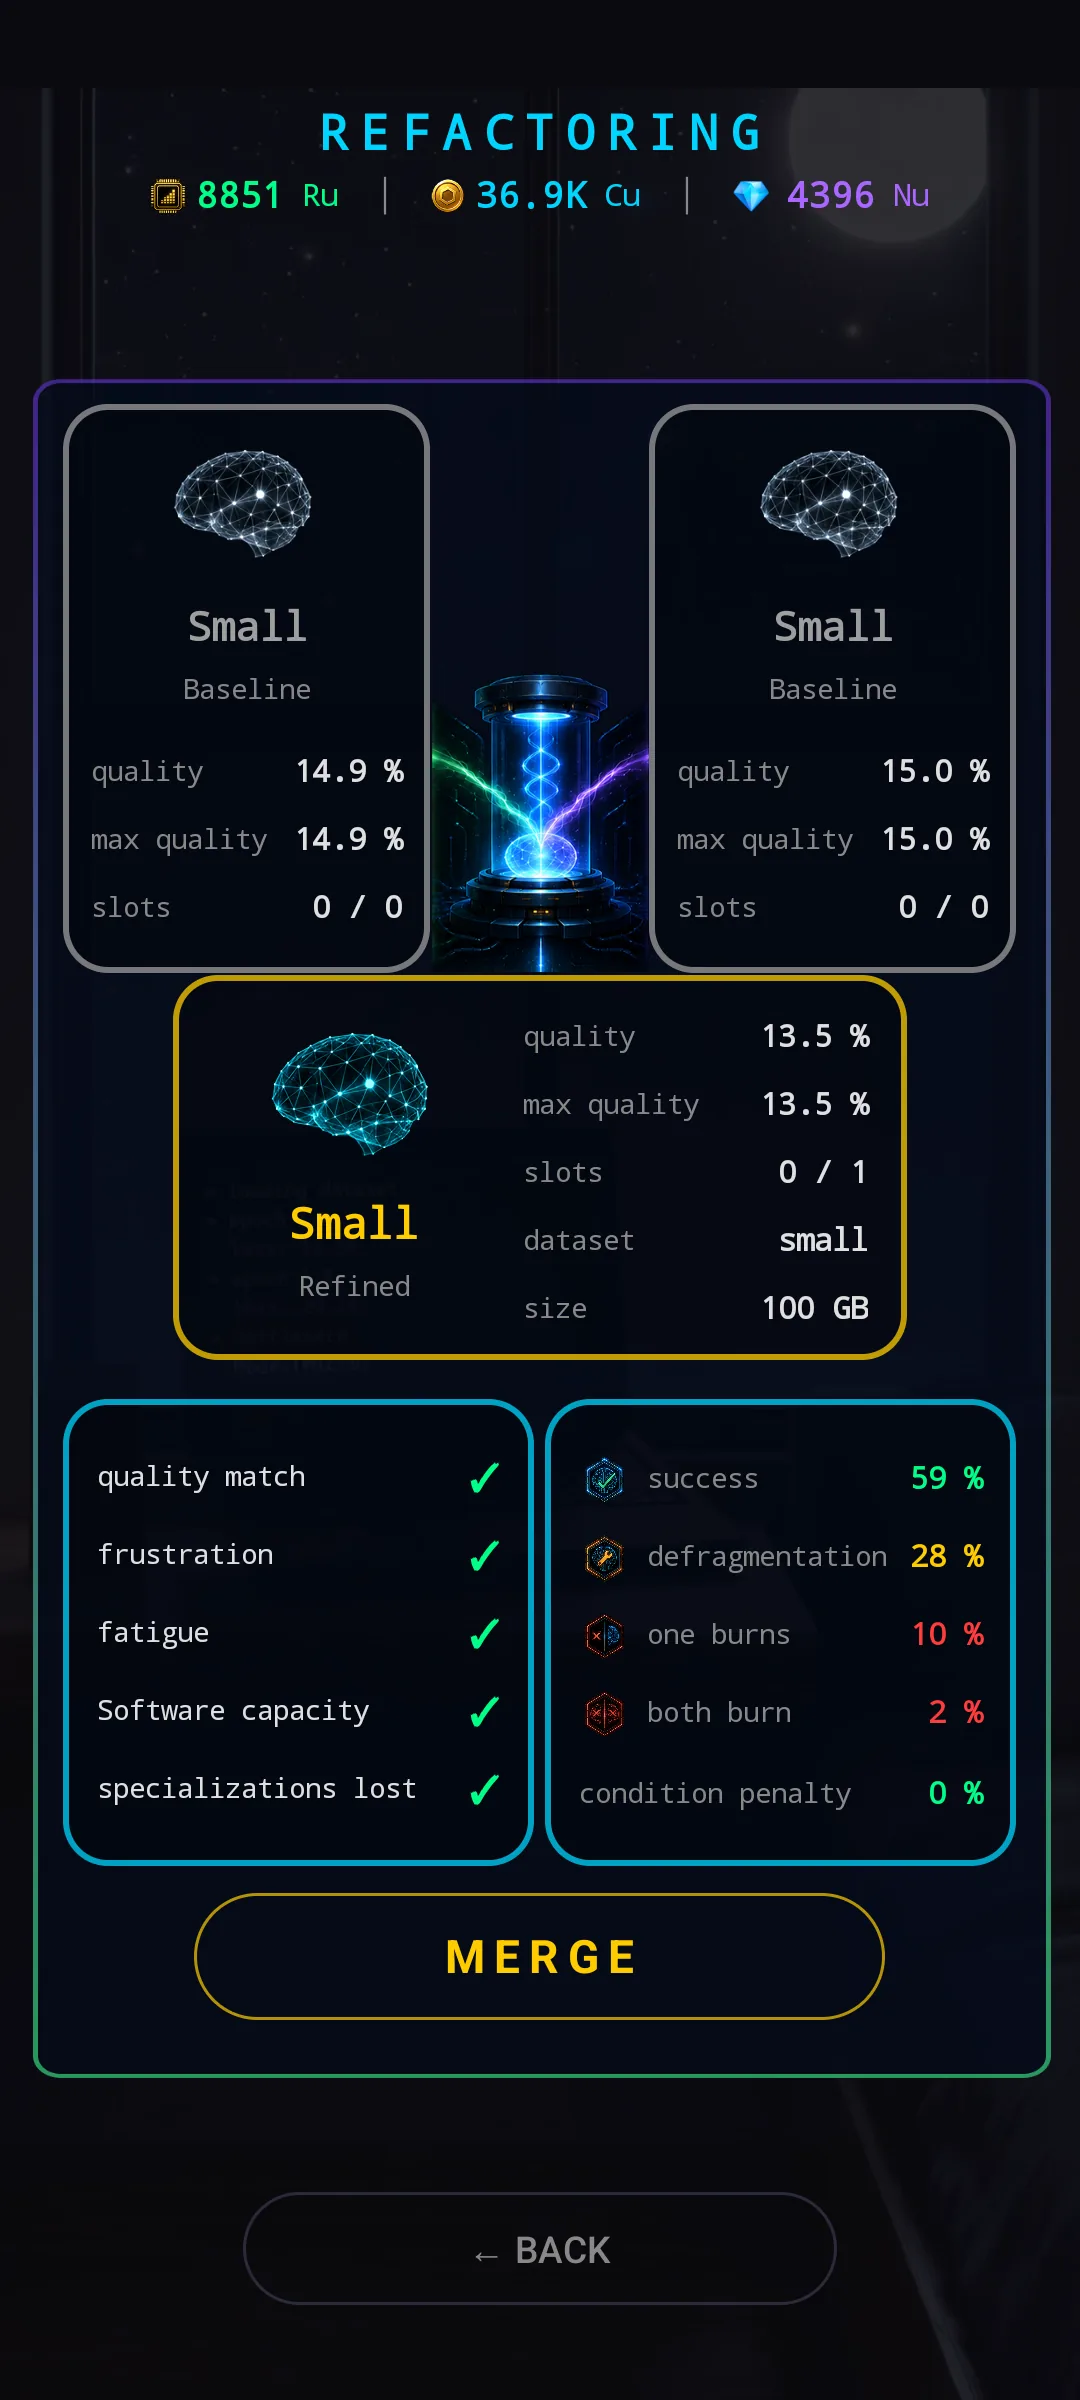
The compatibility panel (left) surfaces every condition that reduces your success chance:
- Quality match — a percentage difference between the two parents' current quality. Bigger gap = bigger malus, applied to the probability panel.
- Frustration, Exhaustion, Software capacity, specializations lost — each is a check (✓) if it isn't a problem, or a flag if it is. Frustration and Exhaustion on the parents both bleed into the success chance; specializations that can't be inherited (only one parent has them) are noted here so you know what the child is losing before you merge.
The probability panel (right) shows the four outcome chances after every malus is applied — this is the real number the merge is rolling against, not the base published rate.
The four possible outcomes
Every merge attempt lands on exactly one of four outcomes. Base rates by rarity (before any condition maluses):
| Success | Defragmentation | One burns | Both burn | |
|---|---|---|---|---|
| Baseline | 90 % | 10 % | — | — |
| Refined | 84 % | 11 % | 4 % | 1 % |
| Distilled | 78 % | 11 % | 9 % | 2 % |
| Emergent | 70 % | 6 % | 18 % | 6 % |
Each outcome means something different:
- Success — the child is created, both parents are consumed. This is the outcome you're playing for.
- Defragmentation — the child is created, but corrupted. Both parents are still consumed; the child needs a paid defrag step (Cu cost + a short real-world timer) before it can be used. A setback, not a loss.
- One burns — merge fails; one parent is destroyed, the other returns to the Archive. You keep half of what you brought.
- Both burn — merge fails; both parents are destroyed. The worst outcome. Both are gone.
Depth mode — what pluskos are actually for
Every successful merge adds one plusko to the child. So the progression looks like this:
- Two Base → one
+ - Two
+→ one++ - Two
++→ one+++
Depth cap is +++. And every next step is materially harder than the one before — the second step carries 1.6× the failure chance of the first, the third 2.4×. What you're buying with all that risk is three separate things:
- A higher quality ceiling. Each plusko lifts
the cap the model can ever reach. On a Micro that's a
rounding adjustment. On a Colossus at
+++, that's the difference between roughly eighty and a hundred percent quality. This is the reason to keep a model instead of selling it. - A slot, and a higher SW level cap. Each
plusko adds one SW slot and lifts the SW level cap by fifty
— from 50 on the base to 200 on
+++. Slot count also scales with rarity: a Baseline at+++carries three SW; an Emergent at+++carries six. - Access to SW at all, if you're on the Baseline branch. Baseline models have no slots until you breed them. For the bottom branch, the first merge is your ticket into the SW economy in the first place.
Carelessness costs — parent condition
A model can be sent into the chamber even when it's just come off a hard run. Frustration and exhaustion aren't a lock, they're a price. Same with a quality mismatch between the two parents. All three chip into the success chance and push the outcome distribution toward the worst end.
If you're not chasing a specific window, let both parents rest to zero frustration and exhaustion before merging. It's usually cheaper than eating a bad roll.
The cross-class door at +++
There is exactly one exception to the same-class rule. A
model at +++ can be merged with a model
one class up (also required to be at a
compatible depth). The child ascends to the higher class.
The catch: quality and MP get averaged in that process, so the ascended child is a worse individual than one bred from two matched parents at the higher class would be. What you paid for is that you carried SW levels one tier up — and there's otherwise no way to do that, because SW level belongs to the model-SW pair, not to you.
Use the +++ door when the SW investment is what
you value most; use straight class-jump progression when
you're after the strongest possible individual at the higher
tier.
Improve Rarity mode — trade depth for tier
The second mode under the gear icon. Same compatibility rules as Depth (parents must share class, rarity, and depth), but a successful merge produces a child one rarity higher instead of one depth deeper. There's no Cu or Ru cost — the price is paid in bred depth from the parents.
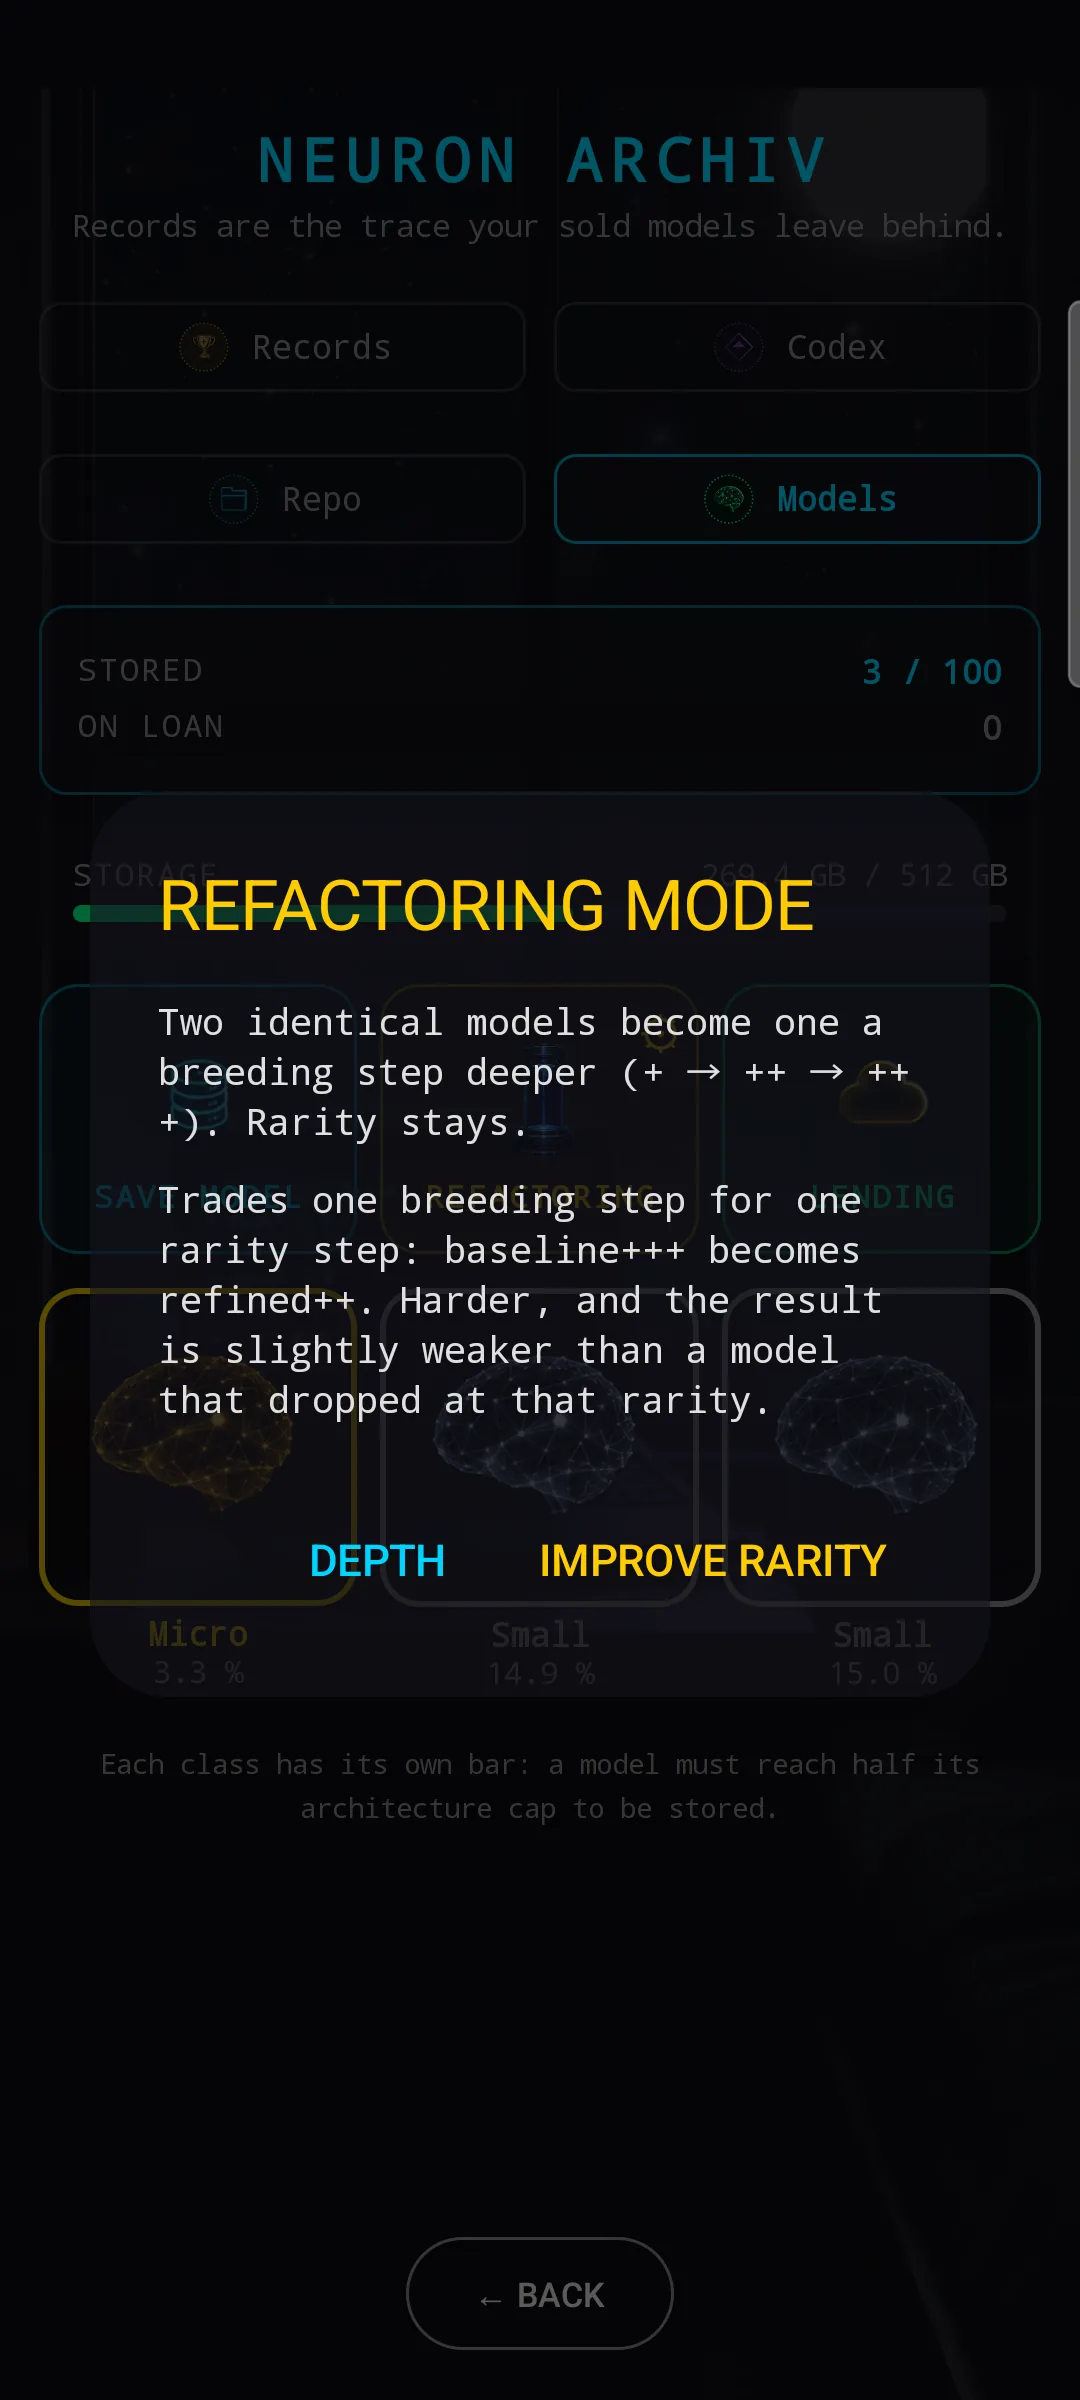
The plusko-for-rarity trade
Parents in, child out:
| Parents | Child (in Improve Rarity mode) |
|---|---|
Baseline +++ | Refined ++ |
Baseline ++ | Refined + |
Baseline + | Refined (base) |
| Baseline (base) | Refined (base) — nothing to trade; the risk is the price |
The trade is zero-sum on slots: slot count
is rarity + depth, so a Baseline +++
becoming Refined ++ holds the same total slot
count. Installed SW loadouts inherit as before.
A model with no pluskos can still be promoted — it just has much worse odds. Interestingly, it also gains a slot in the process, because the higher rarity carries more base slots.
Cost — success rates
Success rises with the pluskos you sacrifice and falls with model size. On a Micro, where the model is cheap and fast, base rates look like this (before condition maluses):
| Parents | Baseline → Refined | Refined → Distilled | Distilled → Emergent |
|---|---|---|---|
+++ | 89.9 % | 78.4 % | 57.1 % |
++ | 84.4 % | 68.2 % | 42.8 % |
+ | 76.9 % | 52.3 % | 27.3 % |
| base | 66.0 % | 24.2 % | 17.2 % |
On a Colossus, those same attempts are
roughly five times less likely — around 64 %, 42 %, and
21 % at +++, and about 4 % for a bare Distilled
promotion.
That gap is intentional. Micro models are cheap and fast, so promotion attempts on them are meant to be experiments. Promoting a Colossus is meant to be a rare, deliberate attempt — not a routine.
Manufactured isn't the same as natural
How much of the ten percent you actually pay is set by the MP stat Specializace on the source model. 100 points = a clean transition with no loss; 0 points = the full ten percent hit. That stat had been quietly waiting for the specialisation system to catch up with it; now it has a second, related job: how well your brain survives being reshaped.
And because the penalty is calculated fresh on every promotion, a Baseline → Emergent path across three promotions leaves you at roughly three-quarters of a natural Emergent's numbers.
A rolled rarity is always better. Always.
Failure risk is calculated by target, not source
Improve Rarity uses the same four outcomes (success / defragmentation / one burns / both burns), with one important twist:
Ministry of Continuity coverage applies to Improve Rarity too. This is finally something you'll be doing often enough for that coverage to be worth the price.
Quick tips
- Match parents' condition, not just their rarity. Frustration and exhaustion on the parents show up as a direct malus on the probability panel. Rest, then merge.
- Read the probability panel every time. Base rates in the table above are before condition maluses. The panel shows the real numbers the roll will use.
- Defragmentation is not a loss. It costs Cu and a real-world timer, but the child is intact. Plan for it — on Refined and above, it's roughly one merge in ten.
- Baseline is the "always arrive" path. With clean parents, Baseline can't burn. If you want depth guaranteed and don't care about ceiling, this is where to grind.
- Depth costs compound. A
+++costs seven successful merges of the base. Plan the whole arc before you start; don't try to merge into a chassis you can't afford to lose. - Save the cross-class door for SW you love.
The
+++-to-next-class merge exists mainly to carry your painstakingly levelled SW into a higher tier body. It's not the strongest way to build the next class. - Improve Rarity is your bad-luck insurance, not your main path. Rolling a rarer model is faster, free, and gives you a better model at the end. Reach for Improve Rarity when the drops aren't coming — not as a routine.
- Bring pluskos to a promotion. A
+++parent buys you the best odds and only costs you the depth you already ground out. Promoting bare baselines is the hardest possible version of the trade. - Watch the source model's Specializace stat. Low Specializace means the promoted child eats close to the full 10 % weakness penalty. High Specializace makes the promotion clean.
- Micro is where you experiment; Colossus is where you commit. Promotion odds on a Colossus are roughly five times worse than on a Micro. Learn the mechanic on cheap chassis.